Monday, 29 March 2021

6mm Hungary 1848 army on parade

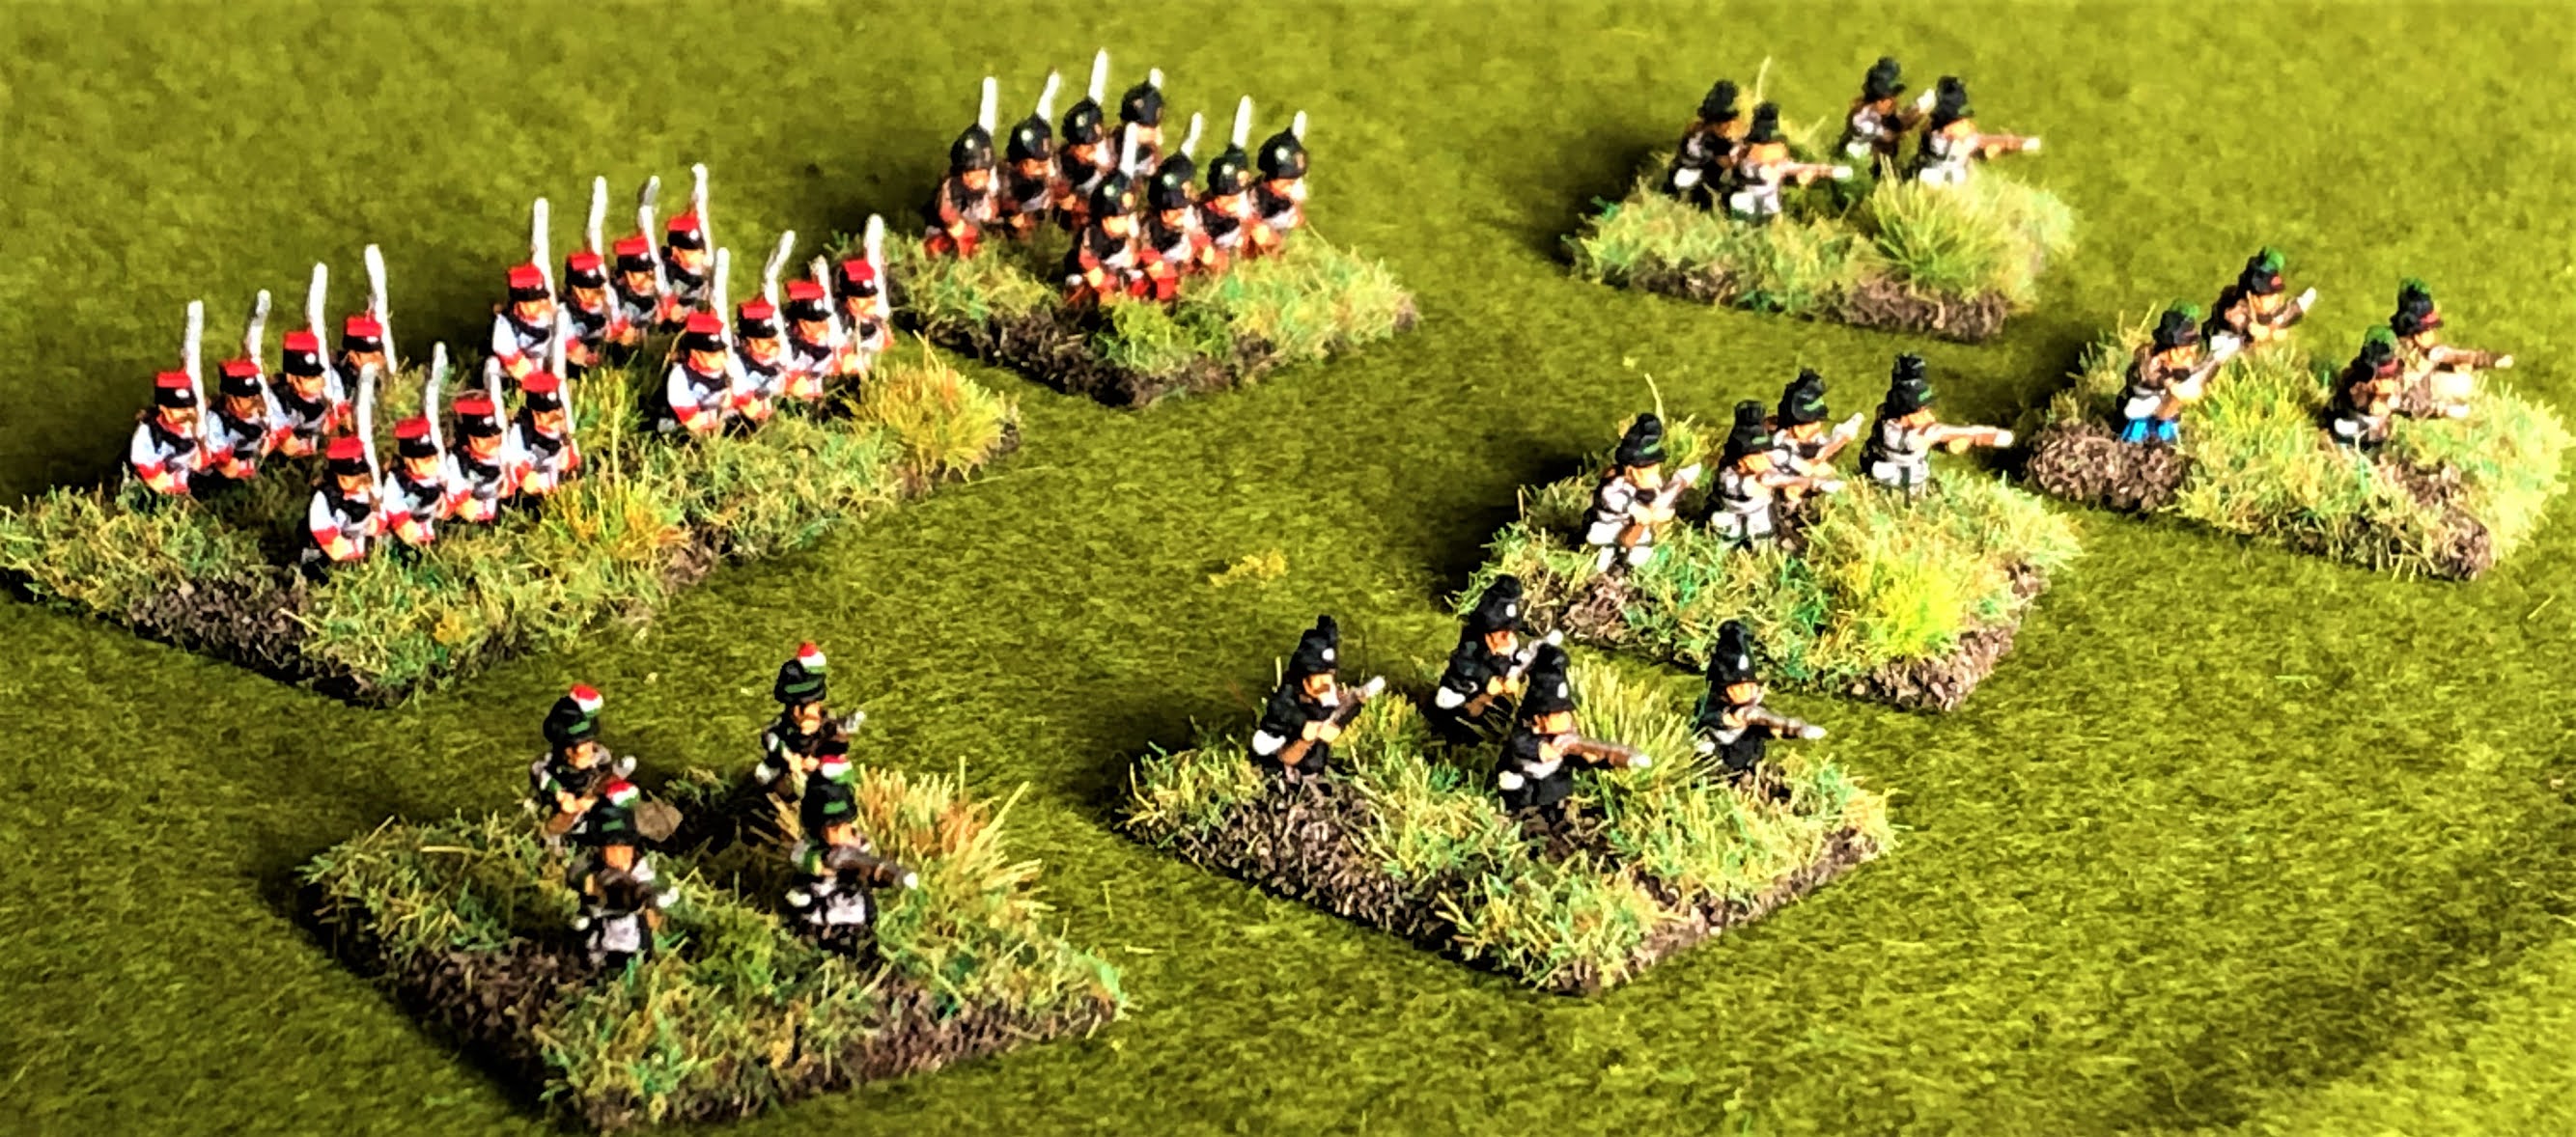
This post is to showcase my beautiful new 1/300 scale (6mm) Hungarian army for wargaming the Hungarian War of Independence of 1848-1849. The figures are from Baccus (mostly adapted from their American Civil War range), painted and based by the talented Richard Morrill, flags by Maverick Models. My camerawork can't really do these little works of art justice, but still, here they are in all their glory:

The generals: Poeltenberg in green, Gorgei in red arguing with Dembinski in the red hat, etc. 
Figures from the ACW generals pack. The broken cannon wheel is a nice touch.
 
A rabble of rowdy rebels! Militia armed with scythes and pitchforks. These featured in the battles of Schwechat and Temesvar in particular. You have to admire Richard's work on the red-white-green polearms and the embroidered waistcoats. Figures are English Civil War peasants. 
 
Artillery! Some gun carriages in red-white-green, others just red-green on wood, others plain wood.
Sadly the photo doesn't really show you Richard's exquisitely delicate scratch-built rocket launcher (the crew at top left). Guns and gunners Prussian Napoleonic, I think.
 
No Hungarian army would be complete without hussars. Four different regiments are represented here: 4th Sandor, 5th Radetzky, 6th Wurttemberg, 1st Csaszar (I think).
Austrian Risorgimento hussar figures, I believe.
 
Former imperial regiments raised in Hungary provided a core for the new Hungarian army. They kept their white tunics initially but changed the flags, braid and badges. Oh, and Richard painted the red-white-green sashes around the officers' waists! Austrian infantry from the Risorgimento range. Not quite the right shako for the 1840s, I know, but in 6mm you can get away with a lot.

Hungary's own new army was the honved (roughly 'home defence'). The standard uniform was blue kepi, brown tunic and blue trousers, but there were quite a few variations, as shown here: red or white kepis, black shakos, grey tunics ... Check out the red braid on the officers' chests, more fine brushwork by Richard. There are also a few conversions: these are ACW Union figures who came with more standard-bearers than I needed, so Richard converted the surplus ones into sword-wielding officers.
 
Not the best troops in the army, but some of the prettiest: national guard units in bright blue, green and grey varieties. Figures are ACW Union troops in frock coat. Amazing paintwork on these tiny characters - Richard has used shading and highlighting!
 
Last but not least, some 'exotics'. The Polish Legion are ACW Union in frock coat, with tiny squares of cardboard to turn their kepis into red czapkas. Next to them, ACW infantry converted into grenadiers. Those greenstuff bearskins are textured and have had recognisable grenade badges painted on them!
Front row left to right: Tyrol Jaegers with their distinctive red-white-green feather; German 'Death's Head' Legion; and honved jaegers in grey and brown varieties.

The army is based for use with the "Bloody Big BATTLES!" rules. You will find reports of many Hungary 1848 BBB games on this blog (use the label "1848" to find these).

For uniform references I relied on Zoltan Barcy & Gyozo Somogyi, "A Szabadsagharc Hadserege", and Ralph Weaver, "The Hungarian Army 1848-1849".

Richard's talents are in high demand, so if you want him to paint an army for you, you might have to queue for a few months (I did). However, he tells me it does depend on the size and nature of the order, and the best advice is to get in touch and he'll see what he can do. His website at Monty's Wargaming World has his contact details, as well as loads of info and links to photos.

I hope you've enjoyed this parade of an unusual and colourful army. If you want to learn about the actual historical army's exploits, let me modestly steer you towards my book, Hungary 1848: The Winter Campaign.


Friday, 26 March 2021

Clausewitz 1799 Vol.2 is published

Closely following the appearance of Vol.1 in December, last month saw the publication of our latest Clausewitz translation: 'The Coalition Crumbles, Napoleon Returns: The 1799 Campaign in Italy and Switzerland, Volume 2'. It has been slow to arrive on Amazon - logistics perhaps impeded by pandemic? - but it did so yesterday, only to promptly go out of stock (sold out, presumably). Anyway, for a brief glorious moment last night, both the 1799 volumes and the 1796 book were all in Amazon's Top 100 best-selling books on the history of the Napoleonic Wars:


 As for Vol.2 itself, highlights include the Second Battle of Zurich and Suvorov's remarkable march over the Alps. A favourite episode of mine is Archduke Charles's farcical attempt at a river crossing, in which his 30,000 or so men are repelled by just 200 Swiss jaegers. The accounts of these and many other fascinating actions are all accompanied by Clausewitz's incisive analysis, in turn supported by Professor Murray's erudite commentary.

The previous books are here:

'Napoleon Absent, Coalition Ascendant: The 1799 Campaign in Italy and Switzerland, Volume 1'

'Napoleon's 1796 Italian Campaign'

Books being like buses - you wait ages, then two or three all arrive at once - my next one should appear soon. It's a change of scene but similar format, a translated history with extensive commentary added:

'Hungary 1848: The Winter Campaign'

Wednesday, 24 March 2021

Hungary 1848 #5: Isaszeg

Our Hungary 1848 campaign progresses. Isaszeg (6 April 1849) was one of the largest and most important battles of the war. It drove the Austrian army back into Budapest, leaving the Hungarian army free to relieve the vital besieged fortress of Komarom. The Austrian C-in-C paid for his failure by being recalled and replaced.

This scenario has been well tested before. We rolled out the battlemat and it delivered again. It took one and a half evening sessions to fight (about four and a half hours).

The Hungarian attackers chose not to drive straight toward the objectives in the centre. Instead, they opted for sweeping left and right hooks to minimise their exposure to the Austrian gun line on the dominating high ground. They were hindered by terrain as well as their own tentativeness. Thus their advance was slower than it might have been. They did crush a couple of Austrian outpost brigades, but the situation makes that almost inevitable. They managed to replicate history in exposing their centre to a devastating counterattack in the King's Wood.

The situation at the end of Turn 6 (three turns to go). Looking east from behind the Austrian line.
Hungarian units outlined in red, Austrians in yellow.

At that point (Turn 6), things looked bleak for the Hungarians. Both their outflanking manoeuvres were bogging down in marshes or among steep wooded hills. In the north, they had succeeded in bringing VII Cps reinforcements onto the table, but the Austrians had summoned a tough grenadier brigade to counter them. In the south, Klapka's flank march looked unlikely to arrive in time. In the centre, Liechtenstein seemed about to overrun their gun line.


Aftermath of Liechtenstein's assault into the King's Wood. Disordered Austrians consider exploiting their success to roll over the remnants of Szekulics's division and the Hungarian batteries.

But by counterattacking, the Austrians exposed themselves to a counterblow in return. While they milled around in the woods, the 9th honved battalion (the 'red kepis') led a thrust against Liechtenstein's flank and rear, kicking a rocket battery out of the pivotal position in the vineyards. Similarly at Isaszeg, the Polish Legion led the charge across the bridge and could not be driven back again. In the north, Kmety's lead battalion emerged from the hills to capture Godollo, which the Austrians had carelessly left unguarded.


Isaszeg bridge: Polish Legion and Austrian cuirassiers eye each other across the Rakos.

At the start of the last turn, then, (Austrian Turn 9), the Hungarians held four objectives, their victory target. Windisch-Graetz still had his potent cuirassiers and grenadiers available to counterattack. The cuirassiers crossed the marshy Rakos and charged, hoping to retake the vineyards - but were repulsed. All eyes on the grenadiers: and yes, they ejected Kmety from Godollo, retrieving the situation to achieve a draw.


Situation at game end. Hungarians hold three objectives: Isaszeg, the Isaszeg bridge (no Austrians within 3" of it), and the vineyards in the centre. Austrians hold the other three: the Lower Mill bridge, the Besnyo monastery and - newly recaptured - Godollo, for a a draw by the skin of their teeth.

Reflections:

- The variable reinforcements in the north added unpredictability without skewing the game unduly;

- Four objectives all being contested on Turn 9 made it anyone's game and an exciting finish;

- At one point the two Austrian players were exchanging secret messages via WhatsApp, but these were taking several minutes to go through, thus accurately reproducing the arthritic Austrian orders process;

- As one Hungarian player (Mark) commented afterwards, trying to go against the grain of the terrain can be costly. Games like this do show how terrain channels the action and shapes a battle;

- Although Hartlieb's outpost brigades were eventually wiped out, they did not die in vain: their sacrifice caused significant delay and disruption to the Hungarian advance. (And of course, very few of them really 'died', they just routed across the Rakos);

- Players again remarked on how helpful the battlemat is for ease of visibility via webcam;

- Great game, robust scenario, no changes needed.


Draft scenario is in the BBB group files as usual.

Thursday, 11 March 2021

Punch-up in chapel! Kápolna (1849)

This week we went to chapel. No, we didn’t really - all the chapels are shut. However, ‘Kápolna’ is the Hungarian word for ‘chapel’. It is also the name of a small village on the main highway that runs east from Budapest. Two 30,000-man armies collided here in February 1849, providing #4 in our series of refights from the Hungarian War of Independence. (The others have been reported here too; the most recent one was Hermannstadt.)


The monument at Kápolna depicts the Hungarian army's chaplain 
leading the counterattack in full ecclesiastical garb.
 

The battle of Kápolna was preceded by some remarkable strategic manoeuvres. When the Austrians invaded Hungary, Görgei’s corps defending the frontier refused battle. Instead, Görgei conducted a skilful retreat through what is now Slovakia, fighting the occasional rearguard action. The Austrians hoped to trap him between the pursuing forces and Schlick’s division invading from Galicia. However, Görgei not only eluded the pursuers but turned the tables and almost pinned Schlick against Klapka’s Hungarian corps approaching from the southeast. Schlick narrowly escaped to the west.

When Görgei and Klapka combined, they were subordinated to the hopeless Pole, Henryk Dembinsky, chosen for political reasons rather than competence. Dembinsky advanced toward Budapest to eject the Austrians from the capital, which they had occupied in January. The fact that he refused to tell his subordinates his plan suggests that he did not have one. On the eve of the battle, not expecting an attack, he had mixed up his different corps and dispersed their divisions across a wide area (probably so they could find shelter against the bitter February weather).

The Austrian commander-in-chief, Feldmarschall Windisch-Grätz, was generally very cautious. However, on this occasion he had acted decisively. Realising the Hungarian army was concentrated east of Budapest, he marched out to pounce on it with most of his army. He also liaised with Schlick to arrange for the latter to descend from the mountains against the Hungarians' right flank while W-G attacked their front.

A two-day battle resulted. On the first day, the Austrians drove the forward Hungarian divisions back behind a small river. On day two, Hungarian reinforcements arrived, but so did Schlick. The Hungarians were defeated, but the Austrians were too exhausted to pursue and exploit their victory. The Hungarian army retreated, regrouped, and returned a month later to defeat the Austrians at Isaszeg.

In game terms, this produces a very entertaining scenario. It is an L-shaped battle, with varied terrain and low enough troop density to allow - indeed, oblige - manoeuvre. Both sides get to bring on reinforcements, both sides have choices to make about where to move, and both sides have to do their share of attacking.

The battlemat in action. Game end: Ilka Top (left of picture) 
and Kapolna (right centre) heavily contested.

It is also colourful, in that it features many of the units that devotees of this war particularly love: the Polish Legion, the German Legion, the Viennese Legion, the Tyrolean Jaegers, rockets, honveds and national guards; Austrian jaegers and Croat grenzers; formidable cuirassiers and dashing hussars.

We fought this battle four years ago, as reported here. The same battlemat was rolled out again for this week's remote game. Csorich's Austrian division was commanded by Colin, whose dice are usually dire. Not so this time. Devastating cannonades and musketry blew away battalion after battalion of hapless honveds. Day 1 belonged entirely to Austria, so the Hungarians fell back behind the Tarna, though they still occupied Kápolna  itself.

Honveds, Polish Legion, national guards, Tyrol Jaegers and German Legion
try to drive Schlick's Austrians off Ilka Top

Day 2 started badly for them as well, as Schlick's grenzers, fresh from massacring prisoners at Petervasara, arrived on the northern end of the battle and overwhelmed Dessewffy at Verpelet. Schlick's cuirassiers rode ahead to sit on the commanding hill of Ilka Top. Meanwhile, Wrbna's gun line pummelled the defenders of Kápolna.

Hungarian reinforcements rushed up to try to turn the tide. Some bolstered the line around Kápolna. Others raced toward Ilka Top. It all shaped up to climactic collisions on the last turn. In the south, the Austrians were poised for a mass assault on Kápolna; in the north, Hungarians (and Poles and Germans) mustered to counterattack on Ilka Top. Crunch! Against the odds, both assaults were repelled - a slightly anticlimactic end, but nevertheless it had been a tense finish to an exciting game.


 Austrians poised for their mass assault on Kápolna.
Apologies for shaky camera work - it must have been the excitement.
 

Reflections:

- Our campaign is rocking along: 6 games since the end of December (including 2 replays). I seem to be benefiting from having a captive audience.

- Giving the players short briefings about the campaign context and events linking the battles helps  to bring them to life. (The battles, not the players.) So too do character sketches of the generals' personalities. "OK, Puchner is old and ill - anyone feel like playing him?" "Wrbna has been soured by 30 years of peacetime garrison, his subordinates can't stand him, after the war he shoots himself ..."

- The snowy battlemat was a boon, super-easy to set up, and easy for the players to see the troops against it.

- The scenario is a very good one, plenty of choices and movement for both sides, full of replay value.

- The scenario includes a special rule to reflect the historical dislocation of the Hungarian defence by moving a random division to the wrong side of the river after deployment. This is similar to the dislocated defensive deployments at Gettysburg and Koniggratz. Starting dislocated compels the defender to move - a good thing in a game.

- The draft victory conditions provided 'double jeopardy' for the Hungarians: if the Austrians reached certain locations on Day 1, their good fortune in doing so would be doubly rewarded by giving them a victory point as well as forcing the Hungarians back. Bad idea, now amended.

- My players seem to have absorbed the doctrine of the time, commencing battles with an artillery duel between massed batteries.

- Extra photos this time as demanded by 1,000s of eager readers of this blog (thanks, Al).

- Wise words from Dave W: "My test is always, would I play that again? If the answer is yes, the scenario is good enough." Kápolna is good enough.


PS The long-awaited book 'Hungary 1848: The Winter Campaign' which includes a very detailed account of this battle should be going to print imminently - page proofs approved, index finished this week.


Tuesday, 16 February 2021

Hermannstadt 'micro-campaign'

This week we fought the third battle in our Hungary 1848 campaign, following on from Pakozd and Schwechat: Hermannstadt. Nowadays, Hermannstadt is the city of Sibiu in Romania; back then, it was the southern capital of the Austrian province of Transylvania (the northern one being Klausenburg aka Cluj).

Snow-bedecked Transylvania, as observed by the all-seeing eye of my new webcam-on-a-stalk.
Game end: the Austrians have advanced from Hermannstadt (centre left) north up the valley road to take Stolzenburg (upper right) as well as overrunning Salzburg (top centre).

 In the Hungarian War of Independence, the operations in Transylvania were largely independent of events in Hungary proper except for occasional transfers of troops between the two theatres. The veteran Polish revolutionary, Jozef 'Papa' Bem fought a brilliant campaign in which his audacious lightning manoeuvres were reminiscent of the young Bonaparte in 1796, expelling the Austrians from Transylvania and then keeping multiple invading columns at bay until late in the war.

Over the course of a couple of weeks in January/February 1849, Bem fought a series of actions around Hermannstadt. His initial attempt to take the city failed and he fell back to Stolzenburg (Slimnic). The Austrians brought up reinforcements and attacked him but were repulsed. Bem then took most of his army west to open the way for a division coming from Hungary to reinforce him. He left his 2ic, Czetz, entrenched around Salzburg (Sura Mica). When the Austrians attacked again, the small Hungarian force was overwhelmed.

I set myself an ambitious challenge: to capture these three connected actions, spread across two weeks and an area 10 miles square, in a single playable scenario that was effectively a 'micro-campaign'. The result was a game of 11 turns split into three days, with two Night Intervals in between. Unsurprisingly, a first playtest proved abortive: a combination of a good Hungarian plan, a poor Austrian one, some bad luck, some undergunning of the Austrian defences by me, and a 'sudden death' scenario victory condition resulted in a one-sided game and an early finish.

After rejigging the scenario, we tried it a second time with a different set of players, with much better success. The Hungarians still managed to exploit their historical initial advantage and achieved a good 'high tide', capturing two of the three Austrian outpost positions. Once the Austrians were reinforced for 'Day 2', rather than fall back to defend high ground as historically, the Hungarian players continued to press, hoping either to take another outpost or at least to keep the Austrians at a distance from the Day 3 objectives.

After Day 2 there was a major reset as the Austrians received still more reinforcements, while most of the Hungarian army quit the field. Both sides redeployed, the Hungarians falling back and constructing redoubts to defend objectives on the main axes, the Austrians pushing forward as far as they could. Before the redeployment, given the scenario time limit, we all thought the Austrians had little chance of taking the objectives they needed for a draw, let alone victory. As it turned out, it went right to the wire, with all three results possible on the last turn. The very last dice of the game decided it: an Austrian win!

Reflections, then:

- A surprisingly successful super-exciting finish to a see-saw game.

-  As is often the way, the 'Night Interval' resets and reinforcements/withdrawals changed the situation significantly and gave the players challenging decisions to make, both in anticipation and in reaction.

- Small numbers of units on the table mean a couple of lucky rolls can make a big difference, more so than in larger games where the dice are more likely to even out.

- Playtest, playtest, playtest! Especially unconventional scenarios like this, where cunning players will exploit loopholes in scenario special rules. Although this game went well, I'll tweak it and then we'll play it again.

- Avoid 'Instant Win' victory conditions that can cut a game short and end everyone's entertainment prematurely.

- As it stands, the scenario requires reinforcement/withdrawal to reach a fixed number of units during the Night Intervals. Naturally, the players therefore regarded surplus units as expendable and were suitably aggressive accordingly. I need to change that to adding/removing a fixed number of units instead, so that the players cherish their little lead men's lives more.

- Since last game I invested in a webcam to make it easier for players to see what was going on. It provides a sharper picture and is easier to manoeuvre to show different parts of the battlefield. This did make a difference. (Logitech C920 HD Pro, if you're interested.)

- One of the guys hadn't rolled dice in August; I think another had only played two games in the last year. Getting together online for what turned out to be such an exciting game full of testing decisions made some battle-starved wargamers very happy.

The first draft of the scenario is in the BBB group files. It took us two 3-hour sessions to play online but would need half the time in person. Alert readers will notice that although the map in the scenario is 6'x4', the table is only 4'x4' - I realised all the action would be in the middle 4' so I lopped a foot off each end.

Hopefully one more playtest will be enough. I'll update this blogpost with the result. After that, the campaign action will move to the main front again and one of the biggest battles of the war: Kapolna.

PS If you're at all interested in the Hungarian War of Independence 1848-1849, you'll want this forthcoming book.


Update: as planned, we fought a further playtest, and had another dramatically see-sawing game. After the first day, the Hungarians looked doomed: they'd only taken one Austrian outpost, lost several battalions, their army was in tatters and defeat seemed inevitable. On day 2, confident Austrians surged in the centre but left themselves vulnerable to a desperate last-chance charge by Czetz on the Hungarian right. Improbably, this not only took a second outpost but exploited into a third in the Austrian rear, making Austrian victory technically impossible. Despite this, on day 3 the Austrians in turn swarmed forward again and came oh-so-close to overrunning the last Hungarian position to salvage a draw. Verdict from one of the Austrian players: "Is the scenario balanced? Not sure. Is it entertaining? Yes. Does it capture the tough choices for both sides? Absolutely." I reckon one last small tweak in the Austrians' favour and we're done.


Thursday, 21 January 2021

Transatlantic remote gaming

For the past few years I have been fortunate enough to have a regular January trip to the US. This always finishes with an intense weekend of gaming with a very fine group of American wargamer friends, as testified to by several enthusiastic previous blog posts.

Not so in January 2021. I don't think I need to explain why.

However, undeterred, the guys decided to maintain the tradition. Last weekend, a couple of them got together in person as usual. A full schedule of battles had been drafted and circulated in advance. Those on the spot set up the games and ran them, and the rest of us dialled in.


British redcoats march through Lexington. Right of pic you can see two other camera views of the battle (one a different sector, the next the overhead plan view) and then individual players' Discord feeds (video turned off during the game). Left of screen is where the team side rooms and game resource documents are to be found.


The first challenge was time zones. When you're all staying in the same place, you can play a game until it finishes, reset, start a new game when everyone's ready; party on into the small hours, crash at 3:00 a.m., reveille at 8, fuel up on fried breakfast and coffee, start the morning's game as soon as everybody's fit to fight ... but when players are in different countries 5 or 6 hours apart, setting definite start times and accommodating people's 'hard stops' becomes more important.

What it boiled down to for me was that I got to play one game for 8 hours or so from 2:00-10:00 p.m. on Saturday, then another smaller one for three hours on Sunday afternoon, both of these being the morning engagement for the players physically around the table.

The technological set-up was pretty sophisticated (much more so than my simple laptop camera arrangement I reported on in my previous post). As far as the physical apparatus was concerned, to provide a top-down plan view of the whole battlefield, Scott lashed a webcam to a TV studio microphone boom; two other cameras (iPads in cradles) could be moved around the battlefield to give close-ups of where the action happened to be.

The software platform we used was Discord. This supports video and voice. Importantly, it lets the receiver choose any camera for the main view, while the others remain visible as smaller views. It has some other features which were really useful for the games. The gamemaster can post resources in Discord such as scenario briefings, orders of battle, quick reference sheets etc, where they are readily accessible to players. He can also set up side rooms for each team of players, so that eg the Sudanese players can go to their side room and talk or text to discuss plans or hidden movement without the British players hearing what is being said. The text is also handy for other things, for instance as a place to record secret decisions one side might have to make, for future reference.


As for the two games, briefly:


Lexington & Concord (1775)

This was a reprise of the terrific American Revolutionary War scenario we played 5 years ago using Muskets & Tomahawks. This time it had been adapted to play with Black Powder. Inevitably, I got nobbled to be the British, because I speak the language - the King's English, that is. It always adds considerably to my American comrades' enjoyment to have me put on my best British officer voice. I can also contribute the odd idiom from the other ranks: "You're 'aving a giraffe, sir", upon failing an activation roll, generated particular hilarity. Just as well I scored some points on the linguistic entertainment front, because our British expedition was doomed militarily. It took us 17 of the 18 turns to score our first Victory Point, by which time the Yankees had racked up 30. ("We'll call it a draw, then ...") Scott did suggest post-game that the translation from M&T to BP wasn't quite calibrated right and the unit stats were too skewed toward the Americans. Perhaps so; perhaps we were hurt more by the ace of spades being drawn on Turn 2, meaning a ton of American troops were activated so early that we never got through to Concord. Whatever - it was a spectacular game and a lot of fun.

El Teb (1884)

For the Sunday game we changed continents and centuries to Africa 100 years or so later, where the British were fighting a different colonial campaign, this time in the Mahdist War in the Sudan. The scenario was based on one in Tim Tilson's book, "The Gordon Campaign", but adapted for use with "The Men Who Would be Kings" rules. Having spent Saturday attacking, I was ready to do some defending, so I opted to play for Osman Digna's team. Discord's secret chat channels came into their own, as we Sudanese got to use hidden deployment and hidden movement. I had a merry couple of hours of chucking spears, sniping at expensively-educated cavalrymen, and charging out to stab some unlucky jocks. ("They don't like it up 'em, sir.") Unfortunately my time ran out, but happily Nick dialled in at a convenient moment, so he took over. I think it ended badly for the Sudanese, but again, it doesn't really matter - it was about the journey more than the destination.


No remote event was ever going to match the fantastic in-person get-togethers we've had over the years, but this was a pretty good substitute. Naturally we drank a remote toast: to good friends and great gaming.


Thursday, 14 January 2021

"Ah, Vienna!": Schwechat (1848)

This was the second battle in our Hungary 1848 campaign: Schwechat. Historically, it's an unusual situation that makes for a different tabletop challenge. The Hungarians had kicked out an invading Croat army. Rather than retreat to Croatia, the Croats had headed for Vienna to join the imperial army gathering there. Meanwhile, the city of Vienna had risen in revolt against the Kaiser. The Hungarian army was a rather ragged mix of line troops, newly-raised honveds, and scythe-armed national guards; and it was divided between those who wanted to help the Viennese revolutionaries and those who thought it wrong or unwise to invade Austria and turn Hungary's self-defense action into outright rebellion. A false alarm during the night before the battle generated a wild goose chase night march for part of the army, which made it even more fatigued and frustrated. It therefore failed to breach the Croat line at Schwechat and was then routed when reinforcements arrived from the imperial forces besieging Vienna. The revolutionaries did not join in.


Balloon-basket view of the Schwechat battlefield: 6mm figures seen from a distance through a laptop camera, thus creating very realistic fog of war ... the roads are the Hungarians' axis of advance, with Vienna off-table top right; the Hungarian armed paddlesteamer Meszaros on the Danube bottom right; Croats are defending the line of the Kalter Gang river. Schwechat is where the roads cross the river. Hungarian massed guns on the hill in the centre, supported by scythe-armed rabble.

This is a tricky situation to represent in a scenario. My first effort didn't really work, as I reported back in 2016 (complete with Hungarian poetry). I revised the scenario after the playtest back then; I reviewed it again and refined it further before our game this time. The distinctive ingredient is the rate at which reinforcements become available to the Austro-Croat defenders. The Austrian players can choose which of the available reinforcements to commit to action and when. This in turn affects a Hungarian decision about when to see if the Viennese will attempt a sortie; they only get one shot at this, and the more troops the Austrians have withdrawn from the besieging force, the greater the chance of a sortie.

I'm pleased to say this generated a cracking game for my four remote players plus two interested observers. As for the previous battle, Pakozd, we just used simple online meeting software and my laptop camera. Once all the players turned off their own video feeds so the battlefield filled the screen, this worked OK. A serendipitous factor helped. Although Schwechat was fought in October, I set it up as a snowy battlefield, using hedges dotted around the hills to outline them. The dark troop blocks and terrain features were very easy for the players to see against the white background and compensated to a degree for the somewhat distant and fuzzy panorama view. Usually in our multi-player BBB games things happen in parallel, as the players on one side can all carry out their moves at the same time. For the remote game, of course, we had to operate in sequence as I had to move all the troops. (The players got to roll their own dice, though - we're a trusting lot.) This necessarily made the game take a bit longer but we still finished it in an evening. And I got my 10,000 steps of exercise by running round the table.

The Hungarians attacked with a very clear plan. They raced forward, daring the Austrians to come out and attack their march columns (they didn't), then setting up a grand battery on the hill on their centre-right. Consequently their left was largely unprotected, inviting the Austrians to attempt a right hook against the objectives on the vulnerable Hungarian line of communications. The Austrians did venture their cavalry forward vaguely in this direction, but seemed unsure about what they were trying to achieve. As a result, one of their two potent cavalry brigades wandered into range of the massed Hungarian guns, got pinned down, and was duly wiped out. The other could still have got around to the Hungarian rear but opted not to, so it was eventually driven back and held off by superior numbers of hussars.

While the Austrian right hook was being rebuffed, the Hungarian attack on the Austrian left was having little more success. The honveds seemed reluctant to assault the Grenzers defending Mannswoerth; they pushed into the gap between Mannswoerth and Schwechat, but were repulsed with heavy losses.

This relative stalemate took us to turn 7 out of 8. The Hungarians had inflicted significant casualties on the Austrians, but had yet to take an objective, so were behind on points and time was running out. Meanwhile, several brigades had been released from the imperial siege lines, including their crack grenadiers, more cavalry and several batteries. Turn 7 was crucial and exciting: the Hungarians finally stormed Mannswoerth and also took Zwoelfaxing, another of the strongpoints in the Austrian defensive line. The Austrians were in a good position to retake the latter, but the dice were unkind and their counterattack could not go the extra yard. They had also miscalculated concerning their reinforcements: they committed several regiments, but too late for them to actually reach the places where they were needed. However, this emboldened the Viennese, who drove the last nail into the Austrian coffin on the final turn by surging out of Vienna in force and seizing another objective at Simmering.

Reflections, then (taking my cue this time from Steve J's excellent format for his Wargaming Addict AARs):

- The remote format worked when scaled up to four players. More than that would probably be too many, but having four (and a couple of observers) made it an even more convivial social occasion than the previous 2-player game, very jolly indeed. We spent a good half-hour at the half-time drinks interval just nattering.

- The white battlefield was very helpful and I may well use it again, regardless of whether it was actually snow-covered historically. A north pointer could be useful for next time as some players got confused when giving directions. ("Northeast, I mean southeast. Left a bit. No, the other left ...") Need to give some thought to how to help distinguish units at a distance: big coloured counters? Use larger figures? (Dave W has 10mm armies which would be a bit more visible than my 6mm.)

- The Hungarians demonstrated the value of having a clear plan and sticking to it. The Austrians demonstrated the dangers of being indecisive and tentative and rolling bad dice.

- The scenario was very successful in producing a close and exciting game. The revised rule for Austrian reinforcement release and Viennese sortie worked well. (Draft version of the scenario in the BBB group files.)

- It's tricky for a scenario to capture how brittle the Hungarian army proved to be. The Hungarian players did a good job of letting their solid line troops do most of the fighting, shielding their extra-fragile honveds and national guard. Even so, and despite the sound Hungarian plan, by the end of the game their infantry was definitely running out of steam, so we figured the scenario is pitched about right.

- One of the guys said of the remote gaming under lockdown, "it's kinda like therapy" ... it was a brilliant fun evening.

Chronologically, the next major battle of the war was around Hermannstadt aka Nagyszeben aka Sibiu, which has since moved to Romania. Next stop Transylvania!