Wednesday 20 December 2023

Spectacular Indian Mutiny Xmas special!

Mark surpassed himself with his latest spectacular Christmas special. These are big multi-player BBB games with a twist: unlike standard scenarios where time limits are clear and everyone knows what their side's common objectives are, in these Christmas games each player has different secret objectives depending on his own individual motivations - greed, glory, self-preservation, rivalry, ambition, etc.

The setting was the climactic assault of the siege of Delhi in 1857 during the Indian Mutiny. (Retaking the whole city actually took a week but this was compressed into 8 game turns.) Mark handcrafted some 15 feet of bastioned walls to represent Delhi's fortifications. Dave W and Phil joined me on the imperial side, outnumbered by five Indian defenders: Crispin, Luke, Ben, Dave T and Nick O.

It fell to me to take the role of Brigadier Nicholson, evidently a fellow of considerable pluck and determination, judging by my objectives. These included storming both the two breaches by the Water Bastion and the Kashmir Bastion (pic above).

Mutineer's-eye view of my force, which for game purposes included both Nicholson's 1st Column and Jones's 2nd Column: four 3-base regiments of European troops plus two larger regiments of loyal sepoys. (Figures from Mark's collection, made by Irregular Miniatures.)

I advanced boldly upon the leftmost breach. I won't be able to tell you much about what was going on along the other 13 feet of fortifications.

Indian artillery on the bastions induced a little more caution towards the righthand breach while we poured fire on the defenders to soften them up for a turn first. Note the small barrels behind my troops. These represent petards for blasting our way into bastions and the like.


Festive combat resolution mechanism! Turns 2 and 3 were spent effecting entry via both breaches, only for Crispin's savage counterattacking hordes to eject the 1st Column from the Water Bastion breach and wipe out a regiment of the 2nd Column, the 2nd Bengal Fusiliers. That loss provoked a cracker pull that I lost, resulting in Nicholson being wounded and rendered hors de combat, seriously handicapping my force for the rest of the game.

To my right was Colonel Campbell's 3rd Column (Dave W). Here he demonstrates one of our patent self-hoisting petards against the Kabul gate.

Turn 4: 2nd Column's 4th Sikhs storm in to avenge the 2nd Bengal Fusiliers
and rout their whiteclad foes, already reeling from the Fusiliers' gallant resistance.
(Yellow markers indicate Disrupted; blue is Spent.)

Turn 5: we are now solidly established inside the walls and driving the enemy before us. The Sikhs are the unit upper right. 1st Column has taken the St James suburb (the grey patch) and the 8th Foot supports its right flank. Heavy casualties are starting to tell on the mutineers.

Our casualties have not been light, though. Here the wounded Nicholson parades assorted wounded and stragglers from my force and Dave's on the table edge.

Start of Turn 8. The building top left is the Magazine, which is also one of my Objectives. In front of it is a shaky line of blue-countered Spent mutineer rabble. My leading unit, the 75th Foot (the line centre left) will shake off its Disruption and charge! Unfortunately, without Nicholson to motivate them, its tired comrades will watch it go in alone.

The 1st Bengal Fusiliers won't even stay to watch ... having rolled snake-eyes earlier, they actually retired outside the breach again. I rationalised this as them being detached to escort supplies and artillery moving up and wounded moving back.

My highwater mark! The 75th routed their spent opponents so comprehensively that they then impetuously charged the rather larger and more solid mob in the Magazine. Unsurprisingly, they bounced off with heavy loss, but their gallantry cannot be faulted.

One of our British team objectives was to find and capture the king of Delhi (Bahadur Shah, I think). Here we see him making his escape past the Red Fort. More splendid Irregular Miniatures.

So how did it turn out? As I said, I didn't have much idea what was happening beyond my scrap with Crispin. He and a couple of other Indian players did better than us on the personal objectives. However, what we didn't know was that there were two factions on the Indian side. Luke and Ben's faction achieved every one of their objectives and therefore achieved a team win. Hurrah for them! (The treacherous dogs, damn their eyes.)

If you enjoyed this and fancy trying some large-scale India games yourself, do take a look at Mark's scenario book, "Bloody Big Battles in INDIA!"

Reflections

Just a seasonal one: the value and importance of good friends.

On which note, I wish all readers of this blog a Merry Christmas and a Happy New Year. I hope you all get to spend some quality time with the people most important to you. See you in 2024!


Thursday 7 December 2023

Ferocious fighting at Chickamauga (1863 ACW)

Chickamauga was one of the biggest ACW battles, with about 60,000+ men on each side. I've fought it a couple of times before, back in 2016, but I see I only wrote brief reports (see here and here). Still, even seven years later I remember these were great games, so I suggested it for our club night this week and Crispin duly obliged. We had a good turnout so there were three of us on each side, plus Crispin as ref. Chickamauga is a good scenario for such a multi-player game because it is easy to just divide up sectors of the line and share the troops out on both sides.

The history is that in September 1863 (two months after Gettysburg), Braxton Bragg's Confederate Army of Tennessee, reinforced with a corps from the Army of Northern Virginia, crashes into Rosecrans's Union Army of the Cumberland south of the strategically important town of Chattanooga. The Confederates are trying to right hook and outflank the Union army to cut it off from Chattanooga, but it doesn't really work. Instead, it degenerates into a big line-out among the woods, a battle lasting two days with reinforcements for both sides turning up from various directions.

Our game pretty much replicated that. I can't be sure - despite only having three or four units to command on the Union extreme right, I found the action there so intense and absorbing that I don't have much idea what was going on elsewhere. I also only took a couple of photos at the start and then forgot to take any more. Let me offer those pics to orient the reader somewhat, then a brief summary of the game so far as I can provide it, followed by some reflections.

I commanded the Union extreme right, including Van Cleve's 3rd Division of Crittenden's XXI Cps. Here we see Van Cleve arriving from the right (southern) table edge to close the gap in the line around the Brock and Viniard farmsteads (white objective markers). Reynolds (4th Div of XIV Cps) and Palmer (2nd Div, XXI Cps) are visible top left of picture. Top right is Hood's ANV I Cps, part of the Confederate storm about to break over the Union line.

View from behind the Poe farmstead (white objective counter) in the Union center. Baird and Brannan (1st & 3rd Div's of Thomas's XIV Cps flank it and hold Kelly's field to the left and Brotherton's farm to the right. Bedford Forrest's cavalry visible on the Confederate extreme right (top left) and Walker's corps top center.

The battlefield all looks like this, mostly wooded with some patches of open ground, criss-crossed by trails. There are two lines of objectives representing the Union defensive lines. The Confederates must hold two of the first line objectives at game end for a draw, plus one second line objective for a win.

How did the battle go? Roughly: the Confederate center was sacrificed in furious charges. Although these did not breach the line, they took so much US effort to repel that Forrest's cavalry were able to seize a couple of objectives on the US left. The US left wing eventually managed to drive the Confederates out of some but not all, but was unable to spare any support for the US right. Meanwhile, a Confederate left hook, eventually supported by a Confederate grand battery in front of the Viniard property, was able to break through in a couple of places and seize two objectives to earn a draw.

The whole game was intense, everyone really engaged, bloody fighting, objectives taken and retaken, ebb and flow and heart-in-mouth moments. It could easily have gone either way. Honourable draw was a fair result.

Reflections:

Ebb and flow, no 'pivotal moment': Last week's Franco-Prussian game prompted me to write a whole 'Reflections' essay on 'Pivotal moments in wargames'. The heavily wooded terrain on the much denser battlefield at Chickamauga made it much harder for a defender to cover gaps, either with fire or by moving reserves across quickly; on the other hand, it also made it much harder for an attacker to exploit success and roll up flanks or dash through to green fields beyond. There were plenty of tough fights, gallant charges and big swings of fortune, but they only had local consequences. The dense terrain created 'firewalls' between these local actions and made it difficult for them to produce rapidly cascading effects.

Cover yourselves in glory, lads! When the troops are first put on the table, they all look a lot alike. During the course of the game, though, one little bunch of bits of painted metal can really distinguish itself from the rest. That was the case for several here, even just on our Union right wing. On the US side, we pinned high hopes on Negley's 2nd Div of XIV Cps, with their famous Colt revolving rifles. Unfortunately, Negley let us down badly: the first rebel yell sent his boys reeling back to the field in the SW corner of the battlefield, where they spent most of the game rallying; eventually they pulled themselves together to try to retake the Glenn house (lost partly due to their absence from the line), but bounced feebly off.

On the Confederate left, by contrast, a couple of the units facing us distinguished themselves, much to Luke's satisfaction as their commander. The greenhorns of Preston's division belied their Raw rating, fighting hard throughout and keeping many Union troops busy. Cheatham's division suffered terrible casualties early on, as a result of which they then spent most of the next four turns in involuntary retreats almost back to their baseline - only to rally near the Alexander house, form a march column, and race up the road in time to seize the Viniard objective on the penultimate turn.

Thus, in their different ways, all these three units stood out. It's always nice when our little metal men take on a character of their own like that.

Commanding cavalry is a distinct art. Cavalry can be a potent weapon but as the nineteenth century goes on it becomes harder to use them right. I've noted before that it's not my forte. This time, I handled them better and caused the Confederates some problems on their left. But meanwhile on their right, Dave W (whose entire command in this game was all the Confederate cavalry) discovered that he's "no JEB Stuart".


The Chickamauga scenario is available from the BBB group files here.


Friday 1 December 2023

Stolberg's Death Ride: pivotal moments in wargames

This reflection is prompted by last week's Franco-Prussian War game of the battle of Loigny/Poupry (1870). Rather than picking out various aspects of the game to reflect on, this time I've picked out just one to discuss in a little more (slightly rambling and disjointed) depth: the 'pivotal moment'. I'll give a brief summary of the game, then get to my point.

Loigny/Poupry was one of the first major battles of the Republican phase of the war, after the fall of Napoleon III. The French Army of the Loire was therefore a mixture of regular troops (depot battalions or units such as the Foreign Legion, freshly arrived from Africa) and masses of newly-mustered, relatively poorly-trained and -armed gardes mobiles. It faced a German army that was by now battle-hardened and had honed its skirmish tactics. The Loire campaign was directed at breaking the German siege of Paris. This battle saw the Army of the Loire hitting a Bavarian covering force that was then rescued by other German contingents. Consequently it makes for a nice open game where both sides are bringing forces onto the table and have to manoeuvre in their respective efforts to break or hold the line.

Nine captioned photos below the map tell the tale of the game, followed by reflections at the end if you want to jump straight to those.

The scenario map. (Loigny is one of the nine Franco-Prussian battles in the linked campaign in the BBB rulebook.) It's a pretty open battlefield, dotted with villages, three of which (Poupry, Lumeau and Loigny) are the objective locations. One big wood behind Poupry. Bavarians start on table in the lower half. French 16 Cps (Chanzy) arrives first from lower right. German reinforcements will arrive from top left at start of Day 2 (Turn 4), followed by French 15 Cps from top right T5, then 17 Cps in the centre T8/9.

The map as translated into a lovely snowy battlemat by Crispin. The wintry orange woods set it off beautifully. View looking north, French approaching from bottom edge. White counters mark the three victory locations. One Bavarian brigade in Guillonville (bottom left) to act as a tripwire; a second holds Loigny on the ridge; a third plus cavalry are behind that; the fourth follows on T2.

Close-up of the Bavarians holding Loigny. 6mm figures by Baccus.
The windmills are a nice historical touch.

View from Loigny as Chanzy's troops screen off and bypass Guillonville.

French Turn 4 (first move on the second day). Chanzy's corps has developed its line nicely towards the central objective, Lumeau (lefthand edge of pic) which is held only by Bavarian cavalry. Poor Bavarian movement rolls meant the infantry were just a little too slow so they will get caught in the open instead of being able to defend the village. French artillery is rumbling up to form a gun line to dominate the centre of the battlefield. 

I was commanding the German left. (John had the Bavarians; Dave and Crispin were French.) My lads were also stymied by lame movement dice, so the French would steal a march on us and get into Poupry first as well. Note the little cluster of cavalry just this side of the big Poupry wood upper left. This is Count Stolberg's 2nd Cavalry Division. The French infantry nearest to it, top centre, is about to leap into Lumeau (the white counter to their right), leaving their guns unescorted.

This was a pivotal moment in the battle - as in, if the dice had gone differently, it would have significantly changed the course of the game. Seeing the ominous French gun line still in the process of forming up, with half its batteries still limbered and the others already low on ammo from pounding the Bavarians, I gambled and launched Stolberg's cavalry at the few guns already deployed. There was about 40% chance that they would charge home; if they did, they would probably chase off or wipe out much of the French artillery. As this picture shows, though, French fire repelled them with the loss of one of their three bases. French cavalry then finished them off.

Meanwhile, my infantry used the cover of the wood to press into deadly needlegun range of Poupry, The garde mobile had got in there ahead of us but a few casualties soon rendered them spent (blue counter). 

However, reaching the front edge of the wood, we were in a 'fire sack'. The orange counter shows that these troops in Artenay on the French extreme right are chassepot-armed regiments de marche. Behind them, the Foreign Legion contributes its firepower. French artillery are out of pic to the right, including some mitrailleuses that would take a toll. On the penultimate turn, I finally managed to eject and wipe out the garde mobile, then repel a French countercharge on the last turn. However, French fire had cost me nearly half of my infantry. Still, at least we held that objective at the end.

The centre was bitterly contested. My fourth brigade made three decent attempts to storm Lumeau. Had Stolberg's Death Ride succeeded, the defending fire would have been less and we might well have got in. As it was, De Sonis's 17 Corps raced up, led here by the Papal Zouaves (OK, the figures are just ordinary zouaves standing in) and took over the defence of Lumeau just in time to save it for the French. Meanwhile, Chanzy's fire had depleted the Bavarians enough for him to storm Loigny. Final score: Germans held only 1 of the 3 objectives, so it was a glorious victory for the French!


Reflections:

Pivotal moments: Sometimes, games are virtually decided at the start, when the two sides' deployments dictate how it will go (perhaps through one side's irretrievable error). Others are only decided at the end: a case of general ebb and flow, push and shove, where neither side is really on top until the last couple of turns, and maybe it comes down to the last few dice on the last few assaults. And then there is a third kind where some pivotal moment mid-battle seems in retrospect to be the one the whole thing hinged on. I think this Loigny game was one of these. As I described above, Stolberg's charge had a fair chance of succeeding; if it had, we Germans could reasonably have expected to draw and would have had a chance of a win.

Looking back over a few earlier reports, I see some others that we could put in that same category. A German victory at Spicheren owed much to a grand battery and a particularly deadly salvo of artillery fire mid-game (albeit the scenario was probably skewed towards a German win anyway). Oudenarde was a case where my audacious sally onto an enemy flank deserved better results than it got, so let's call that a pivotal moment. At Waterloo, the Allied heavy cavalry's charge turned the game. 

By contrast: my defeat at Tel-el-Kebir was due to my early indecision rather than any critical moment later, so let's say that one was decided at the start. Likewise Malplaquet was determined more by our deployment than by our dice; ditto Beaumont; similarly Dybbøl, where we were always playing catch-up after being distracted on the first couple of turns.

As an example of the second type, where the battle is more evenly poised, ebb and flow and in doubt throughout, let me offer Tudela or Borodino.

These are three different kinds of story, each enjoyable in their own way. Those that are nip and tuck all the way and go down to the wire are probably best in terms of overall tension and excitement. However, there is a special pleasure to be had from the games where you can look back and say "that was the moment everything hinged on - if only it had gone differently!" That pivotal moment, the critical scene in the movie that changes the situation dramatically, after which everything else is just tying up the loose ends ...

There is also pleasure at the time in the high-stakes gamble. Launching Stolberg in this Loigny game, or sallying from Eyne in the Oudenarde battle, I knew at the time that it was risky and would cost me if it went wrong (as it did in both cases). Still, I think Clausewitz would approve, as he prefers a gambler to the general who is paralysed by doubt. And at least I was only sacrificing little lead soldiers. Anyway, it's more exciting than sitting tight and hoping for the best! 


Update 3 Dec 2023: the original reflection was a little brief as I was pressed for time. Here's some more of what I wanted to say about this, as expounded in a nice discussion on the Lead Adventure Forum:

I think the pivotal moment really has to be a high-stakes decision. (Me citing an artillery bombardment rolling a 12 was a bit of a cheat.)

'Decided at deployment': well, it's not really so black and white, you're rarely necessarily doomed. It's more a case of poor early decisions skewing the odds against you for the rest of the game.

To offer an analogy, imagine a battle as being like a long-term illness, where the disease is the enemy.
'Decided at Deployment' might be the fact that you became a chain-smoker at the age of 12, making it harder to fight the disease for the rest of your life and likely it will kill you.
'Ebb and Flow' would be just trying to manage it with diet, exercise and medication, to more or less effect - maybe ending in a draw (live to a decent age, albeit quality of life a bit diminished).
'Pivotal Moment' - that's the decision to go under the knife for that kill-or-cure operation.

Safety professionals use a 'bowtie diagram'
https://en.wikipedia.org/wiki/Bow-tie_diagram
in which multiple possible Mechanisms can lead to a single critical Event that can then have multiple Outcomes. Our situation is similar except that the Event (the Pivotal Moment) generally won't result from one Mechanism but from the cumulative effects of several contributing circumstances (activation failures, an exposed flank, a battery's fire slackening from low ammo ...). It then has multiple ramifications, more so than a lower-risk decision elsewhere that does not change the situation so dramatically.


A full list of my 'Reflections on Wargaming' essays can be found here.


Friday 10 November 2023

Twice in one night! Spicheren revisited

This report is written in some haste, partly because I'm busy, partly because this is a report of a game several weeks ago that I've only just got round to writing up. Please forgive the resulting brevity. Maybe that's a virtue.

Spicheren was one of the small curtain-raiser actions in the first days of the Franco-Prussian War. It shows off the contrasting vices and virtues of the two sides: French passivity and Chassepot rifles pitted against energetic but unsubtle German command and Krupp guns. I last visited this scenario when I first wrote it in 2015 as reported here. Crispin rolled it out last month on one of his famous battlemats.

It's a small game - 7 units a side, 8 turns - with an option to play an even smaller version on 4'x4' with even fewer units that lasts only 6 turns. We were able to play the game twice in three hours at on a Monday night at OWS. Six annotated photos below tell the story of the first game. Some reflections after.

Frog's-eye view of the battlefield, i.e., looking northeast from Forbach (bottom centre) through the Sophie glassworks and Stiring Wendel (the two BUAs on the railway, left centre) towards where the Germans are debouching through Saarbrücken. Spicheren village is the red roof furthest towards the upper right.

German 5th and 14th Divisions on the march through Saarbrücken. Note the brown-chalked hills south of the town. This is where the German artillery will be set up as a massed battery.


French defenders await on the Rotherberg. Red marker behind them belongs to a half-strength mitrailleuse unit. White counter denotes an Objective.

We Germans were too scared of French firepower to march straight up the Rotherberg. We opted for a pincer movement. Half our force hooked left through the Pfaffen woods to even things up between Chassepot and needlegun. This photo shows the right hook running into French resistance north of Stiring Wendel. A firefight breaks out across the pond.

Now the left hook develops into an enveloping attack on the Rotherberg. By now the massed battery has done great execution, obliterating a French brigade. We like these odds better. Snake-eyed dice top left betray the French cavalry's reluctance to tangle with Prussian hussars who are on a wide sweep around the French right. 


Germans seize Forbach unopposed. Victory! The scenario provides for the German 26th Brigade to arrive mid-game from the west and attack Stiring Wendel (as it did historically) or to arrive even later from the southwest to threaten the French supply depot at Forbach (a concern that hamstrung the French command on the day). In our game, the French gambled, left Forbach undefended, and paid the price. 

Reflections:

Short and sweet. With four players, this game romped along so swiftly that we were able to change hats and play it again. In years gone by, I've played too many games that were left unsatisfactorily unfinished (see my Reflections essay on "Who cares if we don't finish the game?"). Hence BBB where we virtually always get a result in an evening. On this occasion we managed two.

Replay value. As one of the joys of historical scenarios is to replay them and explore different plans, it was a bonus to be able to fight this twice in quick succession. I think in game two the French deployed further right to cover better against the German left hook from the first game; the Germans responded by pushing more strongly in the centre. Different plans, different games, similar end result (emphatic French defeat).

Victory conditions. The French were so soundly beaten that we wondered if the scenario was skewed. Another club had recently reported playing this so I consulted them. In their go, the Germans actually got trounced! But apparently this was down to new players testing the rules (and their German army) to destruction. I do think BBB is less forgiving of novice errors by attackers than by defenders. Anyway, the collective playtests indicated I just needed to up the German victory targets by one extra Objective. Updated version of the scenario is now available from the BBB groups.io files here.


Thursday 12 October 2023

Kassassin & Tel-el-Kebir (1882) as a single scenario

After last week's excursion among the sun-kissed vineyards of northern Hungary, this week we were transported to the sun-baked sands of northern Egypt. As part of the "Bloody Big AFRICAN Battles!" project, we playtested Mark's scenario for Tel-el-Kebir (1882), the major action during the British conquest of Egypt.

Tel-el-Kebir on its own is not very exciting as a situation to wargame: a frontal assault on a simple line of entrenchments that was over in an hour after a rather one-sided fight. (See my post here on whether frontally assaulting redoubts can make a good game.) Mark's creative solution was to combine it with the preceding action at Kassassin. This entailed some compression of both time and space: Kassassin should really be another four feet away from the entrenchments, rather than on the table edge; and the 'Night Interval' between the two actions is actually the fortnight between 28 August and 13 September 1882. This compression did not create any distortion or other problem and produced a scenario in which both sides get to do some maneuvering and have some genuine decisions to make.

Herewith a brief photo-AAR followed by some reflections:

It really was a very pretty table. Proper sand-coloured cloth, sandy hills, sand-embanked railway, exquisite palm trees, and a tidy British tent encampment in the foreground. The loco is pushing a flatcar-mounted 40-pdr gun. The British 2nd and 4th Brigades are all that stands between the 15,000 Egyptians debouching from their entrenchments (top of pic) and the British camp and the village of Kassassin (lower left). If either of these two objectives is taken, however briefly, the Egyptians earn a victory point - in effect, establishing a 'highwater mark'.

The open sandy plain on the British right. A small Egyptian force threatens from top right, opposed by British guns bottom left. Just visible at top of pic, to the left of the QR sheet, is pale felt representing the soft sand ('Difficult Terrain') protecting the Egyptian lines' left flank.

The Egyptian assault inflicted casualties (you can see both British 3-base infantry units are now reduced to 2-base) and came close to breaking through and taking the camp. However, the thin red line held firm long enough for the Household Cavalry to come to the rescue (upper right), to be followed on Turn 3 by the Guards Brigade. Egyptian losses were heavier (blue cube indicates a Spent unit; another brigade was wiped out entirely). The scenario gives the Egyptian player the option of pressing his attack for 4 turns rather than 3, which has two advantages: it not only gives another bite at the cherry to take the camp or Kassassin, it also means the British player will have one turn less when it comes to assaulting the entrenchments. However, Mark opted not to take the extra turn, preferring to have his troops spend it defending entrenchments rather than being ridden down by Horse Guards in the open.

Cavalry action on the British right. I sent the Indian cavalry brigade (top left of pic) through the gap between the two advancing Egyptian contingents and then wheeled it right to take on its Egyptian counterparts (right foreground). This put it in a crossfire from Egyptian guns, not to mention an infantry brigade. Fortunately, my enfilading artillery helped to wipe out the infantry. Still, I was lucky not to lose the Indian horse entirely. Don't give me cavalry to command, I clearly don't know how to use them.

I only took photos of the first third of the game, so apologies that you will have to make do with my 1,000 words to paint a picture of the rest of it. Having repulsed the Egyptians from Kassassin, I needed to take 5 of the 9 remaining objectives to win. Two of these were villages among the palm groves and farms south of the canal (top left in first pic), the other seven being redoubts dotted among the entrenchments (all marked by white counters in first pic). In the Night Interval, my troops set up in the historical deployment for the assault on Tel-el-Kebir: Indian brigade on my left south of the canal; Highland Bde and 4th Bde north of it; a grand battery in the centre; 2nd Bde and Guards Bde on the right; Cavalry Division on the right flank.

Honestly, I found the prospect of assaulting the Egyptian fortifications daunting. Most of the Egyptian troops had modern breechloading rifles, with long effective range and deadly short range; they also had a lot of Krupp breechloading cannon, which are no fun to assault frontally. I was especially concerned about the risk to my cavalry (the BBB rules make them a more vulnerable target than infantry) so I fannied about trying to hide them initially, rather than using them to outflank or assault.

Still, I got stuck in eventually. On the left, the Indians took one objective village but ran out of time to reach the second. Next along, the Highlanders and 4th Bde took a long time to storm one objective redoubt, so although they then had another at their mercy, they only had one turn left to take it and failed the movement roll to do so. On my right, the Guards and the Household Cavalry broke in and took one redoubt; the HC were so successful they had a compulsory exploit that actually put them in a position where they had a chance at taking another redoubt in the second line of entrenchments, but didn't quite manage it; redoubts to right and left of the Guards' incursion were at risk on the last turn, but all my three units in range failed to get the necessary movement rolls.

Thus, I took 3 objectives, and had chances at 5 others on the last turn. As none of these came off, I was left with a defeat, but it was by no means a crushing one-sided one, as victory had been very much a possibility until those last few dice. It was a thoroughly entertaining game and should go down well when Mark takes it to the club.


Reflections:

Too much artillery. The typical BBB figure ratios are either 1,000 men / 24 guns per base or 1,500 men / 36 guns per base. For this scenario, Mark had used 500 men / 6 guns per base. That meant artillery was 100% overrepresented - no wonder I was daunted! It evened out to some extent, of course, because the British have plenty of artillery too, but it advantaged the Egyptians more because their guns were in fortifications and we had to approach in short range of them. Fixing the gun ratio shouldn't change the game balance radically but should make it a shade easier for the British to storm the redoubts they need to take.

Characterful units: it's always fun to be able to point out the Highlanders or the Guards. On the British side, Indian troops and the railway gun added further colour. On the Egyptian side, at one end of the scale were the Sudanese veterans - hardcore! - and at the other, a rabble of fellahin conscripts and Bedouin bashi-bazouks.

Scenario design: the concept of combining Kassassin and Tel-el-Kebir in a single game absolutely worked and made it far more interesting than the simple assault would have been. Punctuating games with a Night Interval always seems to have that effect, providing a significant pivot point that entails significant decisions before and during it and gives different aspects to the game.

Cavalry: nope, still don't really know how to use 'em. Any advice? Maybe we should dispense with the wretched nags and replace them with some kind of armoured landship powered by the new-fangled engines those German fellows invented in the 1870s.


Tuesday 10 October 2023

The Value of Playing "What-Ifs"

I don't usually do "what-ifs". By that I mean, my staple fare is straight recreations of historical battles, in which forces have to start deployed broadly where they did historically and both sides are trying to achieve the objectives they were aiming for historically. The purpose of these (apart from providing a few hours' entertainment, obviously) is to let players explore various plans as different possible routes to victory - cracking tactical puzzles, if you like.

Occasionally, though, in the historical scenarios I write I might provide for some not too remote alternative possibility, such as the Russians at the Alma choosing to present a flank threat rather than a direct blocking position.

This week we explored a quite radical alternative. The scenario in question is the Second Battle of Vác (1849) from the Hungarian War of Independence, as found in the "Bloody Big Hungary '48 Battles!" scenario book. The standard historical scenario is an unusual and interesting one to start with, as it is an initial advance guard action followed by a fighting withdrawal. I did the straight refight back in January 2022 (in-depth report with lots of gorgeous photos here). The scenario provides an option that assumes the Hungarian C-in-C, Görgei, chooses the bold course of attempting to break through the Russian army that has intercepted him, rather than withdrawing to find another way around it as he did historically.

The following photos show how that went, with some reflections at the end.

'Der Donau ist blau.' The Hungarians start with an advance guard and two corps on table with a third due later. Here Leiningen's III Cps conducts its forced march along the Danube ...

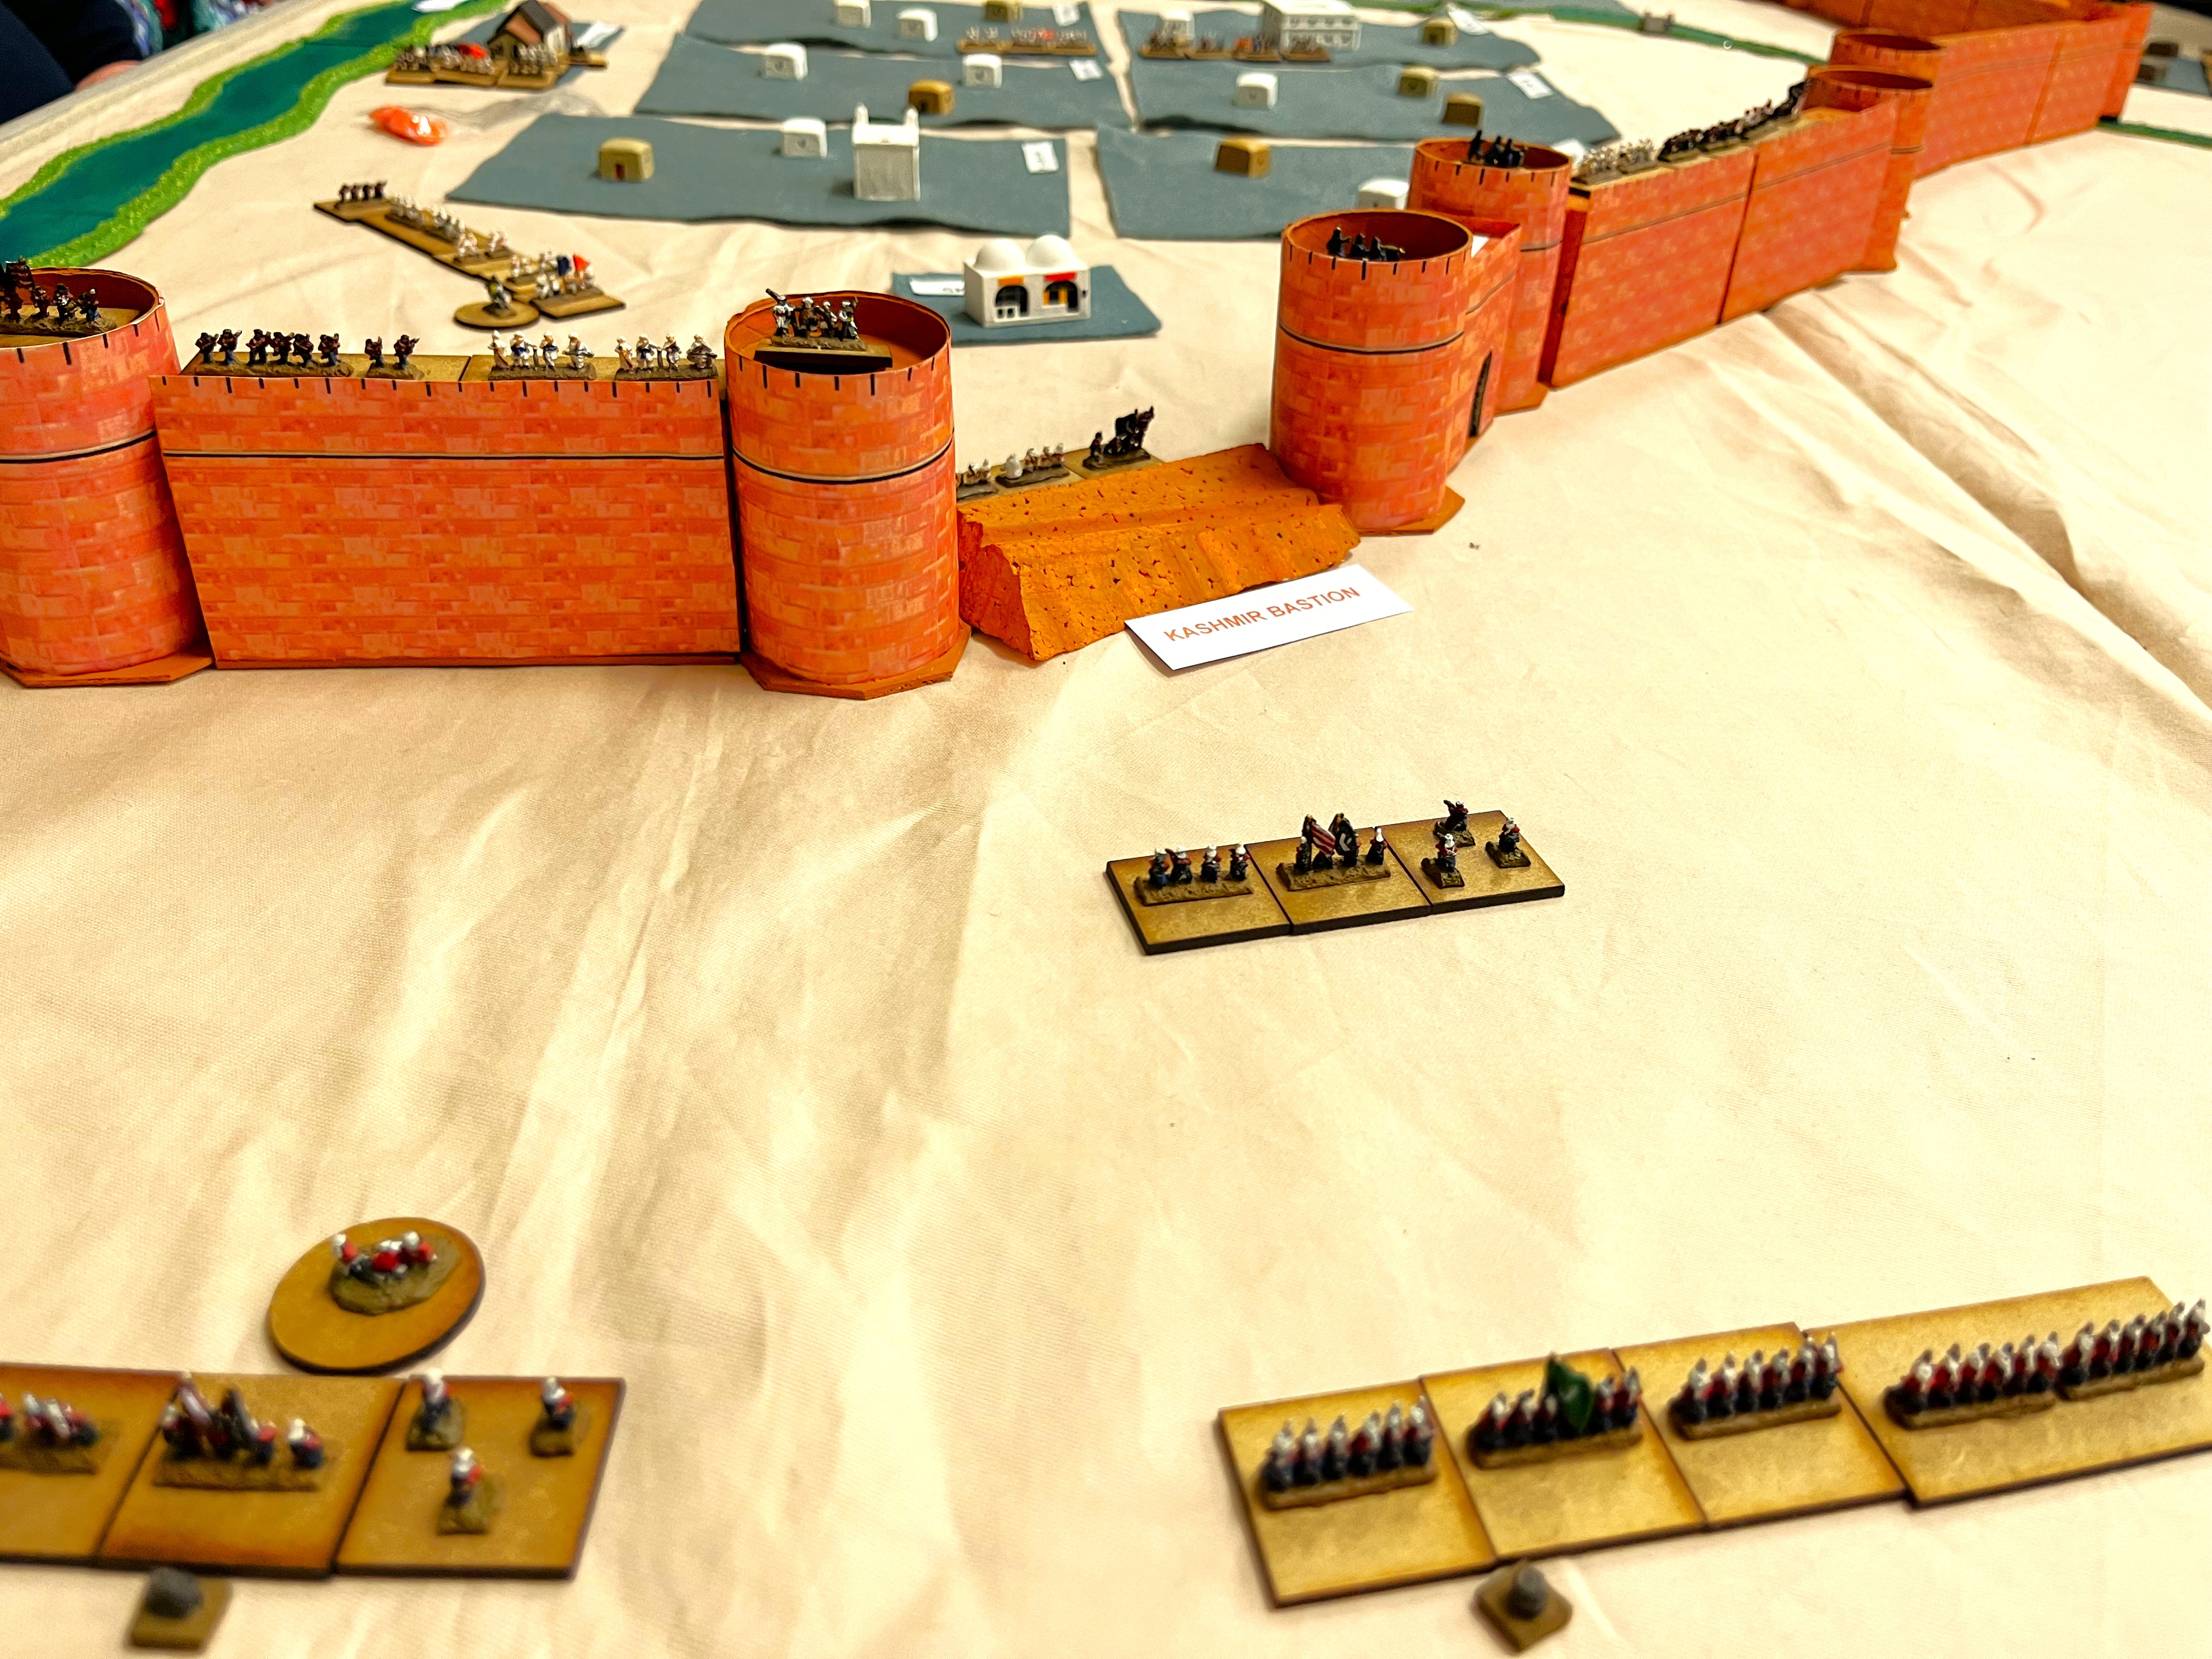
... preceded by Nagysándor's I Cps, seen here marching through the town of Vác. Behind it is the railway embankment for Hungary's very own HS2. (At this time, the Hungarian rail network consisted of one line from Budapest southeast to Szolnok and another from Budapest north to Vác. The leg to Pressburg aka Bratislava was under construction.) Out of shot to the right is the Hungarian advance guard. This spent the first four turns driving back the Russian advance guard and making space for I Cps to push down the road to the south.

OMG that's a lot of Russians ... after the advance guard action, the scenario provides a Night Interval, a lull for everyone to have a rest after their forced marching and deploy for the next day's withdrawal or breakthrough attempt, as applicable. The Russians can deploy anywhere >6" from the Hungarians and south of the Csörög stream. Here you see about 50,000 men poised to crush the reckless Magyars, with a formidable gun line already deployed lower right. Only two of the units in shot are Hungarian: one in the bottom left corner and the other above that in the edge of the vineyard.

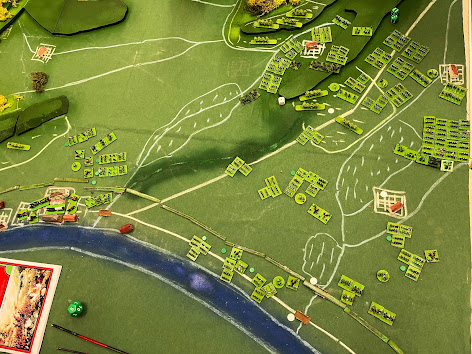
Plan view gives the full picture. The Hungarians are trying to push from left to bottom right. Victory depends on how wide a gap they can maintain at game end, as measured by how many of the four white counters they hold (the two bridges and the village of Sződ at lower right, and the vineyard above that). Russians are all in the upper right quarter. Hungarian I and III Cps are facing them, lower right. Pöltenberg's VII Cps has arrived around Vác (left centre) and will try to put pressure on the Russian right flank.

Most of I and III Cps immediately falls back to try to defend the line of the railway embankment, apart from one brigade that advances to occupy SzÅ‘d. VII Cps pushes forward on the Hungarian left. 

A view from behind the railway embankment before the Russian hordes arrive there.

Turn 7 of 12. The solitary forward Hungarian brigade in SzÅ‘d has been demolished. Initial Russian assault on the Hungarian extreme right has been rebuffed, but worse is about to come.

Russian highwater mark - eight regiments assault the embankment.

Plan view, end of Turn 7 or 8. Russians continue to press forward bottom right but have been repulsed in the centre. Centre of pic, two Hungarian brigades and some hussars have crossed the embankment to attack the right flank of the massed Russian assault. Upper left, VII Cps and the Russians facing it find themselves in a stand-off.

Close-up of the Hungarian counterattack against the repulsed Russians. Their blurred images betray just how shaken those Russians are.

Unusually, we ended the game a couple of turns early because several of the guys had to leave a bit early. The rest of us could have finished it but we were happy to call it a draw. The Russian hordes had suffered enough infantry losses that they would have struggled to press another assault home, but they probably had enough guns to prevent the Hungarian counter-attack from carrying too far either.


The Hungarian army's historical withdrawal was seriously impeded by a column of thousands of refugees following it. Here we see the refugee column milling around and blocking movement through Vác. Even if the Hungarian army itself does break through the Russians, this tail of unfortunates is likely to be left at the mercy of Russian Cossacks and Caucasus Muslim cavalry.

Reflections:

An Illuminating 'What-If'. Görgei is widely regarded as Hungary's best general of the war. I think it fair to say that this what-if game confirmed the wisdom of his actual decision in this case. His historical withdrawal took his army into hilly country that aided rearguard actions to delay pursuit and made it difficult for the Russians to bring their superior numbers to bear; he was able to send his baggage and ammunition trains away first and give them a head start; the Russians were unsure about exactly where he was heading; his army escaped virtually intact (and then dodged behind and through the Russians, leading them on a merry dance for weeks). By contrast, our attempt to break through showed that it would have been pretty disastrous. Even if victorious, his army would have been mauled; it would then have had to march across open country, harassed by Russian light cavalry and Cossacks; it would probably have lost much of its supply train. No doubt I could have worked that out as the likely result beforehand, just as Görgei evidently did, but it was still highly instructive to see it play out on the table.

Shock and Awe: it's one thing to read (or indeed write) a scenario, and another to see the troops deployed. Once the Russian army appeared in full force after the Night Interval, we were all a bit gobsmacked - especially those of us on the Hungarian side tasked with fending it off. It goes to show that small figures can still make a big impression. 6mm is good for mass effect.

Quality vs Quantity: Görgei's army was a pretty well oiled machine at this stage, whereas the Russian one was a mighty but unsubtle steamroller. The Russians had also been ravaged by cholera, which killed more Russians than the Hungarians did in this war. The scenario therefore gives the Hungarians a quality advantage overall. By the time we stopped, this seemed to be on the way to compensating for Russian numerical superiority.

What is a 'What-If'? It's a bit of a stretch to claim this post as a genuine 'Reflection on Wargaming'. Really it's one battle report that prompted one particular thought that I've tried to expand on. I suppose I can expand on it a bit more by saying every game is a what-if to some degree (unless it is not a game at all but simply an exercise in pushing figures along courses utterly pre-determined by history, without any player choices or chance to deviate from that history). My typical historical recreations start the 'what-if' around the point at which historical opposing armies deployed for a historical battle, with their historical objectives and orders of battle, and explore how different plans might have worked out. The alternative version of Vác that I've reported here just changes the Hungarian C-in-C's aim - the mission, if you like - and explores a more radical strategic plan rather than grand tactical ones. A next step away from the historical event would be to have those same armies meet on a different battlefield, perhaps imagining a breakthrough attempt at a slightly different location; the step after that, to put historical opponents on some imaginary battlefield, tournament-style; beyond that, we get into competition-style games pitting ahistorical opponents against each other in battles that never happened, on terrain that didn't exist, in wars that were never fought. Which step of that progression we prefer depends on which 'what-if' question we want answered.

And finally: Thanks to Crispin for creating the custom battlemat, painting the armies and laying on the game.

For the full list of my (mostly rather more extensive and considered) 'Reflections on Wargaming' essays, see here.

Wednesday 27 September 2023

Zulus! Isandlwana game at Colours 2023

Surprised not to have seen many reports of the Colours wargames show that happened in Newbury as usual earlier this month. Here's my own modest addition to the literature on this subject.

I can't say much about the show in general as I spent most of it helping to run our participation game. I talked to a couple of traders who said it had gone well for them, which is always good to hear. It was swelteringly hot and my impression was that it was really busy in the morning but that a lot of people faded, wilted and went home early when they got too hot and bothered to stay for the afternoon.

At last year's show we ran a nice obscure Hungary 1848 battle in 6mm. This time we went much more mainstream as Bruce laid on a game of Isandlwana using his gorgeous 28mm figures. Lots of people are familiar with this battle. Indeed, several of our guest players or spectators had actually visited the battlefield and knew it very well indeed, one even having had a relative perish there in 1879. That being so, it was particularly gratifying that one of our knowledgeable guests played the whole game through and said at the end, "that felt right".

This is a tribute to Bruce's skilful scenario design, as he adapted BBB (a ruleset geared to making battles of 100s of 1000s of men feasible as wargames on 6'x4' in an evening) to an action in which the smaller side had fewer than 2,000. BBB's elastic scale proved capable of shrinking down that far and still producing a very plausible game.

I thought I took a bunch of photos of his work but apparently not. I can only assume I was too busy chatting with people and helping to run the game. All I can offer you is a view of the racecourse, a couple of pics of the terrain being created and one of the British deployment, followed by a few reflections.

The view from our splendid vantage point. We were as overheated as greenhouse tomatoes, but it still beats the Distelfink room at Historicon. Maybe it captured the right feeling of southern Africa and all we needed was some itchy woollen clothing with tight high collars.


Step 1 of laying out the terrain was to put together Bruce's cunningly crafted polystyrene jigsaw for the hills.

Drape a cloth over the top, add the most prominent hilltops, sprinkle tiny gravel to help to define the slopes. Dongas (streams) and campsite will follow. Top left of pic is the range of hills the main Zulu force camped behind and attacked across. Isandlwana hill is the rocky brown one. Zulu right horn came from left edge of pic, left horn from the right edge. Our visiting expert complimented Bruce on his choice of green cloth: apparently, the movie 'Zulu Dawn' gives a false impression of a dry brown battlefield because it was filmed in the more convenient dry season, whereas the actual battle took place when the grass would have been lush and green.

A thin red line awaits the storm. Each pair of redcoats represents a company, with one figure being equivalent to 50-80 men. Bottom right, Lt Raw's men gallop frantically back to camp, having discovered the Zulu army. To see more and better pics of Bruce's figures in action (including Zulus this time), see my report of his Nyezane game.

Reflections:

It's a thin red line. Inevitably, the much-debated question came up of whether the massacre was due to ammunition problems (difficulty opening ammo boxes, etc), along with the alternative theory that it was because of weapons fouling up and misfiring. My own feeling after playing the game is that it didn't need any one major factor to make it happen. The problem is, unless the British deploy in a proper tight square (preferably protected by improvised obstacles and with guns at the corners) as they did later in the Sudan, eventually the Zulus will find a flank somewhere. Once they do, the line will get rolled up and swarmed and it's game over.

Popular vs Obscure. I love to explore the esoteric corners of history. There's a particular pleasure to be had from researching wars and recreating battles that few people have ever heard of, especially when (as so often) they present unusual tactical challenges; colourful, even bizarre incidents; and strong characters. Bringing such games to the tabletop, especially at shows, is in its way a service to our little community. However, there is also a lot to be said for the 'headline acts': Gettysburg, Waterloo, Balaclava - the famous battles that everybody knows and can enjoy identifying the terrain features and notable regiments as portrayed on our tables; the ones where the 'what-ifs' have been discussed at length and it can be particularly interesting to see how alternative plans play out in a game. Our previous more obscure games at shows have been appreciated and gone down well enough, but I have to say I think Isandlwana was the most popular yet, so maybe we will go for more such better-known battles in future.

28mm vs 6mm or 10mm. Another factor in the popularity of the Isandlwana game may have been the use of 28mm figures. We usually use 6mm or 10mm because these give the right mass effect for the massed battles we normally lay on. However, larger figures are easier to identify and more eye-catching at a show. Another conundrum to chew over for future games - or maybe we could go in the opposite direction and try 2mm next time!

Update: Bruce's scenarios for Isandlwana and Nyezane are both freely available in the "BBB Zulu Wars" folder in the BBB io group files.