Thursday 23 May 2024

An Unabashed Success! BBB Bash Day V

On 19 May 2024, some 25+ likeminded souls gathered in Daventry UK to share the love for big nineteenth-century battles. Yes! It was the fifth "Bloody Big Battles!" convention, "Bash Day V".

The first three were held at the home of the Oxford Wargames Society, Wolvercote village hall. Last year, Bash Day headed north for the first time to Leeds. (Report here.) This time, we found an accessible Midlands location in the excellent Battlefield Hobbies wargames store.

Because it is entirely about participation, Bash Day takes quite a lot of administrative effort to ensure we have the right number of games for the number of players expected, and then to assign players to the games they want to play. Mark J did a tremendous job of organising all this, liaising with the venue, keeping gamemasters and players informed at every stage, and adapting when (inevitably) one GM and a couple of players dropped out. In the end, it worked out virtually perfectly: all the games had a suitable number of players and everyone got their two games in (one in the morning, one in the afternoon).

The games were all 19th-century actions from a variety of conflicts:

Hanau (1813), from the forthcoming "Napoleon's Bloody Big BATTLES!" scenario book;

Mudki (1845), from the "Bloody Big Battles in INDIA!" scenario book;

The Alma and Balaclava (1854) (beautiful Crimean War games by Matt Bradley of "Pushing Tin" blog fame);

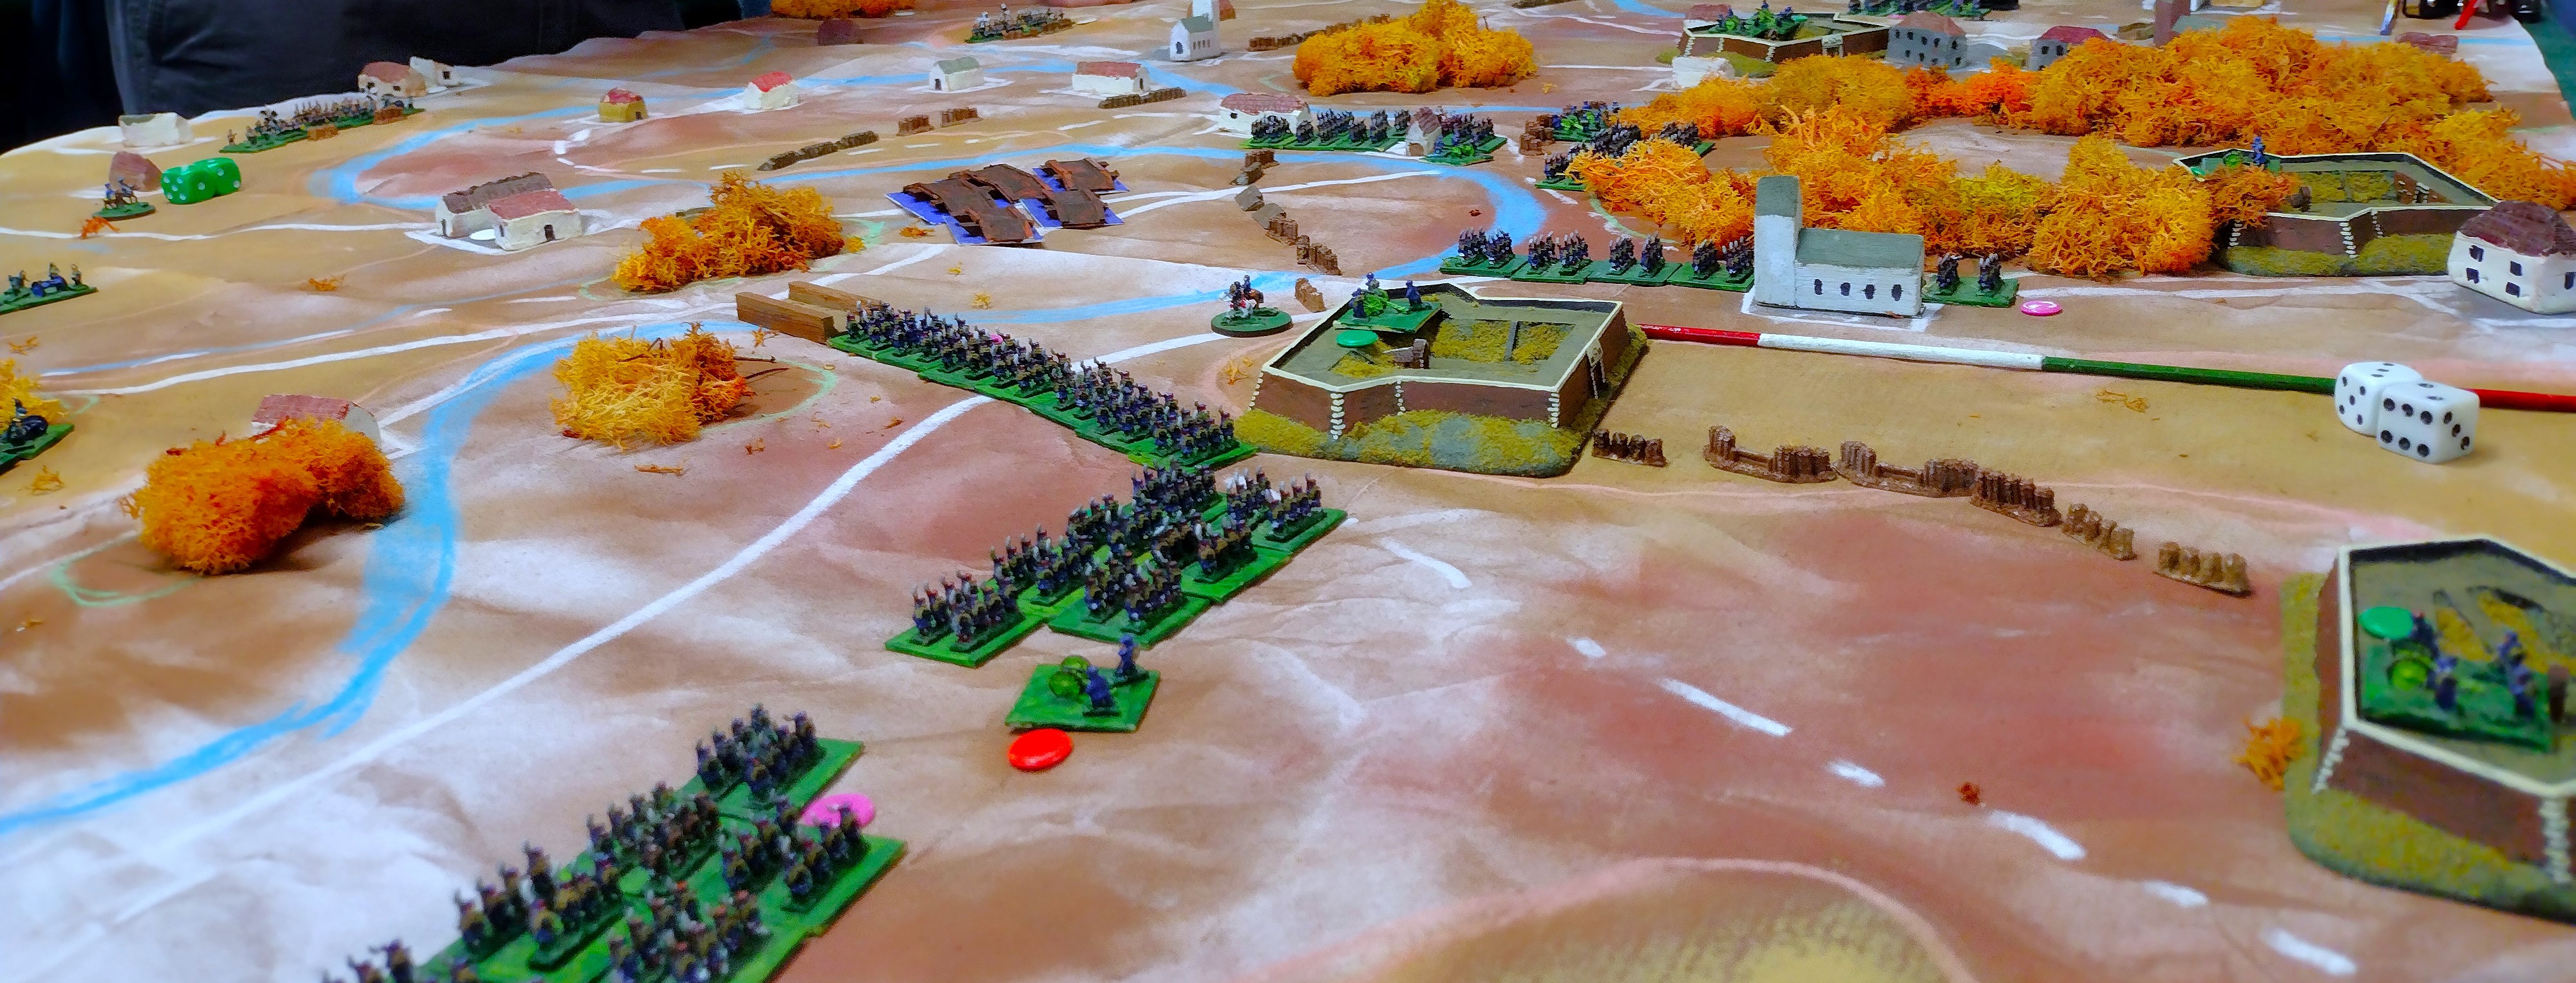
Brandy Station (1863), largest cavalry battle of the ACW;

Mars-la-Tour (1870), one of the biggest battles of the "imperial phase" of the Franco-Prussian War, a scenario from the BBB rulebook;

Champigny/Villiers (1870), when >50,000 men sortied from Paris during the "republican phase" of the Franco-Prussian War, complete with forts, railway guns and a river gunboat;

Isandlwana (1879), the Zulu War game in 28mm that was so popular at the Colours show so popular at the Colours show last year.


Mustering the troops! Set-up phase, circa 9am. Clockwise from foreground: Brandy Station; Isandlwana; Balaclava; the Alma (top left); Mudki (with players); Mars-la-Tour; Champigny/Villiers (top right); Hanau (centre). Photo courtesy of Mark Jarvis.

These games nicely illustrate how BBB can cope equally well with small actions of a few thousand, like Isandlwana, and with massive battles with 100,000+ men on the field, and can still resolve them in an afternoon. The scales on display varied as well, with 6mm, 10mm and 28mm forces in action. Lots of fine craftsmanship was on show: beautiful armies, gorgeous terrain, not to mention cleverly designed scenarios to create nail-biting finishes.

A bleak, wintry scene outside Paris in 1870. Dense columns of French national guards file out between the Paris forts to attack the German siege lines around Champigny and Villiers. Battlemat and armies from Crispin's collection. The forts are mine, from Peter Pig's ACW riverine range. Nowadays these forts are surrounded by urban Paris, of course. I believe one of them is the headquarters of the Foreign Legion; another hosts a wargames club - must visit some time! Photo courtesy of Mark Jarvis.

The players were a varied and high-calibre lot as well. I have sat across the wargame table from a few numpties in my time, but there were none such here. The clientele that BBB attracts seem universally to be nice smart folks who approach the game in a spirit of historical inquiry and good fellowship. Consequently we had a great crowd. Some were veterans of previous Bash Days; others were experienced BBB players attending for the first time; and then there were the totally new recruits who'd never even played BBB before. Some I had met before in person, others I knew 'virtually' from chatting on wargames forums. We doubled our previous record for female gamers attending (nice to see you, Sarah H and Sarah J!) and the teenage generation was present as well (well played, Will!). Special honourable mention goes to our US participant, Jeff, who arranged his UK holiday so that he could join us in Daventry. It was great to meet so many good people and kindred spirits. Half of us went for a post-battle curry - a precious tradition, as it is always nice to have a social as well as the dice-rolling.

Huge thanks to everyone who made this fantastic day possible: to Battlefield Hobbies for hosting; to the gamemasters for laying on such great games; to all the players, some of whom travelled a long way, for making the trek and for participating in such excellent spirit; and especially to Mark J for all his hard work to make it happen and running it so smoothly.

Before we'd even finished our curry, the guys were already talking about planning the next Bash Day. Date, venue and format to be confirmed, but rest assured it will happen. Bash On!


Wednesday 15 May 2024

Dave's Franco-Prussian birthday party

 Dave Whaley is the soul of BBB. It was he who started the whole BBB journey back in 2009 with "Chris, I'd like to do some Franco-Prussian War games".

Fifteen years on and Dave and I are both a bit older and we have indeed done some FPW games. Last weekend he hosted a birthday party with half a dozen of us. We celebrated his birthday in suitable style with two FPW games from the BBB rulebook, one for the imperial phase of the war (Froeschwiller) and one for the republican phase (Loigny/Poupry), punctuated by a non-FPW-themed curry. Herewith a few captioned photos from the games, then reflections as usual.

French in their "position magnifique" await the German onslaught. The bastion of Froeschwiller itself left edge of pic, facing Woerth at the top. An outpost in Elsasshausen (centre of pic) is backed up by Pelle's 2nd Division of MacMahon's 1st Corps. Figures are 10mm Pendraken from Dave's collection.

View looking south. From the left, Germans of Von Kirchbach's V Korps advance around Woerth. Facing them, the French line the heights in front of Froeschwiller and beyond. Bottom right, the Bavarian 7th Brigade files through Langensulzbach to work its way around the French left flank.

Virgin soldiers! Dave didn't have enough Germans, so his were reinforced by Phil's newly painted troops (the ones with the green tufty bases), being blooded in their first ever on-table outing. Lovely work!

Ably commanded by Crispin, the Bavarians had a good war. Here we see both brigades of the Bavarian 4th Division, having smashed through the zouaves of the French 2nd Bde of 1st Div, catch a brigade of 7th Corps in column of march before it can deploy. This was hurled back and eventually wiped out.

Things didn't go so well for me and Phil on the German centre and left. The German gun line plays a crucial role in this battle. I made the mistake of deploying my guns immediately, which meant they were too far back to be truly effective, so I had to limber them up again and redeploy further forward. That cost us a couple of turns when they should have been firing. That plus some duff rolls when they did fire meant we didn't blast away the French quickly enough. Nevertheless, we still stormed Froeschwiller in time to earn the bonus point for taking it early. But we'd therefore had to leave ourselves a bit weak (and been a bit unlucky) on our left, where Mark's audacious Turcos actually sortied across the River Sauer to deny us a victory point there. This is a scenario where casualties matter as well, so we were trying to kill off French units. The above pic shows a sadly diminished 2-base unit, outnumbered by Germans to its front and enfiladed by Bavarians who've just captured Froeschwiller. The French should have been dead meat. Phil's pink dice for this last roll of the game sum up his day.

Congratulations to Mark and Matt on their victory. We could have beaten them, if only we'd been smarter and luckier. Many real generals could say the same.

On to Loigny, then! Exchanging the poorly commanded but excellent troops of the empire for the better-led raw levies of the republic. This pic shows the massed French forces before we deployed them. Again, Dave's 10mm Pendraken.

View of the eastern half of the table (the French right). I took the part of the French C-in-C, d'Aurelle de Paladines, seen here with 15th Corps as it arrives from the SE corner of the battlefield halfway through the game. Poupry, with its white objective counter, is the village upper centre. From the top right, Hessians and Holsteiners race towards Poupry and the town of Artenay (right edge) - not an objective, but a good place to harass the French from.

Meanwhile, Matt on the French left, as Chanzy commanding 16th Corps, had been doing a great job. He killed off a Bavarian advance guard brigade on day 1 and maintained that advantage on day 2. Here we are looking west across the western half of the battlefield. Chanzy's troops have arrived from left edge of pic and worked their way around the Bavarian right: the troops in the wood to the left and the three groups on the far hill are all French. The beleaguered Bavarians have formed a crochet around Loigny (lower right), where their artillery is losing the firefight. Despite a bold counterattack in the centre by one of Mark's German brigades (out of pic, below bottom edge), Matt's well-handled advance was inexorable and the Bavarians were driven out of Loigny - one objective taken by the French. (Incidentally, in reality the high ground is much less pronounced than these polystyrene cliffs suggest and the gentle slopes are very gentle. See my report of my battlefield tour here.)

And on the right, I managed to get a toehold in Poupry before the Germans could get there, and they never managed to winkle me out. Here we see the Foreign Legion fending off green-jacketed German jaegers. As the French held two of the three objectives, that made it a French win. Hurrah!

Reflections:

There are your guns! As I've remarked before, in 19th-century battles putting your guns in the right place is often critical. My early miscalculation cost us at Froeschwiller.

The scenario option worked. For Froeschwiller, Dave used the scenario option that adds an objective: the Germans have to prevent the French from advancing across the Sauer. This added spice to the last couple of turns as Mark's Turcos tried (with eventual success) to dance around Crispin's left flank.

Same scenario, very different games. Loigny is one of our most-played scenarios. It's easy to set up and there's plenty of movement. Its last outing was in December - report here. That was very different, as both sides converged on the Lumeau objective in the centre, whereas this time all the action was on the flanks. It's a great example of the replay value of historical scenarios that let players explore different plans to see how battles could have gone differently.

I do like 10mm. I'm a committed 6mm adherent as I have built up so many 6mm armies over the decades that it would be a massive task to start again in 10mm. However, I'm very happy to play with Dave's and Phil's 10mm armies. At that scale, you still get the mass effect so the game looks a bit like a battle rather than "a few blokes taking a flag for a walk". But it is also easier to distinguish the uniforms and tell the units apart. Another reason I went with 6mm years ago was that I wanted armies for which figures didn't exist and it was easy to proxy 6mm with a paint job. Nowadays that's no longer such a problem as there's much more choice of figures (and you can still do a lot to 10mm with a paint job). Recommended.

Happy Birthday Dave! It was a great day and a great way to celebrate a good man's birthday. The good news is, the man himself had such a good time, he's already planning a repeat for next year!


Thursday 9 May 2024

Just for fun: an AI review of BBB

Just as a bit of fun, I asked an AI tool:

"What do players like or dislike about the "Bloody Big Battles!" wargames ruleset?"


The AI wargamer. Not to be confused with General Fred C. "AI"nsworth.


Here's what the AI had to say about BBB:


===


While opinions can vary, here are some common likes and dislikes that players have expressed regarding the “Bloody Big Battles!” wargame ruleset:

Likes:

  1. Historical Accuracy:

    Many players appreciate that BBB focuses on large-scale historical battles. The scenarios provided allow them to recreate famous engagements with a degree of accuracy.

  2. Epic Scale:

    The ruleset captures the grandeur of massive battles. Players enjoy commanding large armies, maneuvering divisions, and witnessing sweeping movements across the tabletop.

  3. Scenario Variety:

    BBB offers a range of scenarios, from the American Civil War to European conflicts. This variety keeps gameplay fresh and allows players to explore different historical periods.

  4. Playability:

    Despite the large scale, BBB strives for simplicity. Players appreciate that the rules are easy to learn and don’t bog down the game with excessive complexity.

  5. Generals and Command:

    The inclusion of generals and their impact on command and control adds depth. Players must make strategic decisions based on their leaders’ abilities.

Dislikes:

  1. Lack of Detail:

    Some players find BBB too abstract for their taste. It sacrifices intricate details for the sake of playability, which can disappoint those seeking a more realistic simulation.

  2. Command System Complexity:

    While generals enhance gameplay, the command system can be confusing. Players may struggle to grasp the nuances of command ratings and their effects.

  3. Limited Tactical Depth:

    BBB prioritizes the big picture, but some players miss the tactical intricacies found in other rulesets. Detailed unit interactions and terrain effects are less pronounced.

  4. Balance Challenges:

    Achieving balanced scenarios can be tricky. Historical battles often had inherent imbalances, and translating them into a fair tabletop experience can be a delicate task.

  5. Unit Basing and Movement:

    The 1" base representing 1,500 men can lead to odd formations. Some players dislike the lack of flexibility in unit placement due to fixed base sizes.

Remember that preferences vary, and what one player dislikes, another may enjoy. Ultimately, it’s essential to find a ruleset that aligns with your gaming group’s interests and playstyle . 🎲👍

====

On the "Likes": 1 to 4 seem spot on. Not sure about #5, players having to make strategic decisions "based on their leaders' abilities". Must be confusing BBB with some other game there.

On the "Dislikes": 1, 3 and 4 all have some truth to them. I'd question #2: the command system is pretty simple and clear, isn't it? And #5 is surely confused - BBB is more flexible about representing formations than rulesets that use a single base per unit, if that's the AI's point.

(Can't fault its summary remarks, though - for regular good gaming, you really need likeminded players.)

All in all, it makes me suspect the AI hasn't actually played the game. What do you reckon? I guess it must have read a few of the other posts on this BBBBlog ... Should I see if I can get it down to the club next Monday?

***

For collected reviews of BBB of the old-fashioned kind by analog humans, see here.


Wednesday 1 May 2024

Stitched up at Salamanca

After last week's pride at Kliszów comes the fall ...

Mark has pretty much done a whole set of BBB scenarios for the Peninsular War. See, e.g., Colin's report of our Vitoria game in February. This week Mark treated us to another biggie and a battle I know reasonably well: Salamanca.

'Geometry' is a word I seem to use increasingly often in describing the shape of a battle. For all their undoubted subtleties, the one-dimensional straight-line battles so beloved by our ancients tournament-playing comrades at OWS do not excite me. I want angles, salients, open flanks, divided forces, depth, and the resulting complexity and variety of tactical decisions and manoeuvre ...

Salamanca gives us all these things, and that's what makes it such an interesting battle. You could characterise it as an 'L' facing a 'V' that turns into a 'W'. The plan view below helps to explain.


The historical situation saw Marmont's French trying to march past Wellington's right flank to threaten his line of communications. Wellington responded and caught the French extended. In the pic above, the French have come from the top left; their lead divisions (Maucune and Thomières, top right, plus Curto's cavalry) are trying to press on to the Pico de Miranda and the village of Miranda de Azan (just out of shot). Other French divisions have occupied high ground to confront the arriving allies: Foy and Ferey on the heights around Calvarassa; Bonnet on the pivotal Greater Arapil, backed up by Taupin. Together, these form an L-shaped line spread across a large distance.

Wellington's army has arrived in the middle of the L and formed its own V, with its point on the Lesser Arapil and cavalry on each flank. This gives Wellington the advantage of interior lines: it is much easier for him to concentrate his forces against the widely separated French.

The stars indicate objectives: red for British-held, blue for French, white for no initial control. Miranda de Azan is unique in that if French infantry ever hold it, it becomes a kind of high-water mark for them - the objective cannot be taken away from them even if they are expelled. This is Mark's clever game device to represent the fact that the French wanted to advance in that direction and gives the French players an incentive to do so. We French needed three objectives to draw and four to win. 

I commanded the French centre with Luke taking our left and Matt our right. We were facing (allied L-to-R) Phil, Crispin, Dave and Ben. Our initial plan was to hold the three objectives we'd got, plus try to take the Lesser Arapil, but this sort of went out of the window straight away. Just four photos below capture the critical elements of the battle. Reflections follow as usual.


The village of Arapiles, facing our centre-left, the junction of Luke's force and mine. This was immediately occupied by a small Portuguese brigade. Luke decided to send a division to eject this, which it did, but was ejected in turn by an allied counterattack. I found myself obliged to commit two divisions to support Luke. More allied troops were likewise sucked in. Assault and counter-assault raged here for most of the game, until Ben's allied right wing arrived in the French rear to doom us to destruction.

(6mm Baccus figures from Mark's collection, on suitably arid bases for Spain.)

Here we see Ben's and Luke's forces heavily engaged on the French left. Ben had first occupied Miranda and the Pico, then swung left. (Phil and Crispin were doing something similar on the opposite flank, turning the allied V into a W.) Luke's attempt at driving the allies back went awry when his cavalry failed to back up his infantry. It was downhill from there - as in, the French were driven off the ridge, lost all their cavalry and artillery and were seriously battered ... 

Things went a little better for us on the right - but only a little. Matt responded to an allied advance by coming off his ridge and hurling the foe back across the stream. However, he then had to send some troops back to recover Calvarassa from sneaky outflanking Brits. The unit in left foreground is my last division, which I had to send off the Greater Arapil to protect Matt's flank - which unfortunately left the hill unguarded when Crispin was able to march up it.

Last rites: Marmont on the Greater Arapil in the centre, flanked by the remnants of two French divisions, about to be crushed by overwhelming numbers of allies. Another allied brigade is out of shot below the bottom of the pic - it has taken the Greater Arapil and is about to take El Sierro as well. All we have left is Matt hanging on to Calvarassa on our right. Result: emphatic French defeat.

Reflections:

It's a Stitch-Up! Their extended initial deployment inevitably makes the French vulnerable to having their left rolled up, as happened in our game and historically. We couldn't have won anyway!

Make a Plan and Stick to It. Actually maybe we could have won, or drawn at least, if we'd planned and executed better. We didn't need Miranda, the Pico, or Arapiles - we could win without them - but we let ourselves be tempted to chase them anyway, despite our initial discussion about the four objectives we wanted. In retrospect, jumping into Arapiles may have been ill-advised; so may sending troops further left to try to delay Ben's advance; moving off the Greater Arapil didn't work out great either. By contrast, our opponents seemed to have a clear and effective plan. Perhaps it could go better for the French next time. (It couldn't go much worse.)

Upping the Ante. From where I sat, things clearly went from bad to worse in distinct stages. We would attempt something; it would go a bit wrong; we would then have to make a bigger gamble to try to restore the situation; that would go wrong in turn; and so the vicious spiral went down and down. I suppose games (and battles) often go that way, but it has rarely struck me so starkly.