Showing posts with label HQGE High Quality Gaming Experience. Show all posts

Tuesday, 16 September 2025

Moby Dick whale hunt

OWS was honored (US spelling is deliberate) by some special visitors this month: my good American friends Tom Ballou and Sean Barnett.

Tom had been wanting for a while to put on a game at a UK show. This year he finally got around to contacting major UK shows such as Salute, Partizan and Colours, but without much luck until four weeks before the event, the Colours organizers got back to confirm they had a table for him. Little did Tom know, this was the one all our OWS team had had to cancel because of real life getting in the way! Clouds and silver linings ...

Anyway, the trip went ahead and, at quite short notice, Tom and Sean flew over to England. As they were going to be in the area, Tom offered to run his Colours game for us at OWS as well. Yes please!

Now, the game in question wasn't exactly a wargame, certainly not a Bloody Big Battle - but there was plenty of blood, and they don't come much bigger than the main protagonist: Moby Dick! Yes, this was a whale-hunting game in which the infamous cetacean was a dice-driven NPC, while each of us players commanded a whaleboat trying to turn him into lamp-oil and dollars. Readers with qualms about the ethics of a game like this may want to look away now.

This was my boat with its green gunwales. Each crew consisted of a harpoonist, four oarsmen and a steersman.


The mighty whale, covered with harpoons and lines trapping an unlucky seaman. Note the attendant sharks frolicking nearby and looking forward to eating the scraps.


The first three boats get into harpoon range. The disc top right has two sides, "Happy Whale" or "Angry Whale", which affects how fast he moves.
MD starts happy. Guess what harpooning him does.

MD surges angrily forward. The boats that harpooned him find themselves dragged along behind on the 'Nantucket Sleigh Ride'. The red counters indicate how much blood is in the water to attract sharks ...

... which could be bad news for sailors who go overboard, like the ones bobbing in the water here.

Meanwhile, MD is about to charge off the edge of the board. A clever game mechanic says at that point he dives out of the game. The boats then circle nervously, wondering where he will breach again. Hovering seabirds provide a clue. Dave T had had no luck all game, I don't think he'd yet hurled a harpoon, so he was hoping MD would show up close -

- but not that close! Turns out MD's favourite flavor is orange. Could Dave pass the necessary skill rolls to avoid MD's immense maw?

Nooooo! The whaleboat is crushed and its crew devoured.
MD is now Happy Whale.

Ishmael floats on Queequeg's coffin on a very uninviting cold grey sea. (This will mean more to you who have read the book or seen the movie than it did to me.)

With the exception of unlucky Dave, we were actually very fortunate and finally managed to slay the fearsome beast. This was partly because his random movement dice failed to make him dive, partly because Nick O made some monstrous damage rolls.

Regardless of the outcome, it was a tremendously entertaining ride along the way. Apart from the game mechanics, the fun was enhanced considerably by our GM, Tom, in his Captain Ahab hat, adding atmosphere with anecdotes and excerpts from the book, and expatiating knowledgeably about 19th-century whaling.

Apparently the game was created by another gentleman whose name I don't know but would love to credit, and who ran it for years at conventions. Tom played it, loved it, and with its creator's permission codified it and now presents it himself. All the models are Tom's work (can't tell you the manufacturers, sorry). We had a splendid time and I can definitely award Tom the HQGE.


Monday, 30 June 2025

Bash Day goes West! BBB Bash Day VI

The Bloody Big BATTLES! convoy rumbles on. For the sixth incarnation of our annual BBB mini-convention, "Bash Day", we parked our wagons and la(a)gered up at a charming pub in the West Country, the Tudor Arms at Slimbridge.

Photo taken from the pub website

We chose this location because it is Alan Millicheap's home turf. Alan has been a staunch friend of BBB since its early days. As well as creating scenarios and posting nice game reports on his Two Marshals blog, he has done our community great service by establishing the BBB Facebook page, which now has 1,200 members. It was therefore really nice to recognise his contribution by having him host BBB Bash Day VI, ably assisted by Bruce who handled all the logistics of arranging games and booking in players, etc.

This was a little more out of the way than previous Bash Days. Nonetheless, 15 or so of us convened for a day's gaming. Nobody crossed the Atlantic for it this time, but some of our intrepid gamers did undertake a six-hour round trip to join us. This, plus the fact that they and most of the rest were repeat attendees, is already a tribute to Bash Day's status as a High Quality Gaming Experience.

The high quality started with the venue. We had the use of the pub's skittle alley, a spacious function room that had no trouble accommodating us around four game tables. As well as the obvious advantage of access to beverages all day, it served very decent victuals for lunch, and even provided lodging for some of our party who made a weekend of it.

The high quality continued with the four games. These provided a mix of the classic and the obscure; the massive battle and the small skirmish; the intense clash and the multi-day operation; gorgeous 28mm and mass-effect 10mm and 6mm. Specifically:
- Magenta (1859): French vs Austrians in the 2nd Italian War of Independence;
- Chattanooga (1863): the besieged Union army breaks out to storm Confederate siege lines on Lookout Mountain and then Missionary Ridge;
- Spicheren (1870): one of the opening engagements of the Franco-Prussian War;
- 'Ndondakusuka (1856): 2nd Zulu Civil War. (No, I hadn't heard of it either.) Zulus vs Zulus in a battle where the real winners were the crocodiles.

To give readers a break from my non-descript Midlands accent, I invited our gamemasters to provide the following brief reports.

===

Magenta (1859) - report by Rodge

On Al Millicheap’s beautiful purpose-made terrain we played Chris’s Magenta scenario.

It’s a very good scenario and to stand a fighting chance the Austrian passive, fragile, trained and raw troops need the mainly veteran, aggressive French to throw iffy dice; they didn’t.

The Austrians conceded turn 8 (of 9) with 2 of the 3 objectives taken and Magenta about to fall.

Alan's lovely Pendraken 10mm armies.
Not sure how wise it is to keep the French and the Austrians in the same box ...

The French in the foreground are trying to force their way across the Austrian-held canal. To make things easier, half the French force has outflanked the Austrian line and is pouring down from the left. Can they take the two main bridges and the town of Magenta (top centre)?

Austrian columns wind ponderously across the Italian plain.
Will they stiffen the line enough and in time to repel the French onslaught?
So good to see Alan's custom terrain for this battle in action again.

Elite French troops converge on the Austrians defending the vital bridges at Pontenuovo.

View from the Austrian side as the French assault goes in.


===


Chattanooga (1863) - report by GM Crispin

This was the third outing of this scenario. A large Union army has 2 days (9 turns and a night interval) to clear the heights surrounding Chattanooga of the smaller dug-in Confederate forces. On the previous two games (one a draw, one Rebel win) the Union army had managed to clear Lookout Mountain but struggled to make much impact on the long Missionary Ridge.

This time, the Union army (Chris and Anton) got off to a good start. Grant (Anton) stormed Lookout Mountain with 3 divisions and destroyed the defending Rebel unit by turn 5. On the other side of the battlefield Sherman(Chris)  led a 5 division attack on Tunnel Hill which by Turn 6 had effectively shot away Cleburn’s veteran divisions defending it. By Turn 6, when the 4 remaining Union divisions were released for their final assault, things were looking good for the Union with 5 objectives  - (enough for a draw) in the bag – they just needed to take 2 more VPs for a win……..The Confederates were, however, not so easily cowed. They continued to fight on tenaciously: Bragg (Bruce) rushed reinforcements to the North and East of Missionary Ridge to stubbornly repulse the advancing Union army in its track. Similarly in the centre of the battlefield, to the south of Chattanooga, David ably defended the Rossville Gap road exit, denying it to the Union army. So, by the game end on turn 9, with no more VP gained by the Union, a hard-fought draw was agreed!

Initial dispositions. Lookout Mountain is bottom left (Union assault force just out of shot to the left of it). Union main body holds Chattanooga in the centre, mostly not released until mid-battle. Sherman's force in the woods upper right is about to advance against the top end of Missionary Ridge. The coffee is an Americano, obviously. 

No blow-by-blow photo report this time. Let's take you almost to the end. Left of pic: Sherman has taken Billy Goat Hill at the extreme end of Missionary Ridge but been unable to advance any further. The Confederate division in the woods upper right will be driven back Spent, but the Union will run out of time to take the road junction objective (white counter by table edge upper right) or exploit onto Missionary Ridge.


===

Spicheren (1870) - report by GM Dave W

Our BBB big bash days are becoming a popular semi-regular event. Our latest adventure down to Sunny Gloucestershire proved no exception.

Choice of game for me was an early Franco-Prussian War sensation, Spicheren. Three players had chosen to participate in my game: Shaun, and husband and wife team, Bob and Sarah.

I arrived in plenty of time and got the game set up. Lesson no. 1: don’t choose a complicated terrain-heavy game in future!!

Initial set-up. The first Prussians have appeared bottom left of pic, ready to advance and seize as many white objective counters as they can.

The original idea was that Shaun would play the French while Bob and Sarah could scheme between them to pull off a Prussian victory. Shaun arrived 1st and as we were setting up chatting, I gave him a Prussian command and decided to split the happy couple up.

Bob was now the French commander, Frossard, and deployed his command accordingly. Shaun took the initial Prussian forces and the game commenced with some heavy aggressive Prussian attacks towards the two objectives in the Pfaffen woods and on the Rotherberg. These were manfully defended by the French, who were able to push the assaults back several times during Turns 1-3.

While this was happening, Sarah brought on the Turn 2 Prussians and started a steady methodical advance down the road towards Forbach. Shaun finally took his first two objectives by Turn 4 and had also manoeuvred his two-stand cavalry unit behind the French troops who were conducting a fighting withdrawal towards Spicheren itself.

By the end of Turn 4 the Prussian pressure was mounting, driving the French front line back out of Spicheren and causing Bob some concerns as more of his units became Spent. Sarah continued her drive down the road and had made the decision to bring on the Prussian 26th Bde on Turn 6, effectively in the rear of the French holding Forbach. At the midway point in the game it looked like the Prussians had it in the bag.

However, Bob retook and then lost Spicheren on Turns 5 and 6. Both sides' cavalry forces fought a series of assaults that resulted in both sides losing one base and fighting again - wipeout!!

On Turn 7, everything was ready for the stage-managed Prussian assaults on Forbach and Wendel, game over. However, the dice gods decided otherwise. The attack on Forbach rolled low on the manoeuvre roll and failed to close and the assault on Wendel was repulsed.

On Turn 8, the Prussians put everything against Wendel and finally got in. Prussian victory! - or was it? French phase, Turn 8: Bob stepped up to the challenge and his remaining 2-stand, Spent French infantry unit, within range of Spicheren, got back into it and withstood the Prussian defensive fire.  Outstanding. In true BBB fashion, a well deserved draw.

Such fun. Running games can be just as enjoyable as taking part, watching the game unfold and how the players interact. Looking forward to the next one.

The French confront the apparently inexorable Prussian advance on Stiring Wendel.

===


'Ndondakusuka (1856) - report by GM Bruce

Our fourth game was 'Ndondakusuka 1856, the bloodiest battle in Zulu history and the culmination of the Second Zulu Civil War. Prince Ceteswayo and his uSuthu faction fight to the death against Prince Mbuyazi and his iziGqoza for the right to be recognised as heir to King Mpande. This was an unusual BBB battle, as there was only one unit with firepower on the table, the adventurer John Dunn and his 200 rifle-armed African mercenaries. This meant an awful lot of Assaults, as Zulus went assegai to assegai in brutal combat, with casualties to match. Our uSuthu, Bob, Sarah & Anton launched their attack up the steep ridge in the middle in the pictures against the thin line of Crispin & Dave's iziGqoza, in an attempt to reach the civilians and cattle behind before they fled. Note the crocodile patrolling the far River Thukela in search of victims...

Initial set-up, viewed from behind the uSuthu start line. iziGqoza hold the opposite ridge line, cattle and civilians behind their right horn, John Dunn and his men anchoring their left. Note the salubrious surroundings of the Tudor Arms venue: pot plants, leather chairs and funky radiators.

Close-up of the cattle and civilians behind the iziGqoza line. 

The uSuthu attack sets off.

uSuthu breakthrough on the right pushes back Dunn's marksmen but is at the wrong end of the line to worry the civilians and cattle in the distance. All 28mm figures and terrain from Bruce's collection.
Mostly from Warlord; personalities from Empress; African rifles from North Star.

As the original players could not make it on the day, we played 'Ndondakusuka as a bonus in the afternoon, after the other games were finished. We got to Turn 8 out of 9, in an hour or so of manic combat, with the uSuthu having managed not quite enough slaughtering to win, so we called it a draw.

===


These were certainly impressive games. Most of all, though, I continue to be impressed by the good people who come to Bash Day. One participant said to me that this is a function of the nature of the rules and of the historical scenarios: Bash Day attracts smart and knowledgeable players who are interested in history and in exploring historical battles together, in a spirit of collaboration and shared enjoyment. Certainly that was the case (again) at Bash Day VI. My thanks and congratulations to Alan, Bruce, and all our GMs and players for their good company and an all-round excellent day.


Next Bash Day (for there surely will be another) is under discussion and we have some possible venues in mind already. However, if any of you out there would like to host one yourselves, please do get in touch.


Monday, 21 August 2023

From 2mm to 28mm, Malplaquet to Spion Kop, FB to YouTube!

It has been a bumper weekend, not for playing, but for observing the creativity and enthusiasm of other BBB players. In the space of a couple of days I saw reports from four different players on games covering four different conflicts spanning 200 years, using 2mm, 6mm and 28mm figures and terrain, and disseminated via Facebook, blogs, and even a YouTube video. Here they are:


Malplaquet (1709)

Matt Bradley has written and played a scenario for this, the last of Marlborough's 'Big Four'. On his 'Pushing Tin' blog you can see Matt's beautiful 6mm layout.


Dennewitz (1813)

This was David Lopez's first go at BBB and I'm pleased to see he says "really enjoyed the rules". He shared a nice set of photos on the BBB Facebook page. He used 6mm armies with 2mm terrain, including a lovely town and some convincingly forested forests.


Hatchie Bridge (1862)

Another Facebook report, this time from Michael Peccolo. He ran his own Hatchie Bridge scenario at Nashcon. Most BBB players use small-scale figures to fight large-scale battles. Michael used large 28mm figures to fight this small division-sized action. It looks good and it works!


Spion Kop (1900)

Finally, some Boer War action. Eric Elder has cut custom hills to reproduce the Spion Kop scenario battlefield faithfully. You can see his YouTube video about it here. Looking forward to the episode where he fights the battle!


I was actually a bit stunned to see all of these in rapid succession. I was struck by the quantity, the quality, and the range of games, figures and terrain on display. Each of them seems to me to meet the criteria I listed in my essay about the 'High Quality Gaming Experience' (one of my series of 'Reflections on Wargaming'). Those criteria are: The Terrain, The Troops, The Venue, The Rules, The Scenario, The Company. The terrain and troops all look great. Venue-wise, whether basement or garden room or gaming convention, all good. Naturally, I cannot praise the choice of ruleset highly enough. OK, I can't absolutely vouch for the scenarios as I've only played one of them, but it sounds as though they produced entertaining games; nor can I comment with any authority on the company, as I wasn't there to judge, but I'm sure all present were estimable characters and gallant gaming companions.

My compliments to Matt, David, Michael and Eric on their good work and my thanks to them for sharing it with us all.


Tuesday, 18 January 2022

In praise of loooong games

In my previous post I reflected on 'the luxury of time': spending all day on a game at a more sedate pace than the usual time-pressured Monday night at the club. Since then I have enjoyed an epic three-day wargaming weekend, prompting me to ruminate at more length on the virtues of such long games.

The three battles we fought merit reporting in their own right, so let me start by doing that. First up, some exotic oriental action: the Battle of Tai'erzhuang (1938) from the Second Sino-Japanese War. I do love the esoteric corners of history and, at least for parochial Brits like me, this certainly counts as one of those. I knew of the battle but knew little about it. CB introduced the game by describing the political and military background, the events leading up to it, the armies, their weapons and commanders.
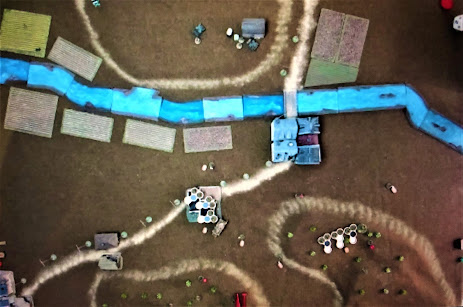
 Chinese defenders were hidden in and around Tai'erzhuang (the town by the river). The first few Japanese invaders have emerged from the northern pass (bottom centre) and taken position on the hill above the town and in the village of Lan Ling.

This battle pitted two Japanese divisions against several times as many Chinese. CB 'bathtubbed' this, representing each division by a battalion, to turn it into a feasible scenario to fight with the O Group rules. No proxies today - he had painted up all the right troops and equipment. Some of the Chinese infantry had Chinese characters on their helmets. Japanese combat patrols were represented by standard-bearers flying the Rising Sun. As for the hardware, the Chinese had amphibious tankettes and Vickers light tanks in gorgeous 4-colour camo, while the Japanese had a nifty Ki-10 biplane, clumsy Type 89 tanks and - pièce de résistance - an SS-Ki flamethrower tank.


How it looks on the ground. A Type 89 nestles next to Lan Ling. Opposing Combat Patrols face off in the central no-man's-land. Ki-10 biplane loiters in the distance.
 
A couple of technical factors slowed the game down. This was only our second or third go with O Group, so unfamiliarity with the rules played a part. O Group is a one-activation-at-a-time set with provision for reactions by the non-phasing player, so really only one thing can happen on the table at a time. In any case, we were playing remotely with players in several locations, which necessarily hinders implementing multiple parallel actions. Consequently, after nine hours of play, the second Chinese battalion had arrived and was heavily engaged, but the second Japanese battalion was not even on the table yet. My first Japanese battalion was pretty much fought to a standstill and had no prospect of mounting any significant attack on the main objective, Tai'erzhuang.
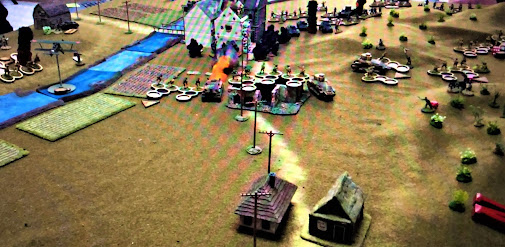
 

Climax of the action. My SS-Ki does a terrifying 'warm-up act', wiping out a Chinese infantry company and their infantry gun dug in east of Tai'erzhuang. Plumes of smoke mark the devastation wrought by Japanese air strikes on Chinese columns in the open.
 
Regular readers might now be expecting me to whinge about playing only half a battle in the time in which we could have completed two BBB games. However, this was one of those that was more about the journey than the destination. The ruleset presented us with plenty of tricky tactical choices each turn - there were always more things we wanted to do than there were command points with which to do them. A patient and careful build-up and low-level initial skirmishing ratcheted up the tension as we fed more and more troops into the line. Then, when both sides went on the full attack - the Chinese reinforcements counterattacking from the west of the town while I sent in the flame tank and friends on the east - there was an explosive frenzy of firing dice, saving rolls, and accompanying groans of dismay or whoops of delight.

***

On to day two. This was supposed to be Waterloo, but a COVID-afflicted GM meant a hasty reshuffle of the schedule. Instead, I laid on a small BBB Hungary 1848 battle, Nagysalló. This is one of my mate Dave W's favourite scenarios and is the one I wrote up for Miniature Wargames in 2017. For background on the battle situation, see a previous AAR here.
 
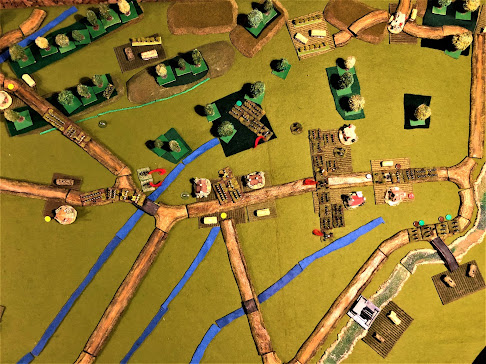
Set-up positions: Austrians in the central village with two more brigades approaching along the roads from the left (south); Hungarians lined up ready to storm the village, with reserves behind them waiting to be unleashed to exploit success.

This is a small battle with about half a dozen units a side and lasting just eight turns. Face to face, with regular BBB players, we would rattle this off in two hours comfortably. Playing remotely, with rules-rusty players and no time pressure, we took all day. As Scott and CB knew nothing about the Hungarian War of Independence, I spent the first hour and a half just giving an outline of the course of the war, a more detailed account of the Spring Campaign in which this was the penultimate battle, and various discursions about commanders, armies, tactics, and situating the war in C19-C20 politics and history: the 1867 Compromise and 'hyphenation' of the Austro-Hungarian Empire, the 50 'golden years' that followed until WWI, the patchwork of ethnic conflicts across eastern Europe ... 
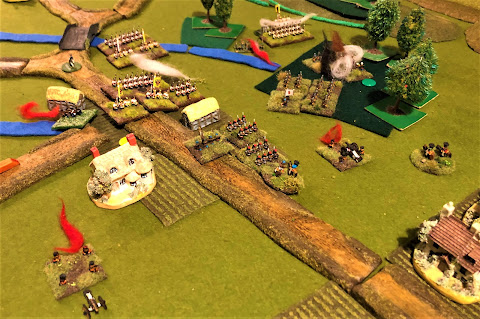
Major punch-up in the centre. The Polish Legion's red czapkas are about to assault disrupted Austrians unsuccessfully. In the woods, Dessewffy's hapless division has accumulated all the possible medals - white fluff = disrupted, black = spent, brown = low ammo, to add to the green counter for being fragile.

Once we got into the game, it was patient stuff. With small numbers of troops, every decision becomes important and every die roll matters. The guys mulled over their options. I lent advice from a rules perspective. When it came to combat, I have the charts in my head and could have resolved it for them in seconds, but they wanted to work through the calculations themselves, which obviously took longer.

As far as the course of the game was concerned, luck was against the Hungarians. The Austrians scored a couple of deadly hits with very high die rolls early on, which has a big impact in a small game. This was compounded by CB being less than fortunate with his reinforcement rolls, only getting one reinforcement into action before we finished. By contrast, Scott got exactly the right unit he needed (his cavalry) at exactly the right time to thwart CB's left hook that could otherwise easily have taken two unguarded objectives to achieve a draw. The end result was therefore a Hungarian defeat.

***

Game one was fought using Discord and game two via Zoom. For game three, Scott's naval battle, I had to have three laptops open: one on Discord, one on Roll20 (which allows hidden movement) and one just for all the charts and documentation.

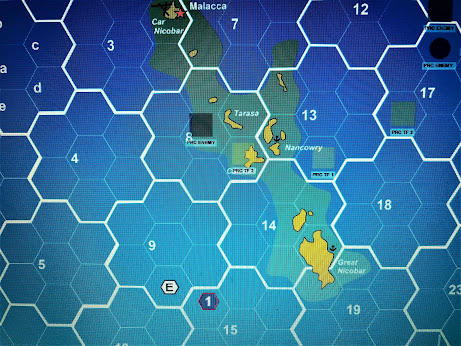
Potential conflict zone: the Nicobar Islands. Grey boxes 'PRC TF' are my Chinese naval task forces; 'PRC Enemy' is detected opposition; the small hexagons E and 1 are neutrals.

Naval really isn't my thing. I don't do boats. My major objections are that absence of terrain makes tactical decisions much less complex and interesting, so they are essentially a dicefest, and that all the most interesting decisions happen at the campaign level rather than on the tactical tabletop. Scott's scenario addressed these objections most satisfactorily. We had terrain: the Nicobar Islands, over on the eastern edge of the Indian Ocean, where Thailand and Malaysia and Indonesia meet, near the Strait of Malacca. (Did you know the Nicobars were a Danish possession until they were sold to Britain in 1868? I didn't before this game.) The 'terrain' also included neutral vessels of various kinds, from cruise liners to freighters to a Russian spy trawler and a US warship. It was a campaign situation rather than a straight fight, an imaginary diplomatic confrontation between India (which administers the Nicobars these days) and China. Rob and I were on the Chinese side - him running the subs, me running the surface ships - trying to recover or, failing that, destroy a Chinese spy trawler that had gone missing among the islands. CB played the Indian navy, which of course turned out to have seized it, so the chilly diplomacy went hot.
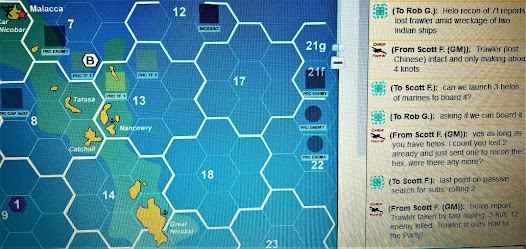
Roll20 has a chat/whisper function that lets you talk to all players or just to the one you specify. As the exchange on right of screenshot shows, this was the point in the game where the Chinese marines had just choppered in and recaptured the trawler - but it wasn't over yet ...
 
The rules were from the venerable Task Force board wargame published over 40 years ago. Modern naval warfare is utterly technical, but TF makes this hideously complex business manageably simple enough to play. Of course, understanding your combat units' capabilities is still important, eg knowing which missiles have 2-hex range rather than 9. When matters came to a head and we were having to decide how many missiles to launch in each wave, and which vector they should arrive on, we needed a lot of handholding and walkthrough-talkthrough from our gamemaster. But that worked OK.

Anyway, most of the game was spent not shooting but just trying to find each other and not sink any neutrals by accident. The search rules are clever: an approximate detection tells you there is something in a 7-hex 'megahex', a significantly better die roll can tell you exactly where and what it is, and there is also the chance of a false report on a duff roll. Roll20 did a great job of the hidden movement and fog of war.

There were effectively four players: Indian, Chinese surface, Chinese subs, and neutrals, each with 3 or 4 task forces or commands. The player order varied randomly each turn. Each player activates a TF in turn until all have activated. Each TF rolls a die to see how many action points it gets, using these to move, fire, search, etc. Again, regular readers might expect me to complain here about only getting a quarter of the game. However, I found I had quite a lot to do, exchanging messages with Rob to report my locations and consult him about what we should do next, or responding to the GM asking me whether I wanted to shoot down a passing Indian helicopter. It was thoroughly absorbing. I wasn't able to stay right to the end, but we did manage to have a couple of reciprocal helicopter assaults on the trawler and a skirmish for control of it, before it was sunk in the subsequent major missile exchange.

***

Reflections

Thus, after three marathon nine-hour remote online gaming sessions we had finished one game (the small BBB battle), sort of mostly finished another (the naval campaign) and half-finished another (the Sino-Japanese battle). But even though two of the three were inconclusive, I was left happy and satisfied and feeling this had been time well spent. Here are some of the reasons why, reasons which can be offered in praise of long games:

Learn more history! It was valuable having the time for full introductions to explain the historical context of the games. For many of us, learning about the history is a major part of the hobby, so acquiring this new knowledge was worthwhile in itself. Understanding the context also made the games themselves richer and more engaging.

Better aesthetics! For such a major event, GMs put extra effort into the troops and terrain and making the table look good. Even I broke out my nice Timecast roads instead of the functional felt ones. We took time out to admire each other's handiwork. CB's beautiful models were held up to the camera. I showed the guys Colin's handcrafted ship-mill.

More thoughtful play! We had the time to read scenario briefings thoroughly, to examine the situation from all angles, to consider our options and work out (hopefully) good plans. As the battle developed, we had the time to ponder before making decisions. (Except when CB's Indian admiral - an inspired creation - was telling us our Chinese helicopters had 30 seconds to turn away from Indian airspace or be shot down.) While there is something to be said for the Monday night adrenalin of having to crack on and make quick decisions, there is also something to be said for respecting and appreciating a finely crafted scenario, and for being able to engage in preliminary manoeuvring and preparatory fires, and for not having to launch a massed charge just because it is 9:30 and people want to finish in time to get to the pub.

It's about the journey, not the destination! In my usual BBB games the result does matter, and often much of the reward and excitement comes from the rush towards a tight finish. But in these epic games, although of course we were all trying to win, the fun was in all the decisions and incidents and episodes along the way. The Japanese flame tank's attack will live long in the memory, as will Scott's reportage of the skirmish on the trawler, and the Indian admiral's protestations at 'perilous and precarious' Chinese incursions.

Good times with good friends! Sometimes on a Monday night we are so efficiently focused on the game that the small talk is limited to a brief hello-how-are-ya at the start and a rushed goodbye at the end. In these long sessions with friends thousands of miles away there was time for interludes to freshen and empty glasses together, catch up on each others' real lives and families and mutual friends, and talk about things other than games. And good friends are even more important than good games.

On which note: until the next time, my good friends!

Thursday, 7 October 2021

Sherlock Holmes and the Wicker Man

And now for something completely different ... as if our recent post-apocalyptic diversion into the Gaslands were not fantastical enough, this week Bruce's talented pen brought us some alternative Victorian SF/Fantasy in the form of his scenario for 'Sherlock Holmes and the Wicker Man'. I trust I don't really need to introduce the eminent detective, Holmes, but some readers may not be familiar with the classic horror movie, The Wicker Man. The film is about a Scottish isle whose inhabitants still cleave to old pagan ways, including the occasional human sacrifice to ensure rich harvests. In Bruce's spin on the plot, Sherlock Holmes is on the island in disguise, investigating the islanders' misdeeds, and summons his sidekick Dr Watson urgently, who arrives with five policemen. These valiant few have to sneak/fight their way past/through Lord Summerisle and assorted henchmen and villagers to rescue a captive from being burned in the giant wicker man.

Bruce's time in lockdown was not entirely wasted. His brush is as talented as his pen and he unfurled a splendid layout for our eyes to feast on. The ruleset was Osprey's "A Fistful of Kung Fu", which apparently uses the engine from the "Song of Blades and Heroes". SBH I was faintly aware of, AFKF I had never heard of, the rules engine I had never encountered but a jolly clever one it is. The basic mechanisms were easy to grasp; we learned their tactical subtleties as we went along.

Mark J and I found ourselves on the side of the old gods and their Hebridean worshippers. Dave T and Nigel were the forces of law and order and civilisation. I'll let the photos tell the story.

The magnificent Wicker Man complete with hapless 28mm maiden trapped inside him and bonfire piled up around him, cultist poised to light it. The Wicker Man is well over a foot tall.

The table seen from the point of view of Watson and the approaching bobbies. They had to get through the wood or orchard, past a couple of dozy cultist sentries. All the other enemies were busy with their pagan ceremony until the alarm was raised.

Some of the islanders. Could that master of disguise, Sherlock Holmes, be one of these? That one on the left looks dubious. Fine paintwork by Bruce.

Lord Summerisle conducts his pagan ritual, backed up by a cultist, his alluring sidekick Willow, and one of his three gamekeepers, oblivious to the policemen sneaking through the trees behind them ...

A big punch-up ensued around the central wagon. Watson perished there, as did a couple of coppers. Willow was wounded but got away, luring a policeman after her.

Holmes is revealed! He could easily despatch those two villagers, but he has more urgent business to attend to. He dashes towards the Wicker Man! He strikes Lord Summerisle to the ground! He scales the ladder and unties the damsel in distress! But ...


... a welcome committee gathers at the foot of the ladder as flames begin licking up the Wicker Man's timber shins. All the police have fallen or scattered. Only the dastardly Summerisle and his cohorts remain. Holmes's chances of survival look remote ...

Thus the game ended in a triumph for the forces of evil, and Conan Doyle will have to either start writing about a new character or resort to penning prequels. There will be a bumper harvest on Summerisle this year.

This was splendid good fun. From my (evil) side of the table it did seem like too hard a job for the goodies, so maybe Bruce will tweak it a bit before its next outing. (For another outing there must surely be - too much work has gone into the Wicker Man not to use him again!) But the game was at least as much about the journey as the destination, and a thoroughly entertaining ride it was. Bravo, Bruce!

Thursday, 14 January 2021

"Ah, Vienna!": Schwechat (1848)

This was the second battle in our Hungary 1848 campaign: Schwechat. Historically, it's an unusual situation that makes for a different tabletop challenge. The Hungarians had kicked out an invading Croat army. Rather than retreat to Croatia, the Croats had headed for Vienna to join the imperial army gathering there. Meanwhile, the city of Vienna had risen in revolt against the Kaiser. The Hungarian army was a rather ragged mix of line troops, newly-raised honveds, and scythe-armed national guards; and it was divided between those who wanted to help the Viennese revolutionaries and those who thought it wrong or unwise to invade Austria and turn Hungary's self-defense action into outright rebellion. A false alarm during the night before the battle generated a wild goose chase night march for part of the army, which made it even more fatigued and frustrated. It therefore failed to breach the Croat line at Schwechat and was then routed when reinforcements arrived from the imperial forces besieging Vienna. The revolutionaries did not join in.


Balloon-basket view of the Schwechat battlefield: 6mm figures seen from a distance through a laptop camera, thus creating very realistic fog of war ... the roads are the Hungarians' axis of advance, with Vienna off-table top right; the Hungarian armed paddlesteamer Meszaros on the Danube bottom right; Croats are defending the line of the Kalter Gang river. Schwechat is where the roads cross the river. Hungarian massed guns on the hill in the centre, supported by scythe-armed rabble.

This is a tricky situation to represent in a scenario. My first effort didn't really work, as I reported back in 2016 (complete with Hungarian poetry). I revised the scenario after the playtest back then; I reviewed it again and refined it further before our game this time. The distinctive ingredient is the rate at which reinforcements become available to the Austro-Croat defenders. The Austrian players can choose which of the available reinforcements to commit to action and when. This in turn affects a Hungarian decision about when to see if the Viennese will attempt a sortie; they only get one shot at this, and the more troops the Austrians have withdrawn from the besieging force, the greater the chance of a sortie.

I'm pleased to say this generated a cracking game for my four remote players plus two interested observers. As for the previous battle, Pakozd, we just used simple online meeting software and my laptop camera. Once all the players turned off their own video feeds so the battlefield filled the screen, this worked OK. A serendipitous factor helped. Although Schwechat was fought in October, I set it up as a snowy battlefield, using hedges dotted around the hills to outline them. The dark troop blocks and terrain features were very easy for the players to see against the white background and compensated to a degree for the somewhat distant and fuzzy panorama view. Usually in our multi-player BBB games things happen in parallel, as the players on one side can all carry out their moves at the same time. For the remote game, of course, we had to operate in sequence as I had to move all the troops. (The players got to roll their own dice, though - we're a trusting lot.) This necessarily made the game take a bit longer but we still finished it in an evening. And I got my 10,000 steps of exercise by running round the table.

The Hungarians attacked with a very clear plan. They raced forward, daring the Austrians to come out and attack their march columns (they didn't), then setting up a grand battery on the hill on their centre-right. Consequently their left was largely unprotected, inviting the Austrians to attempt a right hook against the objectives on the vulnerable Hungarian line of communications. The Austrians did venture their cavalry forward vaguely in this direction, but seemed unsure about what they were trying to achieve. As a result, one of their two potent cavalry brigades wandered into range of the massed Hungarian guns, got pinned down, and was duly wiped out. The other could still have got around to the Hungarian rear but opted not to, so it was eventually driven back and held off by superior numbers of hussars.

While the Austrian right hook was being rebuffed, the Hungarian attack on the Austrian left was having little more success. The honveds seemed reluctant to assault the Grenzers defending Mannswoerth; they pushed into the gap between Mannswoerth and Schwechat, but were repulsed with heavy losses.

This relative stalemate took us to turn 7 out of 8. The Hungarians had inflicted significant casualties on the Austrians, but had yet to take an objective, so were behind on points and time was running out. Meanwhile, several brigades had been released from the imperial siege lines, including their crack grenadiers, more cavalry and several batteries. Turn 7 was crucial and exciting: the Hungarians finally stormed Mannswoerth and also took Zwoelfaxing, another of the strongpoints in the Austrian defensive line. The Austrians were in a good position to retake the latter, but the dice were unkind and their counterattack could not go the extra yard. They had also miscalculated concerning their reinforcements: they committed several regiments, but too late for them to actually reach the places where they were needed. However, this emboldened the Viennese, who drove the last nail into the Austrian coffin on the final turn by surging out of Vienna in force and seizing another objective at Simmering.

Reflections, then (taking my cue this time from Steve J's excellent format for his Wargaming Addict AARs):

- The remote format worked when scaled up to four players. More than that would probably be too many, but having four (and a couple of observers) made it an even more convivial social occasion than the previous 2-player game, very jolly indeed. We spent a good half-hour at the half-time drinks interval just nattering.

- The white battlefield was very helpful and I may well use it again, regardless of whether it was actually snow-covered historically. A north pointer could be useful for next time as some players got confused when giving directions. ("Northeast, I mean southeast. Left a bit. No, the other left ...") Need to give some thought to how to help distinguish units at a distance: big coloured counters? Use larger figures? (Dave W has 10mm armies which would be a bit more visible than my 6mm.)

- The Hungarians demonstrated the value of having a clear plan and sticking to it. The Austrians demonstrated the dangers of being indecisive and tentative and rolling bad dice.

- The scenario was very successful in producing a close and exciting game. The revised rule for Austrian reinforcement release and Viennese sortie worked well. (Draft version of the scenario in the BBB group files.)

- It's tricky for a scenario to capture how brittle the Hungarian army proved to be. The Hungarian players did a good job of letting their solid line troops do most of the fighting, shielding their extra-fragile honveds and national guard. Even so, and despite the sound Hungarian plan, by the end of the game their infantry was definitely running out of steam, so we figured the scenario is pitched about right.

- One of the guys said of the remote gaming under lockdown, "it's kinda like therapy" ... it was a brilliant fun evening.

Chronologically, the next major battle of the war was around Hermannstadt aka Nagyszeben aka Sibiu, which has since moved to Romania. Next stop Transylvania!

Tuesday, 8 September 2020

Wargames holiday hotel, Mayenne!

This summer I managed to overcome the challenges of lockdowns, travel restrictions and quarantines and enjoy an actual holiday. The proper kind: staying in a hotel, visiting museums and sights, dining out, even going to the pub. (And I'm still alive.)

The point of this blog post is not to enthuse about my holiday, but to report on a remarkable place that should be of interest to many wargamers reading this: L'Hotel de Hercé.


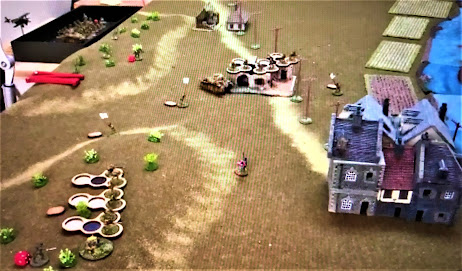
My German Kampfgruppe prepares to advance towards Matt's display cabinet. I do love a SiG33 150mm. It served me well in this battle. Note the funky turreted Kubelwagen.

L'Hotel de Hercé is a charming, boutique chambre d'hôte, in a former noble's mansion in Mayenne. That's about 120km from Caen-Ouistreham if you cross the Channel by ferry, or 375km or so from Calais if you Chunnel it. By plane and train, it's not far from Laval, which has a TGV line from Paris.

Its particular attraction for us wargamers is that it is run by one of our number. Matt is an Aussie who used to run a big wargames club in Canberra, but moved to France a couple of years ago and brought his huge collection with him. A key feature of L'Hotel de Hercé is that it has a spacious salon de guerre. Consequently Matt can offer guests a one-off wargame, or a game with associated battlefield tour, or a full-on wargames holiday. The focus is on local battles, hence Romans vs Gauls, Hundred Years War, Vendée Rebellion/Napoleonics, and WWII. (Also Le Mans, site of the final battle of the Franco-Prussian War, is not far away, so FPW is on Matt's to-do list as well.) Check out the hotel website to see the very comprehensive range of tours, games etc available.

As this year has been a bit of a drought for face-to-face gaming, Matt was kind enough to lay on a WWII battle for me with his very nice 20mm figures and terrain. We tossed a coin for sides and I got to command a German Kampfgruppe winkling some British paras out of a Normandy village. Wow, the battle brain was rusty! But the principles soon came back: maximum use of fire support, reconnaissance, one foot on the ground ... my spotting dice were kind, so my recce detected the first three para trip-wire units in their hedgerows and my artillery and MGs wiped them out for virtually no casualties. Once we got in amongst the buildings it got tougher, and the KG paid a suitable price in the end. Nevertheless, after such a good start it was a pretty efficient attack, and my Germans were victorious. The rules were the venerable Rapid Fire. Believe it or not, I'd never played these before, but they gave us a swift and enjoyable game.

Enough about the gaming. It is important that I should also say that L'Hotel de Hercé is very good for non-wargamers as well (wargamers' spouses, for instance). In fact, most of their guests are non-gamers, attracted by the hotel itself which is full of character, lavishly furnished, and an exceedingly pleasant place to kick back and relax. The town of Mayenne has some historic sights and is endowed with excellent restaurants. There are plenty of interesting places within day trip distance: the tank museum at Saumur, the Le Mans 24-Hour museum, the Machines de L'Ile in Nantes, Roman ruins at Jublains, medieval towns at Vitré and Sainte Suzanne ... Last but not least, Matt and Vanessa are fine hosts and great company (and excellent cooks - do accept the table d'hôte if offered). We are grateful to them for a terrific week and look forward to returning. I encourage you to consider a visit yourself.