Showing posts with label museum. Show all posts

Tuesday, 27 January 2026

Not so one-sided: Uclés (1809)

The impending BBB Peninsular War scenario book will include a lot of battles where the Spanish army fought alone, without its British or Portuguese allies. One of these was the battle of Uclés in 1809.

Before I launch into my report of our game of Uclés, I just want to smuggle in an honourable mention of the Royal Engineers museum in Gillingham. I did a day trip there at the weekend. It is an absolutely splendid place, stuffed full of unique and fascinating artifacts, and with a very decent AFV collection outside. Highly recommended. Two hours wasn't nearly enough to take it all in so I will have to go again. Here's just one pic to remember my visit by.


Now back to Spain. Sir John Moore's incursion had distracted Napoleon's attention and many of his troops to the north, leaving Madrid exposed. The Spanish Army of the Centre advanced on Madrid with Venegas's corps in the lead. Victor concentrated his forces against Venegas, who made a stand at Uclés, where he was enveloped and overwhelmed. He lost half his force; French casualties were negligible.

On the face of it, this looks very one-sided and unpromising as a game. (Though see my Reflections essay on "Wargaming one-sided wars".) However, when Mark examined it, he saw that it had potential. Specifically, the fact that the impassable River Bidija divides the battlefield into two presents both sides with decisions about how many troops to commit to which half - in effect, making it two-sided. And, as so often, of course an inevitable defeat in real-world terms can be turned into a fair contest in game terms by judicious setting of victory conditions.

Here's how it went for us, this time with some lovingly crafted labelled pics as well as the usual annotated photos. Reflections follow at the end.

Bird's-eye view of the battlefield, which is roughly 10km x 7km. This is a small battle by BBB standards: each base represents 300 men; each side has fewer than 50 bases, as they had under 15,000 men a side.

The Bidija bisects the battlefield and can only be crossed at Uclés or the bridge at the righthand (south) edge. Uclés nestles in the gap where the Bidija cuts a steep ridge into two: the Sierra del Pavo and the Cerro de Uclés. The Spanish main line sits on these ridges. An advance guard holds the village of Tribaldos. Venegas himself has his HQ atop the monastery in Uclés. Most of the French army arrives from the SW corner (bottom right of pic). On turns 7 & 8 of this 9-turn game, Ruffin's division will arrive behind the Spanish right flank.

Victory is determined by seven Objectives (white counters): Tribaldos; two for Uclés (one each if it is contested); one for each of the two ridges (held by whoever has most units on it); and one each for the Spanish army's two possible escape routes, either to the NW (near where Ruffin appears) or across the bridge to Rozalen. The French need four of these to draw and five or more to win.

The Spanish centre around Uclés. Dave W commanded the Spanish left in Uclés and on the Sierra del Pavo. I took the right on Cerro de Uclés, including our cavalry, and the advance guard. All figures are Baccus 6mm from Mark's collection. The pink cubes denoting 'Fragile' troops betray the quality difference between the two armies. Our Spanish army has a few good units but is a very mixed bag.

By contrast, most of the French are veteran, some of them Aggressive (green cubes), and some of their cavalry rated as Shock (purple counters), seen here enveloping Tribaldos on Turn 2. (Note the scratchbuilt church from the talented hand of Colin the Wargamer.)

I did contemplate abandoning Tribaldos immediately but we decided it was better to force the French to deploy and fight for it, which would cost us troops but them time. I was facing Will, while Crispin took the French right against Dave. The first French assault hit Tribaldos on Turn 2, Latour-Maubourg's heavy cavalry descending on my left flank while Pacthod's tirailleurs harried my white-coated defenders (two 3-base regiments). My lefthand regiment was forced out. The righthand one held on but suffered losses to musketry.

Meanwhile, some important action was going on in the top left corner of the above pic. On Turn 1, I had pushed our advance guard cavalry around Pacthod's right flank to pin or divert one of his regiments. When this turned against my cavalry, they evaded across the Bidija bridge. That obliged Puthod to fight his way across, instead of being able to race along the road in march column - more precious time expended.

Now we see the other side of the Bidija a turn later. The AG cavalry rallied and charged Puthod - a good call as they had a 50/50 chance of driving him back across the bridge to have to fight for it all over again - but it didn't come off. Puthod's lead regiment rallied in turn and here advances to drive the blown cavalry from the field (which will take another turn). This lets the rest of Puthod's brigade, led by some of Latour's dragoons, march rapidly to the eastern end of the Sierra del Pavo to avoid its steep slope. At left of pic, Dave's leftmost regiment is about to head down the ridge to confront them.

The fall of Tribaldos. Will commits Pacthod to support Latour's renewed assault. This is too much for my gallant defenders. The depleted regiment in the village is swept aside; the flood pours onto my veterans behind; they are driven back, then routed as well. Have they bought enough time, or will their sacrifice have been in vain?

About Turn 3, Dave and I made a major strategic decision. Tribaldos had held out as long as we'd hoped, but my cavalry's subsequent screening skirmishes along the stream behind it had not gone so well, nor had our other cavalry's delaying action at the Bidija bridge. Under pressure on both wings, we decided to abandon the west bank (the foreground) entirely and pull my right wing force into Uclés, freeing all of Dave's troops to fight for the Sierra del Pavo. This picture shows that plan being implemented. All my troops made it across the river except that two-base cavalry unit lower left, of which more later.

A close-up of my beautifully choreographed mass flamenco into Uclés. White-coated infantry, yellow-jacketed dragoons, sombre brown militia, light blue light infantry - it's a very pretty army.

View from behind the now rather abbreviated Spanish line with just a couple of turns to go. Dave's troops on our left are making valiant efforts to keep the French right wing at arm's length from Uclés, while our right in the town presents a formidable front against any French assault across the bridge there.

While all our left wing is disrupted by its exertions, the French right musters all its strength for one massed coordinated assault (good movement rolls compensating for an earlier turn when it was briefly paralysed). This proves irresistible and all three Spanish regiments are swept away.

Dave is left with just one regiment (lower left of pic) to cover the rear of my town defence. Will's best troops move up and form assault column. Their first attempt will be rebuffed but will cover the deployment of his guns in cannister range.

Once deployed, the guns delivered a devastating salvo that rendered my foremost regiment Spent. It did not survive the ensuing French assault on the final turn and is no longer visible in this picture. The other key to the French success was an infantry regiment joining in from the other side of town. It was able to bypass the defenders on the Sierra because they were busy fending off the rest of the French right wing.

Although we still had two Spanish regiments in Uclés, these were not enough to expel both the French units that had broken in. The town ended up contested, worth one Objective each. That gave the French a total of five, enough for victory. However ...

... remember that tiny fragile 2-base cavalry regiment I told you to pay attention to earlier? Here it is on Turn 7, backed up against the Bidija, about to be trapped between the force preparing to assault Uclés (top left) and Ruffin's arriving division (top right). The solution? My caballeros made a mad dash through the gap in front of them - and headed for Tribaldos.

Fortune favours the Fragile - they got the rolls they needed on Turns 7, 8 and 9, and Will's artillery was unable to stop them - they had just enough movement to leap into Tribaldos, on the French line of communications, retaking an Objective and salvaging a draw. Viva el rey! Viva españa!


Reflections

Battlefield geometry. It's a truism I've quoted before: the terrain shapes the battle. In this case, the distinctive terrain - the river bisecting the ridge and dividing the battlefield - definitely made it a distinctive and interesting game.

Last-turn drama. Mark was unsure whether the victory conditions were pitched right, but they turned out perfect. The luck of the dice seemed reasonably evenly distributed. It could hardly have produced a tighter or more dramatic finish, so let's call it good. Classic BBB.

Labelled photos are hard work (well, not so much hard, just time-consuming) so somebody had better say nice things about them if you want me to keep doing them in future reports.

Four playtests to go? Not of this scenario, but of the remaining ones to be polished before the Peninsular War collection is complete and ready for publication. (On which note, I should mention that BBB and its scenario books are now available in pdf as well as print.) Hoping to get the book out before mid-year ...


Saturday, 3 May 2025

Vitoria battlefield visit

Vitoria was the biggest battle of the Peninsular War. Roughly 80,000 Allied troops defeated some 60,000 French. A battle that size deserves to be wargamed, as we did last year (see here and scroll down), and a battlefield that important deserves to be visited, as I did last week.

I benefited considerably from Jonathan Jones's blog report of his own visit to Vitoria (thanks, JJ!). You can find that on his "JJ's Wargames" site, here. JJ focused mainly on the various contested bridges across the Zadorra. I took a different approach and hope that my report therefore complements JJ's nicely.

The Duke of Wellington's tea set! On display in the Álava Museum of Arms in Vitoria.

Our tour began with a visit to the Museo de Armería de Álava. Based on a personal collection, donated in the 1960s, then added to over the decades since, this museum has enough to keep you busy for a good 90 minutes to 2 hours. The ground floor is assorted arms and armour from prehistoric times through to the 18th century. The second floor is where the real excitement starts for us C19 enthusiasts, as most of it is devoted to the battle of Vitoria. Uniforms, weapons and equipment from the period, plus quite a lot of personal effects from notable personages (Wellington, Marshal Jourdan, General Murillo, etc). A grand relief map/diorama that is helpful for getting oriented prior to touring the battlefield, plus several dioramas with miniature figurines depicting various episodes. The second floor is rounded off with weapons from other parts of the world (Africa, Oceania, Japan, etc) and some Spanish uniforms and paraphernalia from the Carlist wars and more recent history.


Logistical notes: we found it convenient to park in the underground car park at Plaza Amárica. It's then less than a 10-minute walk to the museum. We hoped to have lunch at the nearby Casa de Napoleon. That was fully booked but we did very well at Asador Orio.

We decided the best place to see the battlefield from was the central knoll above Ariñez: the Cerro de Jundiz. (Viewpoint #5 on the map on this site.) We spent 45 minutes on a 3km round-trip hike up there and back and studying the battle from it. I took these three panoramic photos that cover about 90 degrees each, starting from the French left on the Puebla Heights, working across the front centre, then down the right to Vitoria itself and the French right rear beyond the city.

Panorama #1. The first Allied column under Hill debouched through the Puebla gap (the notch in the skyline at the right of the picture), then fought its way all along the skyline ridge (the Puebla Heights) to left of pic and beyond. 

Panorama #2. The first two French lines (Gazan and d'Erlon) were arrayed across the flat open ground here, with the Zadorra river covering their front and right. The second Allied column came through the village of Nanclares, nestled against the dark woods centre left. Wellington commanded from a knoll behind it. To the right of that, a higher light green patch is "Kempt's Hill" - high ground in a bend of the Zadorra that concealed an unguarded bridge at Tres Puentes, where Kempt's division got across and established a foothold. The rest of the column crossed there and at Nanclares and Villodas.

Panorama #3. (Not a great pic, sorry.) The third and fourth British columns arrived here: Dalhousie's (really Picton's, as Dalhousie was late) from Mendoza (the light-coloured tower near left edge); Graham's force all across the right half of the pic, tasked with cutting off the retreat, against various villages commanding crossings of the Zadorra near Vitoria. The city itself is visible near right edge of pic. In a nutshell: Picton showed good initiative and attacked at the right time to ensure the two French lines in the centre were effectively outflanked and driven back repeatedly; Graham was a little too cautious, so although he did eventually cut off the enemy's direct route back to France, the French army was able to escape by heading a bit further east towards Pamplona initially.

A lot of action also happened between the knoll and Vitoria, but that is all covered by industrial estates now, so I figured you didn't need a photo of that. Essentially it was just more of the same anyway - Allied lines driving back disordered French lines - really only notable for including the biggest artillery duel of the Peninsular War, when the Allies had to bring up 70+ guns to suppress a similar number of French cannon.

As noted above, the battle featured significant fights at a number of crossings of the Zadorra. We only visited this one, the Puente de Iruña at Tres Puentes. Consider it typical.

Our visit made clear just how big and sprawling a battle this was, and how remarkable it was that Wellington managed to pull off coordinating his four widely separated columns as well as he did. Apart from that, my major take-away from the trip and associated reading was how the fog of war hampered the French defence. While Wellington had full information (thanks to his spy network and the support of the local population), the French did not dare to send out scouts very far or in small patrols, as they would fall victim to Spanish guerrillas. Consequently, for a start, they didn't appreciate quite how outnumbered they actually were. Furthermore, they assumed Wellington would be approaching them more directly from the south and likely to threaten their left across the Puebla Heights, and did not expect his big left hook against their right rear. I'm talking with Mark Smith about how we can reflect this in his Vitoria scenario for the eventual BBB Peninsular War scenario book.

I hope my report will encourage some of you readers to enjoy a visit to Vitoria yourselves. If you do go, I hope what I've written here will be helpful. Buen viaje!


PS - First Carlist War
I tend to dismiss the First Carlist War. It seems to me to be disproportionately popular among wargamers. Obviously this is because the availability of beautiful 28mm Perry figures makes it attractive and gets it plenty of play in the glossy mags, but this protracted series of inconclusive skirmishes just doesn't feature enough substantial battles to pique my interest, even though I normally go for the exotic and off-beat. However, on this trip we did pass through one Carlist War battlefield: Ramales (1839). This seems to have been a big enough fight to inflict nearly 1,000 casualties on each side, so perhaps it merits attention. I was struck by the terrain here. Ramales is in a steep river valley, surrounded by the region's characteristic conical hills. How did they find enough room for a battle there? It would be a challenge for any wargamer's terrain collection! Perhaps I will take up that challenge at some point ...


Friday, 25 November 2022

Lisbon military museum

I have been travelling a bit lately. Downside: not much wargaming. Upside: I was in Lisbon and was able to visit the Lisbon military museum. According to the Lisbon Portugal Tourism Guide page about it, "maybe not too many people are interested in its theme, but no one leaves disappointed"! I'm interested ... and I wasn't disappointed.

The museum isn't organised chronologically but that doesn't mean this brief and far from exhaustive report can't be.

Pre-Napoleonic: quite a lot of morions and halberds and other stuff that goes ding-clang; not my period. I liked the very early artillery though.

Napoleonic: actually I expected even more, but there is still a very decent and substantial section on this.

C19 colonial: some interesting bits and pieces about this little-known (to a lot of us) historical chapter.

WWI: lots on this, about both the Portuguese expeditionary force on the western front and the colonial fronts. Very good.

C20 colonial: a poignant room devoted to this sombre period of colonial guerrilla wars.

Artillery: I believe the museum was once an artillery school and it has lots of cannon.

The museum's official website is part of the Portuguese Army website here.

For much fuller reports than my cursory effort above, and with lots of photos, see Bob Cordery's two reports from 2014 here and here.

Just four photos to give you a taste:

Not actually in the museum but on the way. One example of the many fine pieces of statuary with which Lisbon is endowed. This is the Marquis of Sa da Bandeira, a veteran of the Napoleonic Wars who fought in the Portuguese internal conflicts in the 1830s and subsequently served as prime minister.

A poor photo that doesn't do justice to the fine Peninsular War exhibit. Lots more weapons, equipment, paintings, and a relief map of the lines of Torres Vedras.

I'm sure we all know someone who could use a pistol like King Miguel's, with its corkscrew attachment. It has been suggested the twin bayonets mean it could be doubly useful at a barbecue, skewering sausages as well as opening bottles.

And finally: a French howitzer taken at Vitoria.


Sunday, 5 June 2022

Brittany: fortifications and museums

I took advantage of a week's holiday in Brittany to explore several centuries' worth of fortifications and museums. (See also my previous military museum raid on Brittany to St Cyr.) Most of this reconnaissance was done during day's tour of the Crozon peninsula along the Route des Fortifications. The Crozon tourism office provides a nice downloadable brochure here.

Captioned photos below give the details. In summary:

Wars of Religion: Pointe des Espagnols

C17: Tour Vauban

French Revolution/Napoleonics: coastal batteries and garrison towers; Musée Vendée Chouannerie; Phare d'Eckmühl

C19: Fort Kador; coastal batteries

WWI: 32cm gun

WWII: lots of coastal bunkers; Battle of the Atlantic museum; Lorient submarine pens.

(The photos are grouped by site rather than in any special chronological or geographical order, so if you're interested in one conflict or site in particular, sorry but you'll just have to search/scroll.)


The Pointe des Espagnols

Spanish Point commands the approaches to Brest. The placard below tells the story. In 1594 the Spanish landed; 400 of them fortified the place and defended it for a month against the Huguenots and their English allies. Subsequent centuries saw layers of batteries and fortifications added.

This massive piece of ordnance is a 32cm gun that was deployed here in the 1880s. During WWI it was used as a railway gun at the Somme. It fired so much, it wore out its rifling and was rebored to 34cm calibre!


Fort Kador

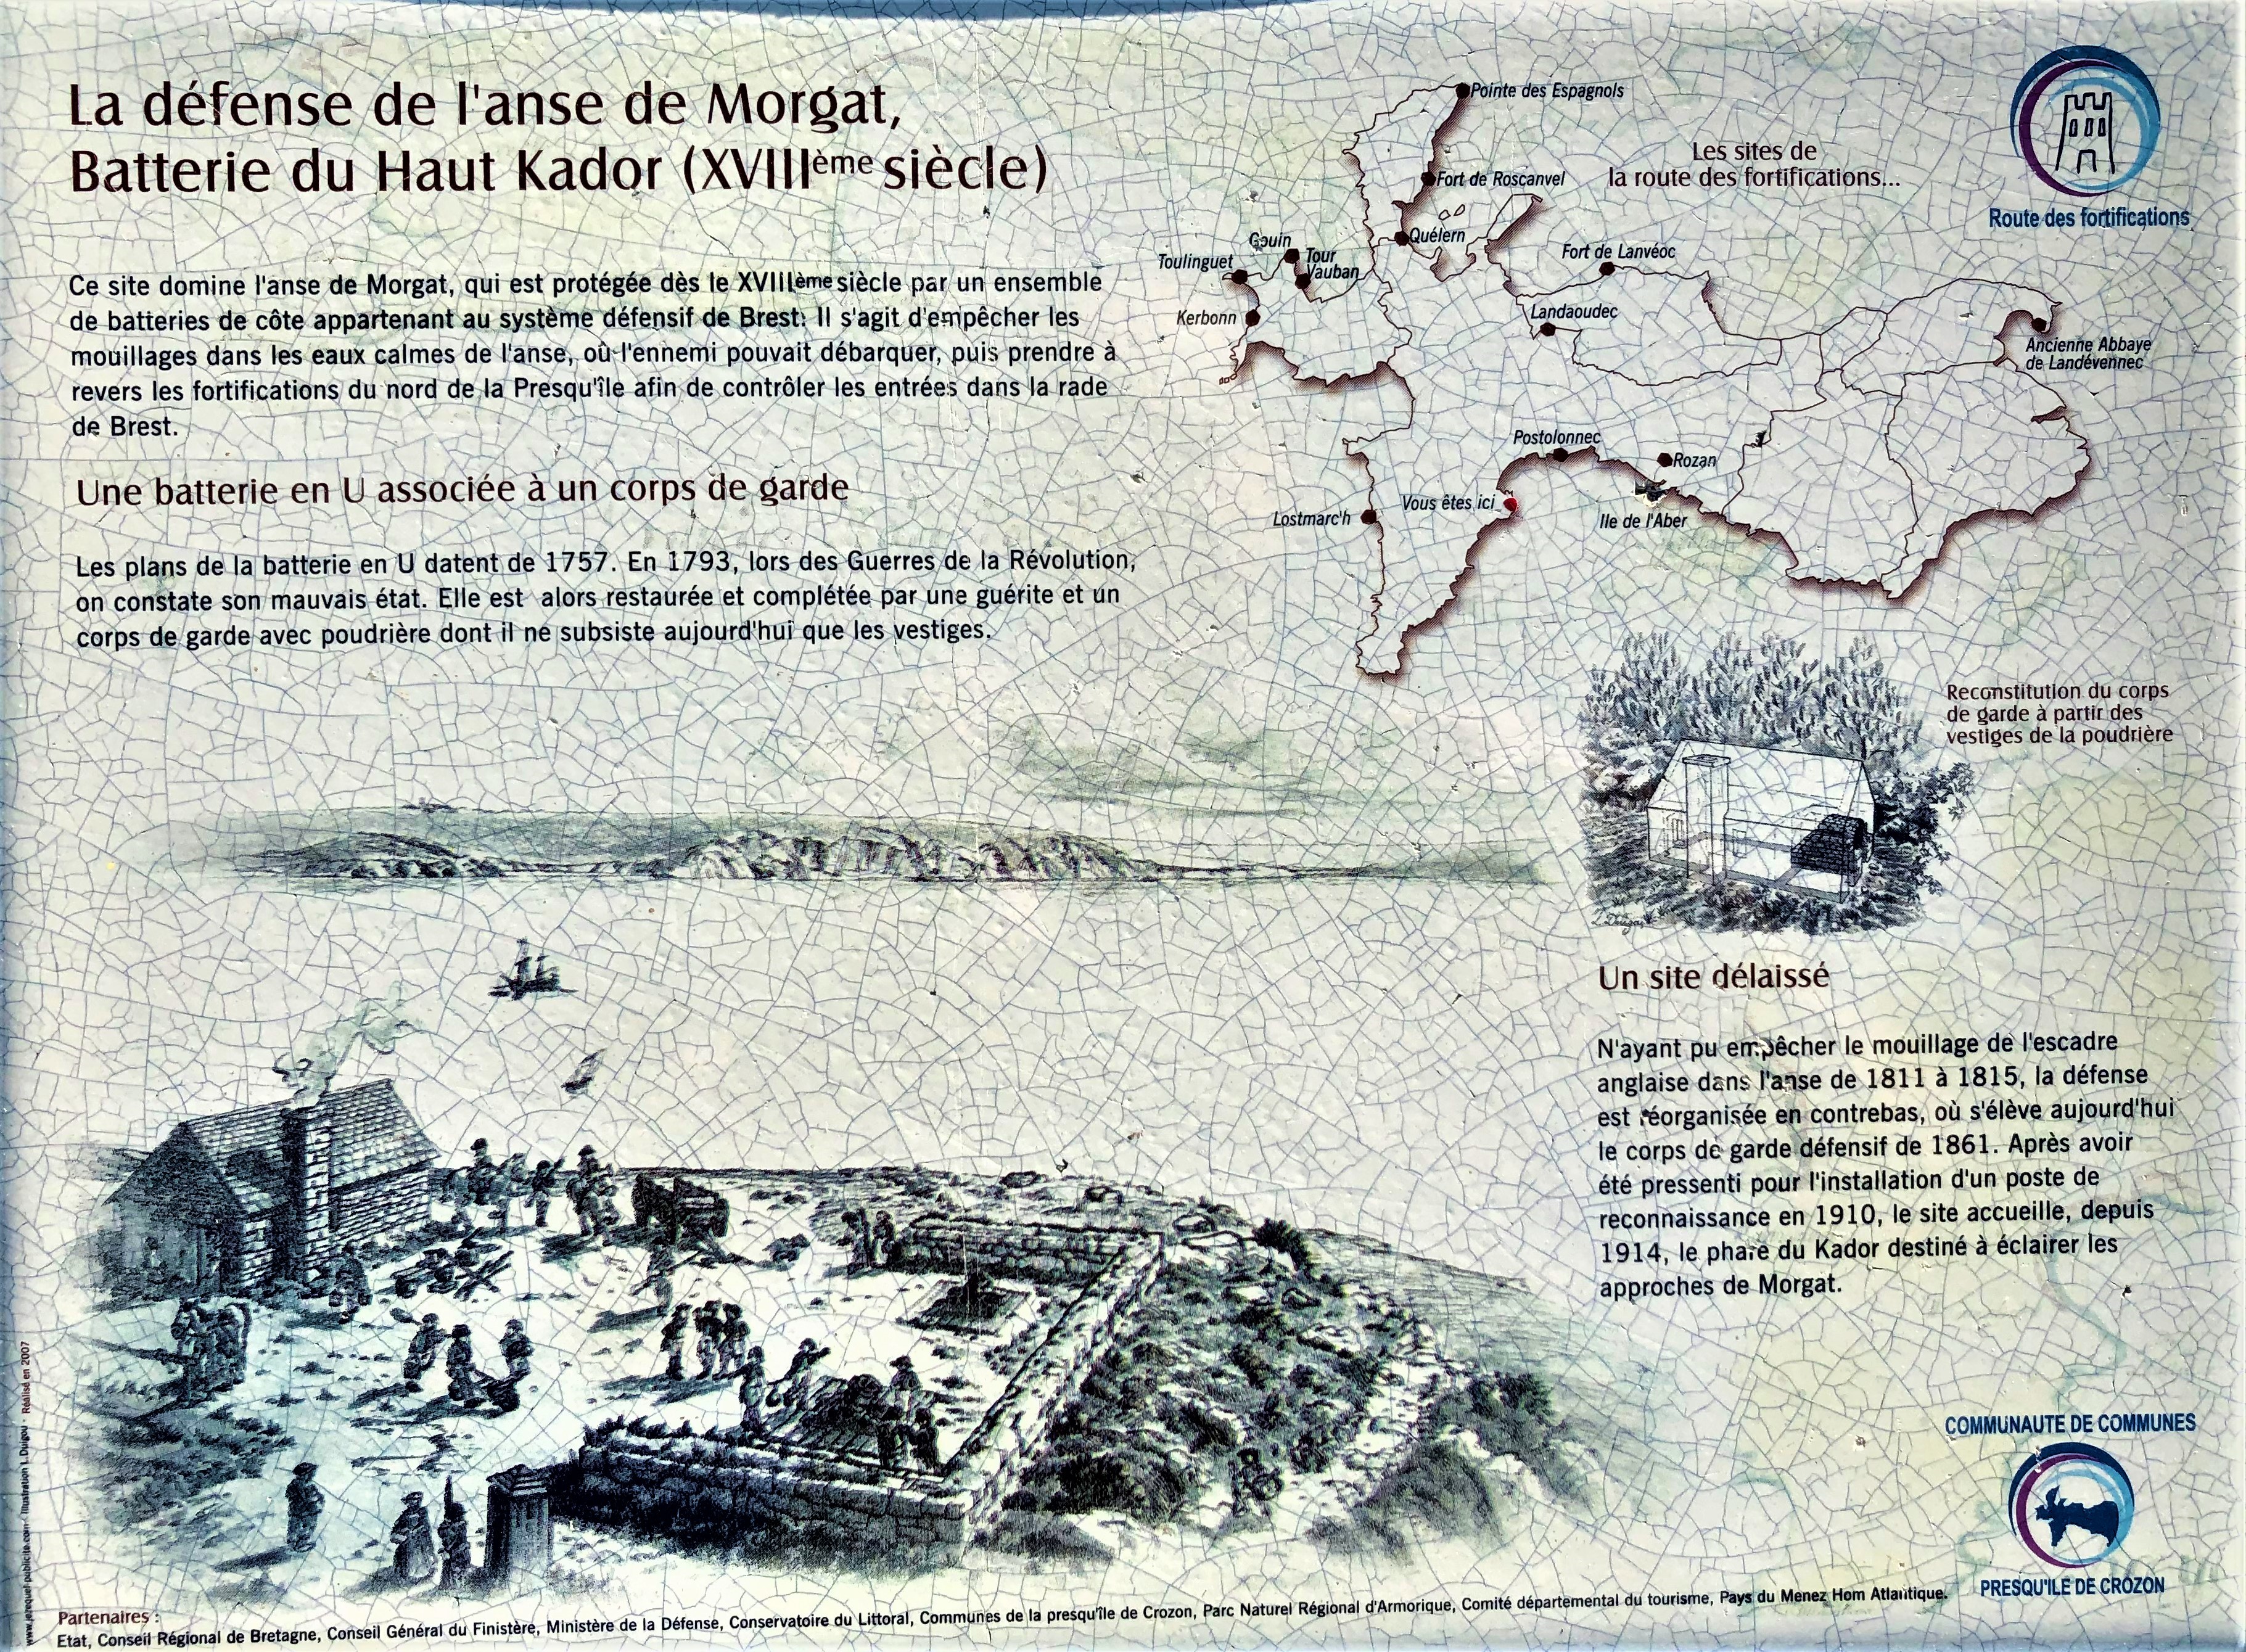
Morgat is the small port of Crozon on the south coast of the peninsula. In the mid-C19 a system of fortifications was built to defend it, including the upper and lower Kador batteries.


The upper battery actually dates back to the Seven Years War: a simple U-shaped mortar position supported by a garrison hut and powder magazine.

The battery (left of pic) - not much left to see!

... but the powder magazine is still there ...

... and so is this substantial casemate behind its earthen ramparts at the lower battery. This fortification now protects a bat colony.


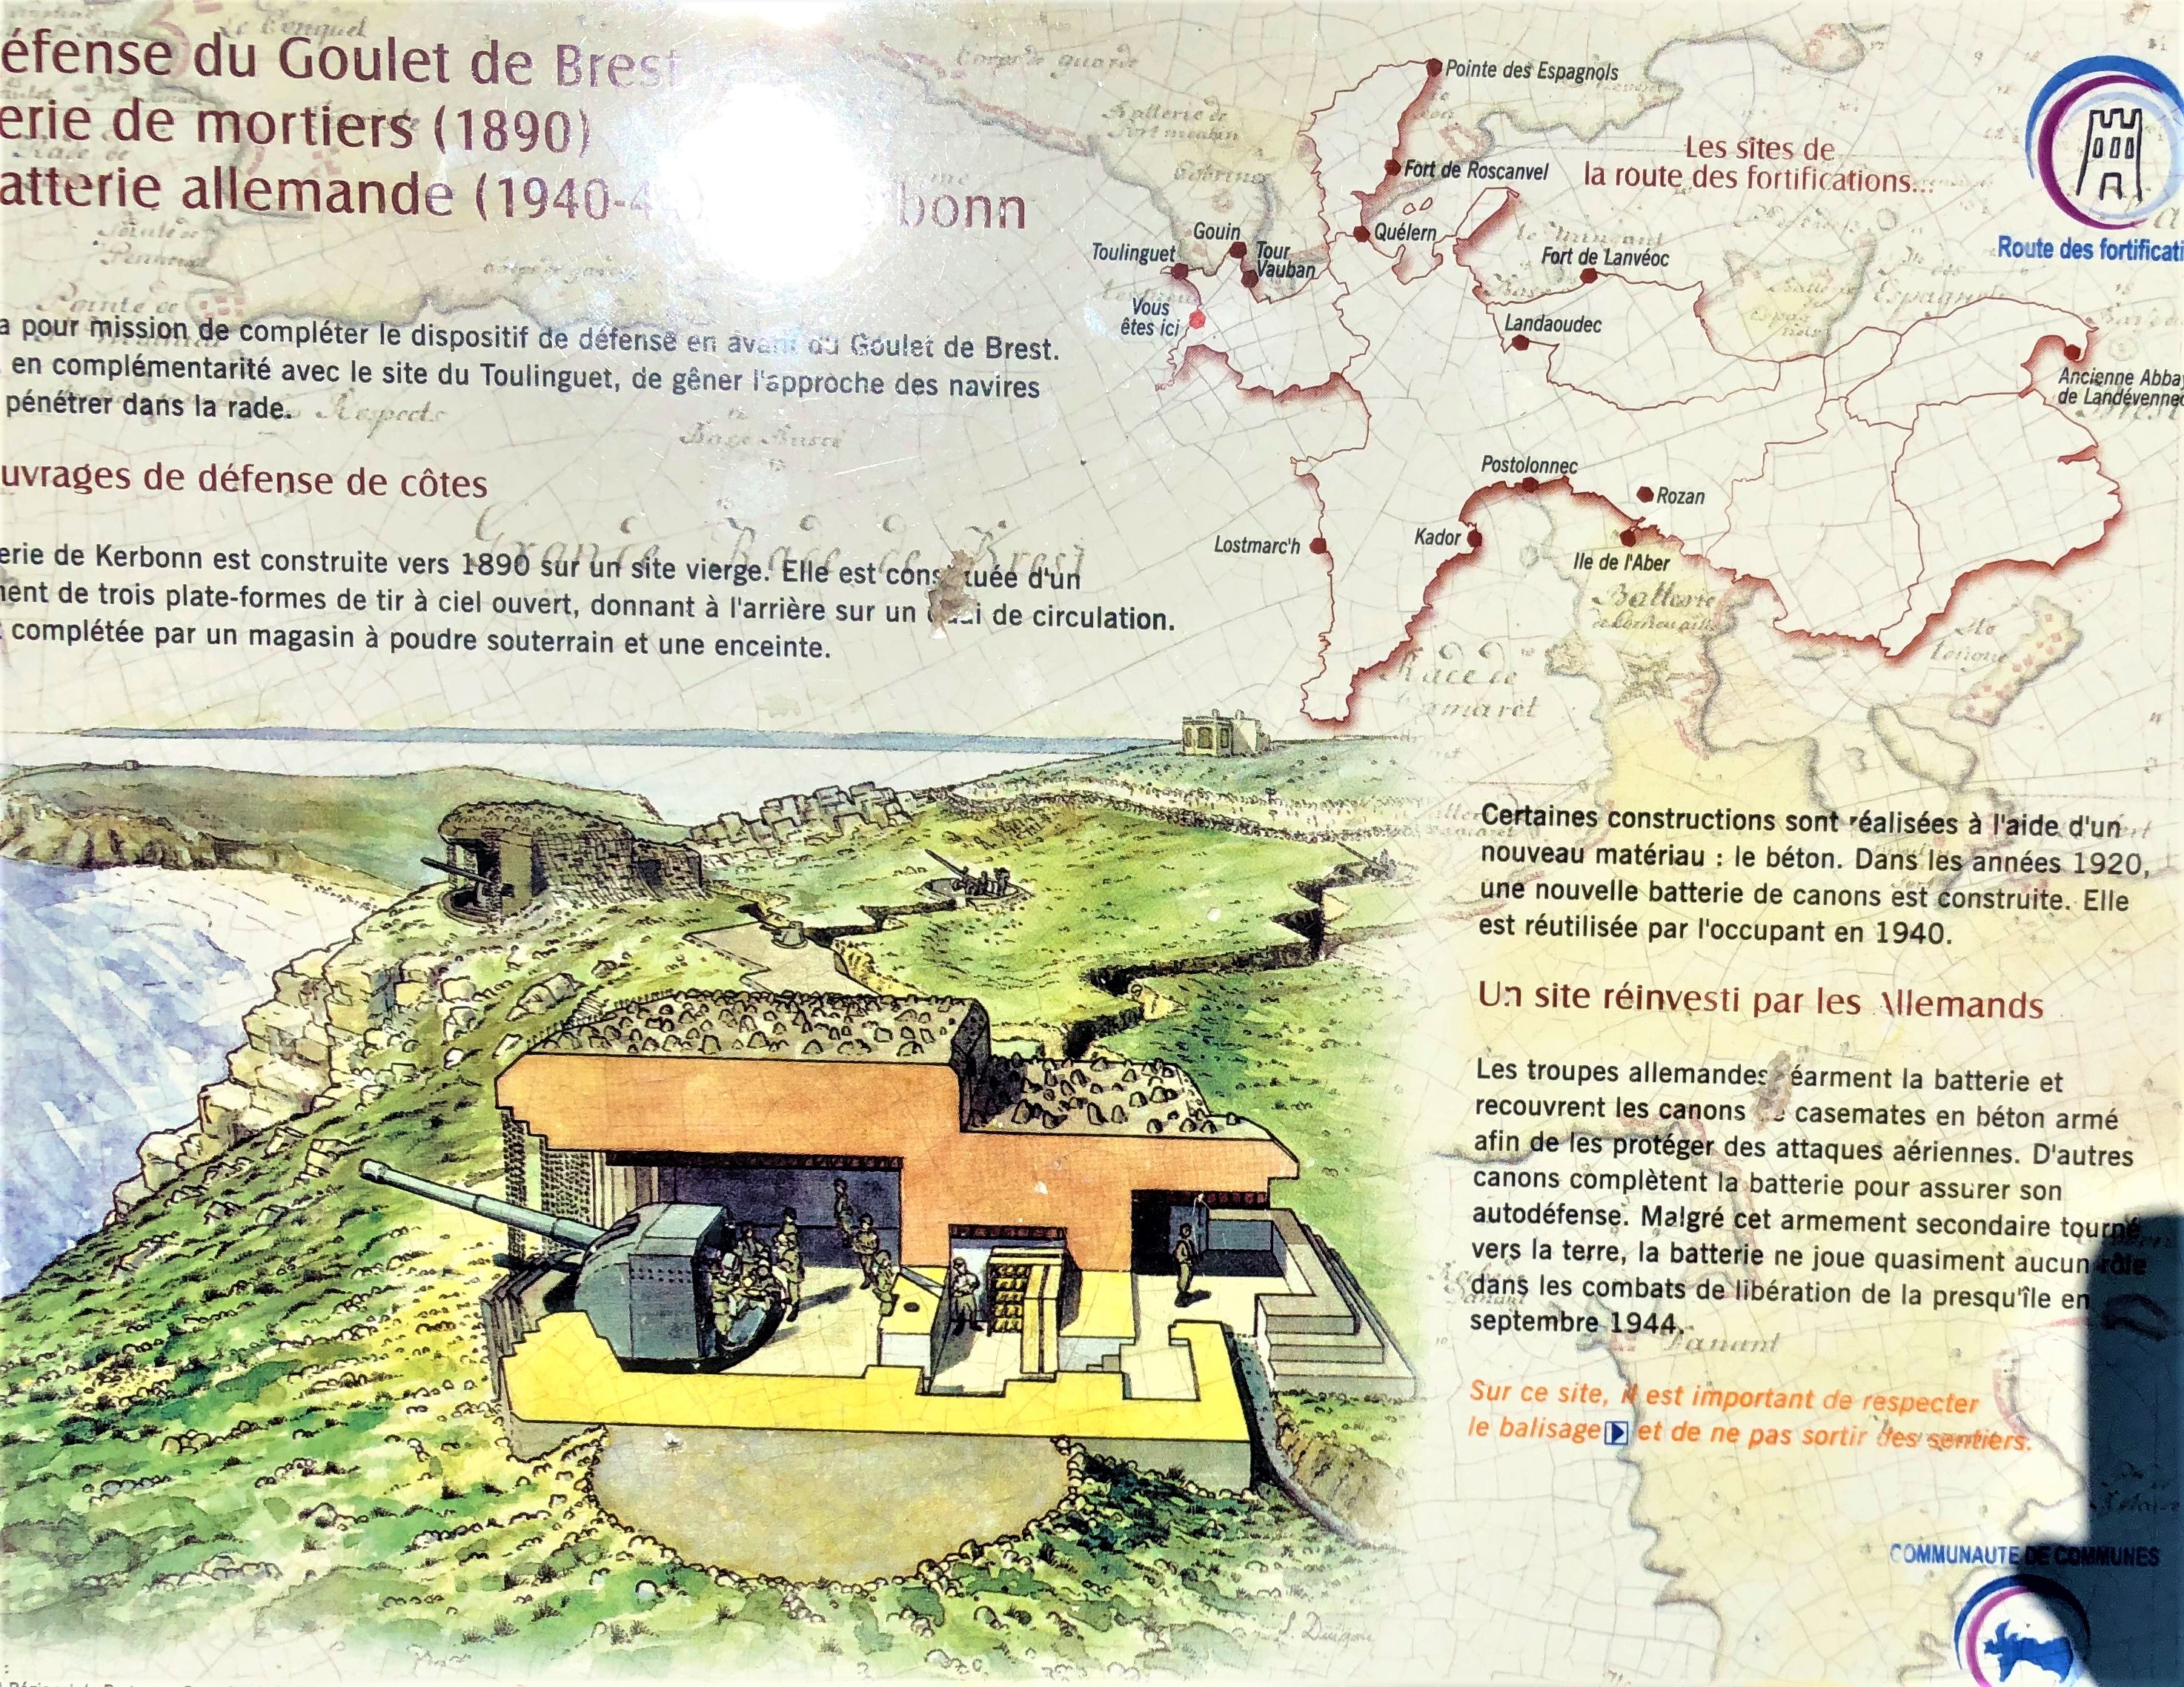
On the west coast of the peninsula is a set of German bunkers. These were built on top of C19 mortar battery positions to house a coastal defence battery in WWII. Nowadays, one of them is home to the excellent Musée Mémorial Bataille Atlantique. 

The museum is approached via an avenue lined with anchors, mostly from French warships. These massive things are three times as tall as me. And it's not that I'm short.

The museum is also guarded by a sea mine and an 88mm off a U-Boat. (Not a very successful one - five missions, 64 days' sailing, no kills, captured in a French port, if I remember right.) The museum is absolutely packed with such treasures.

Stonework betrays the C19 ancestry of the position.


Fort de la Fraternité

On the west coast while heading up to Pointe des Espagnols we found this small fort complex. Originally built in 1793, then updated mid-C19, then taken over and added to by the Germans (of course) in WWII. The hyperlinked source explains better than I can.

The main fort has an extensive loopholed curtain wall (left of pic) and a central powder magazine (right of pic).

It is on the north shore of a cove. Looking south across the cove you can see the German bunker at the point, and a well protected building centre of pic. Incidentally, these sported some better-quality graffiti than the usual - quite artistic, in fact.


Toulinguet is the westernmost tip of the Crozon peninsula. Consequently for Vauban to install a battery, then more added in Napoleonic times, plus an enceinte and tower to protect the landward side; then further batteries in the late C19. A naval surveillance station still operates from the site, hence no entry past the enceinte wall..

The tower is outside the enceinte. This held 18 men.


The charming seaside town of Camaret boasts this fine tower and battery constructed by Vauban. It has a museum inside but time did not permit so I can't report on it. A pity, as apparently there was a serious battle here in 1694 with Vauban himself present. But I can report that Camaret has plenty of nice waterside bars and restaurants to refresh a thirsty student of military history.


Phare d'Eckmühl (Penmarc'h Lighthouse)

At the southwest corner of Brittany, near Penmarc'h, is the Eckmühl lighthouse - so called because it was built with funds donated by Marshal Davout's daughter to commemorate his exploits at the eponymous battle in 1809 which earned him the title of Prince of Eckmühl.

The Phare is just one of a series of four towers along the point. Two of the other three were previous lighthouses, superseded as taller lights were required. As at Toulinguet, the white tower at the end is still an active naval surveillance station.


Lorient U-Boat Base

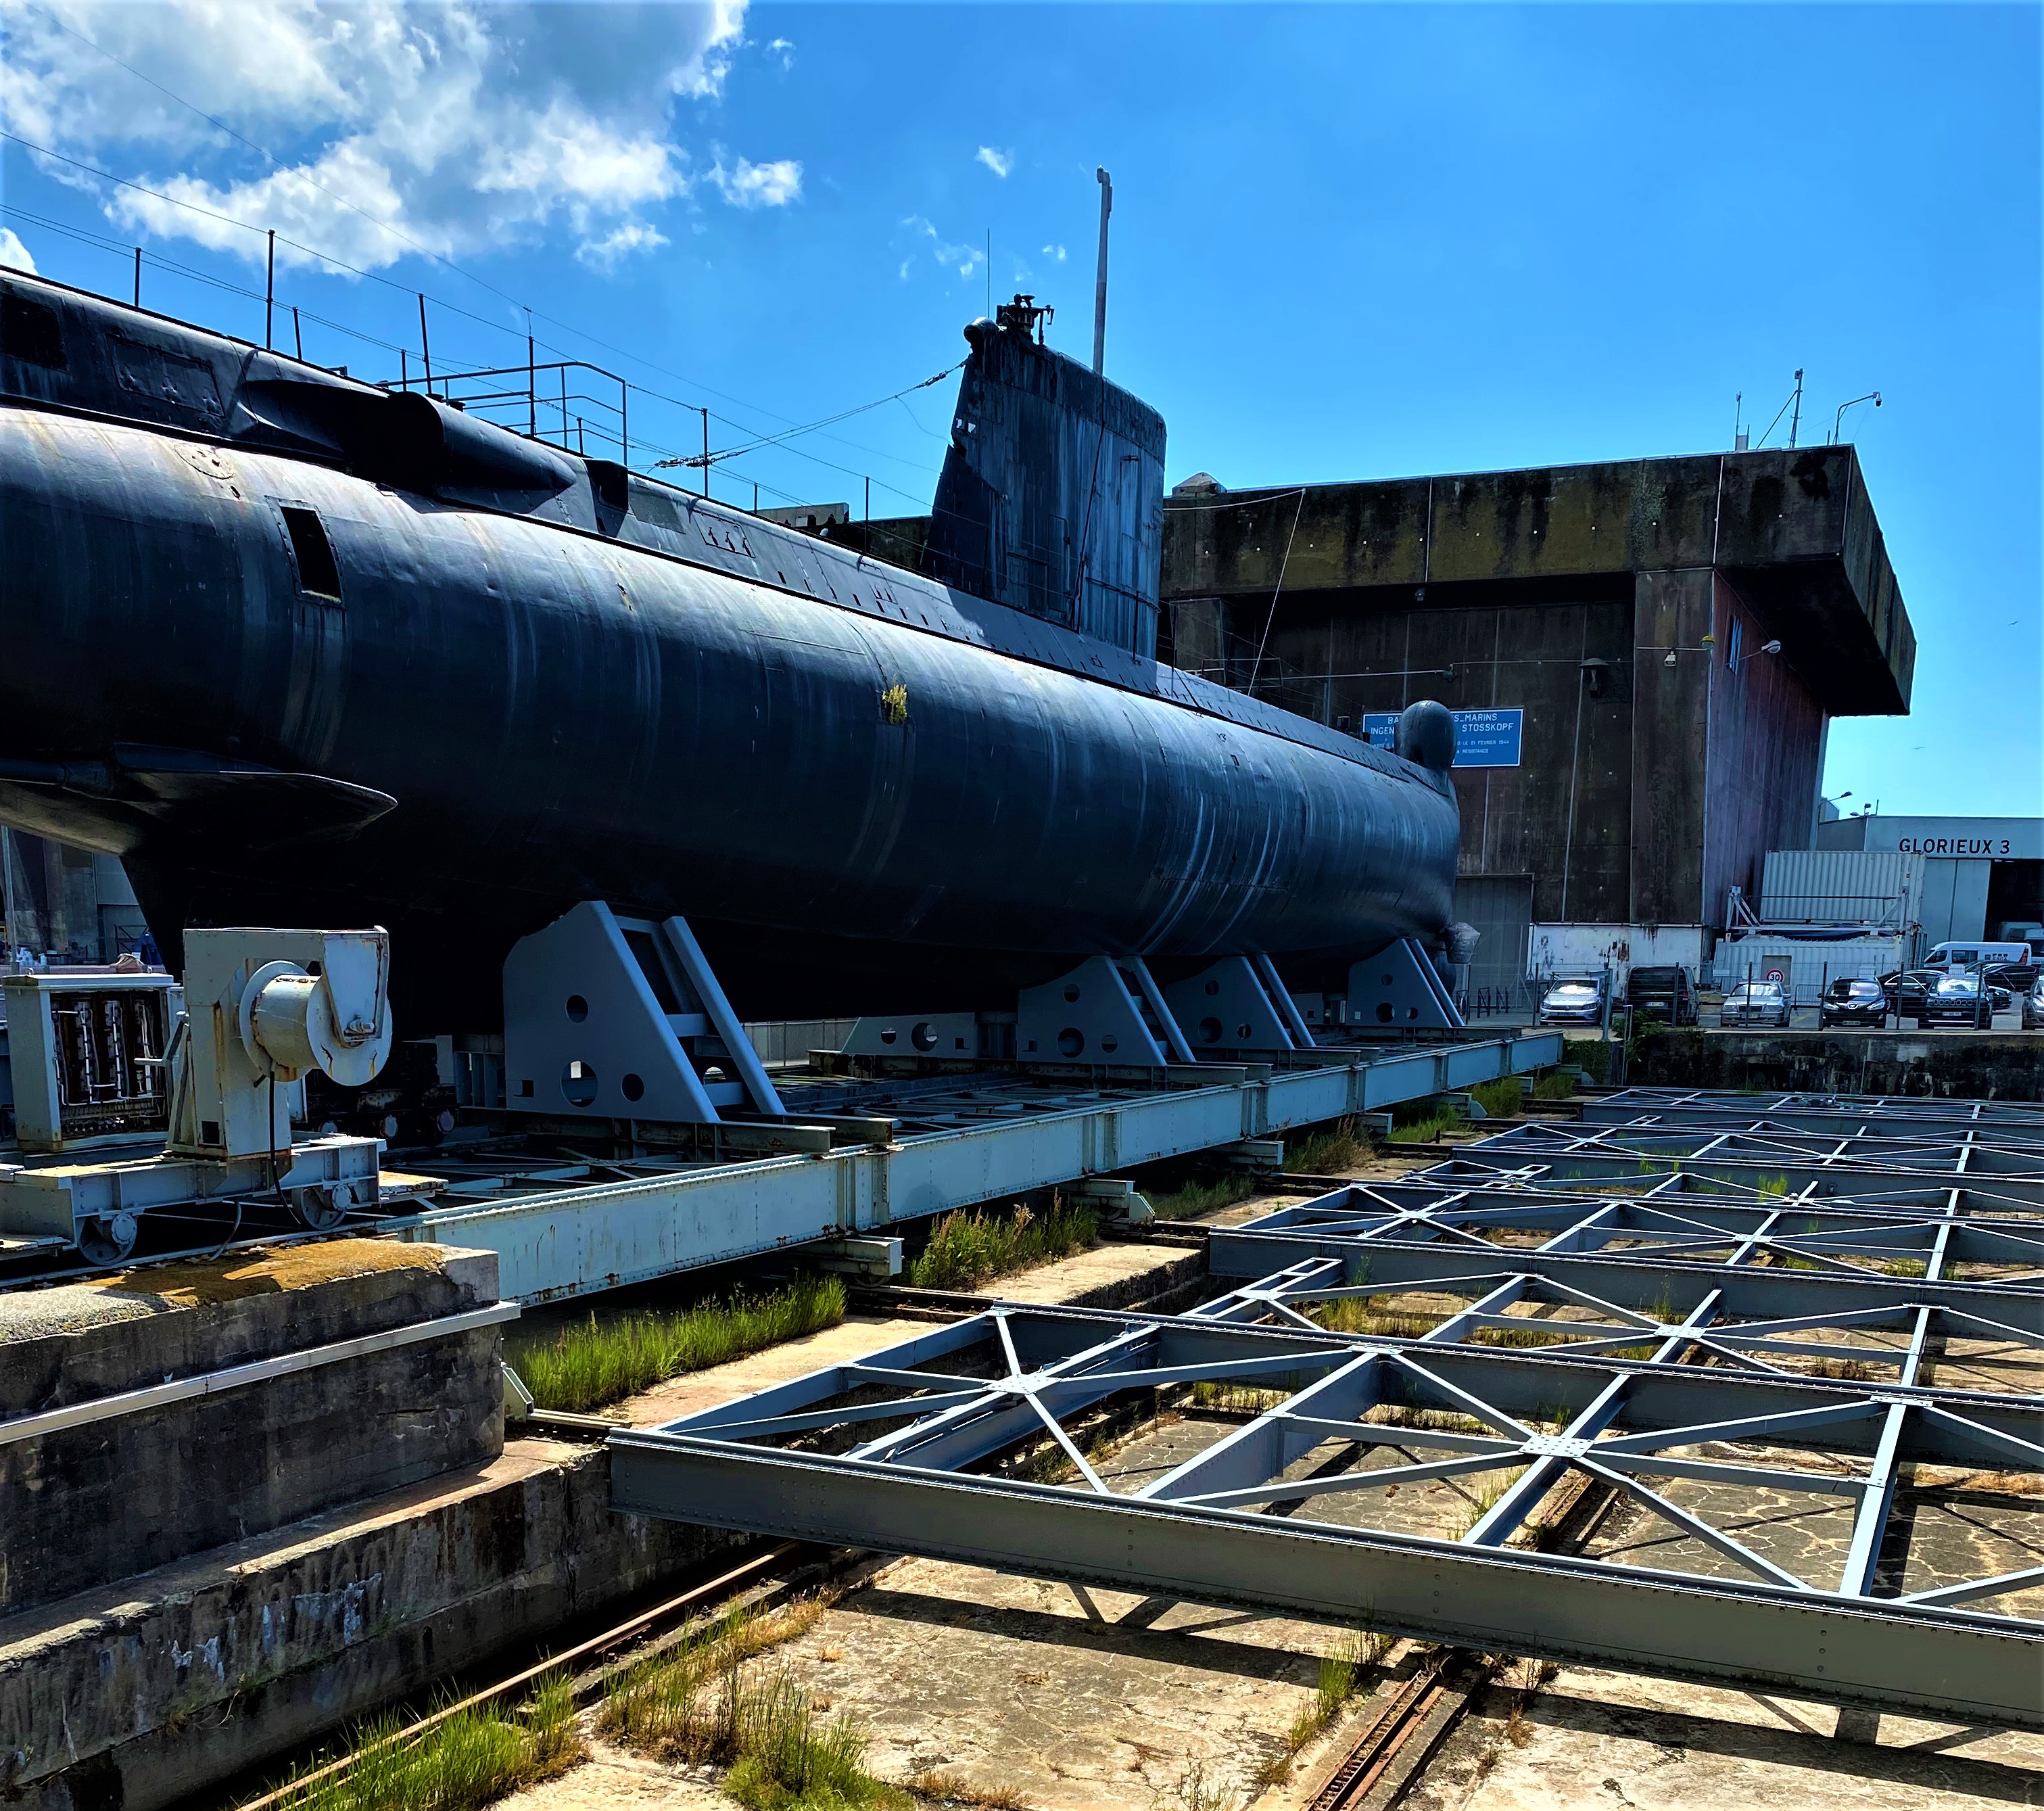
A trip to Brittany would not have been complete without visiting the massive U-Boat pens at Lorient on the south coast. Three huge concrete bunkers had 17 docks in all and an elaborate lift and carriage mechanism to move subs between them.

K1 was closed on the day of our visit; K3 only visitable by guided tour in French; my French is OK but an hour and a half would have been too arduous; so we just went to the K2 exhibit about submarines in general.

That did include a tour of a 1950s French sub, the Flore. Sufficient to confirm that submariner would not have been an ideal job for me.

Didn't make it to Brest but here is a view of the Brest U-Boat pens across the water from Pointe des Espagnols:


Musée Vendée Chouannerie
(Saving the best until last - this one's for you, Vincent!) The Musée des Guerres de l'Ouest (as it also calls itself) is in a former hospital bunker, part of a large complex built by the Germans to defend Quiberon Bay. The museum is devoted to the Breton Chouannerie (a series of uprisings from 1794 to 1832) and the War in the Vendée (1793-1796).

The bunker complex:

I had not appreciated the scale of these conflicts. A map in the museum shows the locations of some 30 battles or significant skirmishes; the Vendéan army fielded 10s of 1000s of men; and well over 100,000 Vendéans died either in action, or of disease or hardship, or in Republican reprisals. Feelings can still run high today: while we were in the museum shop, one of the museum staff was in a heated argument with another visitor. It ran something like this: "The Vendéans were counterrevolutionaries - they had it coming." "What, the women and children burned to death in a church had it coming?" A grim business. As they say, war doesn't decide who's right, only who's left.

A French Revolutionary hussard de la mort - 'Death Hussar'

A distinctive feature of the museum is its rank upon rank of charmingly characterful model soldiers. Here we have some of the Republican forces sent to suppress the uprising.

Not so charming: Republicans pacifying a Vendéan village.

Towards the end, the Vendéan army tried to escape pursuit by crossing the Loire, as depicted in the painting and diorama below:

... and a close-up of the diorama:

The museum had far more than these pictures can do justice to, and more than we could absorb in a short hour's visit. Paintings, uniforms, documents, weapons, artifacts ... I came away armed with a book to learn a bit more about it all. Recommended!