Wednesday 26 January 2022

Back in Bohemia: Trautenau (1866)

 After last week's loooong games, it was back to a more typical club night this Monday. Without making any particular effort to force the pace - in fact, with a fair amount of relaxed chat and banter along the way - five of us cantered through the whole 10-turn game in just two hours' play.

The battle in question was Trautenau, from the Austro-Prussian War of 1866. This was one of the border battles in Bohemia as the Prussian armies invaded through the passes. Historically, Trautenau was the one the Austrians won, albeit pyrrhically, obliging the Prussian 1st Corps to pull back through the pass it had emerged from but suffering four or five times as many casualties (>5,000 Austrian against some 1,300 Prussian).

We last visited the APW in September when John and I embarrassed ourselves at Gitschin. Before that, we fought another pair of the border battles in 2020, Nachod and Skalitz. Pitting short-ranged but deadly Prussian needleguns against the longer-ranged but slower-firing Lorenz rifle and Austrian Stosstaktik always produces enjoyable tactical challenges. Trautenau was no exception.

Crispin ran the game for us. His terrain deserves special mention. I've already applauded his marked-up mats that create convenient roll-out battlefields. Today let me pay tribute to his hills. Most of the ones he used for Trautenau were just picked out of his existing collection (the 'polystyrene jigsaw' approach, albeit his are wood). However, the centrepiece - the long ridge that culminates in the key heights of the Hopfenberg, Kapellenberg and Galgenberg - he had sawn to shape specially.

John and I took the part of the Austrians against the two Daves as the Prussians. The battle is a mobile one. It starts with the Prussian advance guard outside Trautenau confronting one Austrian brigade on the heights. Three more Austrian brigades arrive on Turns 2, 4 and 5. The Prussians receive a similar number of reinforcements on Turns 3, 4 and 5.

The view from the south. Trautenau is just visible behind the commanding heights, top left. Prussians are approaching from top right except for one small detachment via the road top left. All Austrian reinforcements have to march on via the road bottom left. White counters mark objectives. Trautenau and the three heights around it are four of these. Then there is a second line of three: the villages of Hohenbruck (upper left) and Alt-Rognitz (centre right) and the wood between them. The villages also have a red counter to denote that they are 'forward objectives'. The Prussians must hold one of these at game end to achieve the 6 total they need for victory; they have to have held one at some point in the game to earn a draw.

Initial set-up from the Prussian perspective with Prussians queueing up to march through Trautenau. The river is impassable except at Trautenau or at the Parschnitz ford (foreground). A line of Austrians crowns the heights to greet the Prussians. The Prussians' left flanking manoeuvre will have to contend with a succession of wooded ridges, the nearest - the Parschnitzer Berg - being a steep one.

The action was quite fast and furious, so we didn't pause for breath and to take more photos until Turn 7. Von Pape's reinforced advance guard has kicked Mondl's Austrian brigade off the heights with heavy losses, leaving two Austrian batteries top left stranded. Clausewitz is pushing more Prussians up to form a line in the woods. A Prussian cavalry column (centre right) tried to outflank the Austrians but got lost in the woods for most of the game and never did anything useful.

Turn 7 as seen from the Prussian side. The Austrian infantry have formed a solid second line defending the two objective villages and the wood between them, with a couple more batteries at the Hohenbruck junction. The ground between the opposing lines is ominously open. Over the remaining turns the Prussians tried repeatedly to assault, break through and take the wood or Alt-Rognitz, but weight of concentrated Austrian fire repelled them each time. Austrian victory!

Reflections

Terrain matters (1). Crispin's special effort to represent the pivotal hills really helped to represent the action around them accurately.

Terrain matters (2). We got a sense of the challenge the Prussians faced: bashing through a heavily defended pass on their right, or straggling through extensive difficult terrain on their left.

Firepower! After recent Napoleonic or 1848 games with short-range smoothbore weapons, this 1866 action with rifled weapons and breechloading needleguns gave a refreshingly different flavour. The Prussian needleguns demonstrated their lethality in the close combat around the heights. When it came to crossing the open ground to assault the Austrian second line, massed longer-ranged Lorenz rifles with artillery support came out on top.

Maintain the aim! I had read the scenario properly in advance and kept the objectives and reinforcement schedules in mind at all times. John and I therefore marshalled our troops appropriately and (with a little help from Bohemia's terrain and Prussia's poor movement dice) redeemed ourselves after our lamentable performance at Gitschin.

Mobile battles are fun. The nature of this pretty evenly-matched encounter battle meant both sides had lots of movement, and lots of decisions about where to commit reinforcements.

Commanders are crucial. In the historical battle, the Austrian Gablenz was as decisive and aggressive as the Prussian Bonin was shambolic and hesitant. Bonin had mixed up his formations, which caused confusion; some of his troops were particularly fatigued from long approach marches; and during the battle, some Prussian units retreated after misinterpreting signals. On the tabletop, this meant Bonin wasn't represented, and all Prussian units were rated Passive (a -1 on movement). Without those command penalties in our game, the Prussians would have moved fast enough to get into the forward objectives before the Austrian second line could form.

***

The scenario is in the BBB group files as usual.

Tuesday 18 January 2022

In praise of loooong games

In my previous post I reflected on 'the luxury of time': spending all day on a game at a more sedate pace than the usual time-pressured Monday night at the club. Since then I have enjoyed an epic three-day wargaming weekend, prompting me to ruminate at more length on the virtues of such long games.

The three battles we fought merit reporting in their own right, so let me start by doing that. First up, some exotic oriental action: the Battle of Tai'erzhuang (1938) from the Second Sino-Japanese War. I do love the esoteric corners of history and, at least for parochial Brits like me, this certainly counts as one of those. I knew of the battle but knew little about it. CB introduced the game by describing the political and military background, the events leading up to it, the armies, their weapons and commanders.

 Chinese defenders were hidden in and around Tai'erzhuang (the town by the river). The first few Japanese invaders have emerged from the northern pass (bottom centre) and taken position on the hill above the town and in the village of Lan Ling.

This battle pitted two Japanese divisions against several times as many Chinese. CB 'bathtubbed' this, representing each division by a battalion, to turn it into a feasible scenario to fight with the O Group rules. No proxies today - he had painted up all the right troops and equipment. Some of the Chinese infantry had Chinese characters on their helmets. Japanese combat patrols were represented by standard-bearers flying the Rising Sun. As for the hardware, the Chinese had amphibious tankettes and Vickers light tanks in gorgeous 4-colour camo, while the Japanese had a nifty Ki-10 biplane, clumsy Type 89 tanks and - pièce de résistance - an SS-Ki flamethrower tank.


How it looks on the ground. A Type 89 nestles next to Lan Ling. Opposing Combat Patrols face off in the central no-man's-land. Ki-10 biplane loiters in the distance.
 
A couple of technical factors slowed the game down. This was only our second or third go with O Group, so unfamiliarity with the rules played a part. O Group is a one-activation-at-a-time set with provision for reactions by the non-phasing player, so really only one thing can happen on the table at a time. In any case, we were playing remotely with players in several locations, which necessarily hinders implementing multiple parallel actions. Consequently, after nine hours of play, the second Chinese battalion had arrived and was heavily engaged, but the second Japanese battalion was not even on the table yet. My first Japanese battalion was pretty much fought to a standstill and had no prospect of mounting any significant attack on the main objective, Tai'erzhuang.
 

Climax of the action. My SS-Ki does a terrifying 'warm-up act', wiping out a Chinese infantry company and their infantry gun dug in east of Tai'erzhuang. Plumes of smoke mark the devastation wrought by Japanese air strikes on Chinese columns in the open.
 
Regular readers might now be expecting me to whinge about playing only half a battle in the time in which we could have completed two BBB games. However, this was one of those that was more about the journey than the destination. The ruleset presented us with plenty of tricky tactical choices each turn - there were always more things we wanted to do than there were command points with which to do them. A patient and careful build-up and low-level initial skirmishing ratcheted up the tension as we fed more and more troops into the line. Then, when both sides went on the full attack - the Chinese reinforcements counterattacking from the west of the town while I sent in the flame tank and friends on the east - there was an explosive frenzy of firing dice, saving rolls, and accompanying groans of dismay or whoops of delight.

***

On to day two. This was supposed to be Waterloo, but a COVID-afflicted GM meant a hasty reshuffle of the schedule. Instead, I laid on a small BBB Hungary 1848 battle, Nagysalló. This is one of my mate Dave W's favourite scenarios and is the one I wrote up for Miniature Wargames in 2017. For background on the battle situation, see a previous AAR here.
 
Set-up positions: Austrians in the central village with two more brigades approaching along the roads from the left (south); Hungarians lined up ready to storm the village, with reserves behind them waiting to be unleashed to exploit success.

This is a small battle with about half a dozen units a side and lasting just eight turns. Face to face, with regular BBB players, we would rattle this off in two hours comfortably. Playing remotely, with rules-rusty players and no time pressure, we took all day. As Scott and CB knew nothing about the Hungarian War of Independence, I spent the first hour and a half just giving an outline of the course of the war, a more detailed account of the Spring Campaign in which this was the penultimate battle, and various discursions about commanders, armies, tactics, and situating the war in C19-C20 politics and history: the 1867 Compromise and 'hyphenation' of the Austro-Hungarian Empire, the 50 'golden years' that followed until WWI, the patchwork of ethnic conflicts across eastern Europe ... 

Major punch-up in the centre. The Polish Legion's red czapkas are about to assault disrupted Austrians unsuccessfully. In the woods, Dessewffy's hapless division has accumulated all the possible medals - white fluff = disrupted, black = spent, brown = low ammo, to add to the green counter for being fragile.

Once we got into the game, it was patient stuff. With small numbers of troops, every decision becomes important and every die roll matters. The guys mulled over their options. I lent advice from a rules perspective. When it came to combat, I have the charts in my head and could have resolved it for them in seconds, but they wanted to work through the calculations themselves, which obviously took longer.

As far as the course of the game was concerned, luck was against the Hungarians. The Austrians scored a couple of deadly hits with very high die rolls early on, which has a big impact in a small game. This was compounded by CB being less than fortunate with his reinforcement rolls, only getting one reinforcement into action before we finished. By contrast, Scott got exactly the right unit he needed (his cavalry) at exactly the right time to thwart CB's left hook that could otherwise easily have taken two unguarded objectives to achieve a draw. The end result was therefore a Hungarian defeat.

***

Game one was fought using Discord and game two via Zoom. For game three, Scott's naval battle, I had to have three laptops open: one on Discord, one on Roll20 (which allows hidden movement) and one just for all the charts and documentation.

Potential conflict zone: the Nicobar Islands. Grey boxes 'PRC TF' are my Chinese naval task forces; 'PRC Enemy' is detected opposition; the small hexagons E and 1 are neutrals.

Naval really isn't my thing. I don't do boats. My major objections are that absence of terrain makes tactical decisions much less complex and interesting, so they are essentially a dicefest, and that all the most interesting decisions happen at the campaign level rather than on the tactical tabletop. Scott's scenario addressed these objections most satisfactorily. We had terrain: the Nicobar Islands, over on the eastern edge of the Indian Ocean, where Thailand and Malaysia and Indonesia meet, near the Strait of Malacca. (Did you know the Nicobars were a Danish possession until they were sold to Britain in 1868? I didn't before this game.) The 'terrain' also included neutral vessels of various kinds, from cruise liners to freighters to a Russian spy trawler and a US warship. It was a campaign situation rather than a straight fight, an imaginary diplomatic confrontation between India (which administers the Nicobars these days) and China. Rob and I were on the Chinese side - him running the subs, me running the surface ships - trying to recover or, failing that, destroy a Chinese spy trawler that had gone missing among the islands. CB played the Indian navy, which of course turned out to have seized it, so the chilly diplomacy went hot.

Roll20 has a chat/whisper function that lets you talk to all players or just to the one you specify. As the exchange on right of screenshot shows, this was the point in the game where the Chinese marines had just choppered in and recaptured the trawler - but it wasn't over yet ...
 
The rules were from the venerable Task Force board wargame published over 40 years ago. Modern naval warfare is utterly technical, but TF makes this hideously complex business manageably simple enough to play. Of course, understanding your combat units' capabilities is still important, eg knowing which missiles have 2-hex range rather than 9. When matters came to a head and we were having to decide how many missiles to launch in each wave, and which vector they should arrive on, we needed a lot of handholding and walkthrough-talkthrough from our gamemaster. But that worked OK.

Anyway, most of the game was spent not shooting but just trying to find each other and not sink any neutrals by accident. The search rules are clever: an approximate detection tells you there is something in a 7-hex 'megahex', a significantly better die roll can tell you exactly where and what it is, and there is also the chance of a false report on a duff roll. Roll20 did a great job of the hidden movement and fog of war.

There were effectively four players: Indian, Chinese surface, Chinese subs, and neutrals, each with 3 or 4 task forces or commands. The player order varied randomly each turn. Each player activates a TF in turn until all have activated. Each TF rolls a die to see how many action points it gets, using these to move, fire, search, etc. Again, regular readers might expect me to complain here about only getting a quarter of the game. However, I found I had quite a lot to do, exchanging messages with Rob to report my locations and consult him about what we should do next, or responding to the GM asking me whether I wanted to shoot down a passing Indian helicopter. It was thoroughly absorbing. I wasn't able to stay right to the end, but we did manage to have a couple of reciprocal helicopter assaults on the trawler and a skirmish for control of it, before it was sunk in the subsequent major missile exchange.

***

Reflections

Thus, after three marathon nine-hour remote online gaming sessions we had finished one game (the small BBB battle), sort of mostly finished another (the naval campaign) and half-finished another (the Sino-Japanese battle). But even though two of the three were inconclusive, I was left happy and satisfied and feeling this had been time well spent. Here are some of the reasons why, reasons which can be offered in praise of long games:

Learn more history! It was valuable having the time for full introductions to explain the historical context of the games. For many of us, learning about the history is a major part of the hobby, so acquiring this new knowledge was worthwhile in itself. Understanding the context also made the games themselves richer and more engaging.

Better aesthetics! For such a major event, GMs put extra effort into the troops and terrain and making the table look good. Even I broke out my nice Timecast roads instead of the functional felt ones. We took time out to admire each other's handiwork. CB's beautiful models were held up to the camera. I showed the guys Colin's handcrafted ship-mill.

More thoughtful play! We had the time to read scenario briefings thoroughly, to examine the situation from all angles, to consider our options and work out (hopefully) good plans. As the battle developed, we had the time to ponder before making decisions. (Except when CB's Indian admiral - an inspired creation - was telling us our Chinese helicopters had 30 seconds to turn away from Indian airspace or be shot down.) While there is something to be said for the Monday night adrenalin of having to crack on and make quick decisions, there is also something to be said for respecting and appreciating a finely crafted scenario, and for being able to engage in preliminary manoeuvring and preparatory fires, and for not having to launch a massed charge just because it is 9:30 and people want to finish in time to get to the pub.

It's about the journey, not the destination! In my usual BBB games the result does matter, and often much of the reward and excitement comes from the rush towards a tight finish. But in these epic games, although of course we were all trying to win, the fun was in all the decisions and incidents and episodes along the way. The Japanese flame tank's attack will live long in the memory, as will Scott's reportage of the skirmish on the trawler, and the Indian admiral's protestations at 'perilous and precarious' Chinese incursions.

Good times with good friends! Sometimes on a Monday night we are so efficiently focused on the game that the small talk is limited to a brief hello-how-are-ya at the start and a rushed goodbye at the end. In these long sessions with friends thousands of miles away there was time for interludes to freshen and empty glasses together, catch up on each others' real lives and families and mutual friends, and talk about things other than games. And good friends are even more important than good games.

On which note: until the next time, my good friends!

Wednesday 5 January 2022

Hungary 1848 #12: Vác - a fighting withdrawal

What a great start to the New Wargaming Year! Bob, who I hadn't seen in person since the era BC (Before Covid), lured me over to his place for the day. I was expecting one of his fine tank battles - he'd mentioned the idea of a what-if 1969 Sino-Soviet clash - but he had a yen for BBB and liked the look of the next Hungary 1848 scenario in my queue for playtesting. Consequently, we fought the Second Battle of Vác - the twelfth in my series of scenarios for the Hungarian War of Independence - and my beautiful professionally-painted troops got to march across his equally gorgeous terrain instead of my functional felt for a change.

This scenario got an initial playtest two and a half years ago. My post about that game gives the detailed historical background and game situation, so I won't repeat that in full here. In brief summary only: Hungarian and Russian advance guards clash and jockey for position; both sides deploy more troops overnight; the outnumbered Hungarians then decide to withdraw, so they have to hold various objectives for different lengths of time, while getting half their force off the table. The previous playtest had left me with the feeling that the scenario might benefit from being a turn or two longer, so we made it a 12-turn game. Bob took the Hungarian side as it presents the most unusual and interesting challenge (not that the Russians have it easy, but the decisions they have to make are more conventional ones).

What follows is a relatively detailed AAR with over 20 photos to do Bob's table justice. If that's too long for you, skip to the end for a summary and reflections if you're still interested in those.


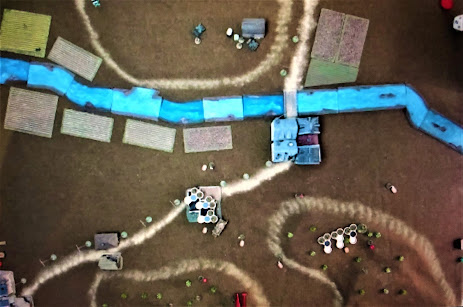
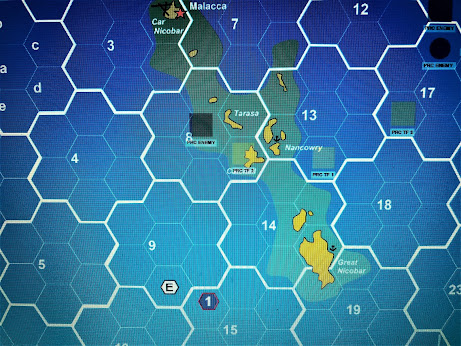
The scenario map to help you get oriented. Russians in green approach from bottom right. Hungarian march column has arrived from top left. Red stars mark objectives. Advance guards will contest the southernmost two initially, then the Hungarians have to hold the middle two at end of turn 8 and the northern two at game end (turn 12). Hungarians need 4 objectives for a draw, 5+ for a win. They also have to withdraw a corps-worth of troops; they lose 1 objective if they fall 1 unit short, 2 objectives if they miss by any more.


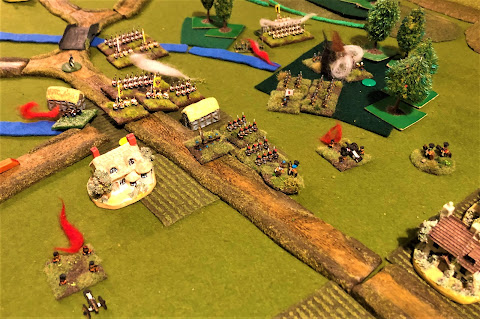
Hungarian advance guard (right of picture) about to drive Bebutov's Caucasus cavalry out of the Sződ vineyards. The game kicked off with a bang as Bob expelled them from both the forward objectives on Turn 1. To do so, he launched his own lead hussar brigade out of Vác in a bold charge which resulted in our cavalry's mutual destruction. This left him with just one cavalry brigade, which would have consequences later.
 

Under the midday sun (shining from the north, but never mind), two Hungarian corps follow their advance guard in a long column marching alongside the Danube from top right of picture into the charming riverside town of Vác (left of picture).

View of the whole battlefield, looking from the tail of the Hungarian march column (bottom right), following the column as it marches south between the Danube and the railway into Vác. The Hungarian advance guard is visible on the plain beyond Vác, opposed by one tiny Russian cavalry unit.

Hungarian Turn 2. The Russians have appeared in more force - three cavalry brigades and their artillery, top left of picture. The Hungarian advance guard has therefore fallen back from the vineyards to join the main body debouching from Vác and form a line.

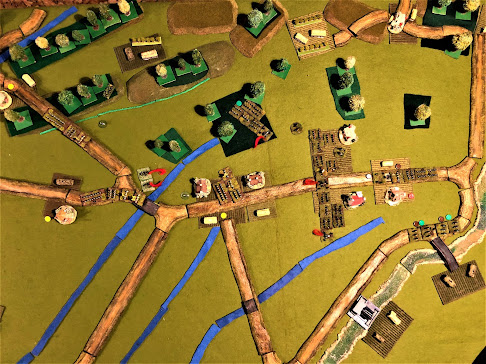
 Close-up of Bobics's division on the Hungarian left; Hungarian right wing is in the distance (top left of picture). In the Night Interval, both sides will redeploy: Hungarians first, south of the Csörög (the stream in centre of picture) and around the Hétkápolna (the church top left), >6" from the Russians; then the Russians, north of the Csörög and >6" from the Hungarians. Bob is therefore trying to establish a line to keep my Russians beyond the Csörög so we don't constrict his redeployment and are ourselves forced to deploy at a distance from the next objectives.

Same situation as the previous photo, but looking towards the Hungarian right wing from behind the Russians, who have straggled somewhat on arrival. Some infantry and guns are in the vineyards, cavalry probing right towards the Csörög, and more infantry bringing up the rear.

Hungarian Turn 3. Their march columns have changed into battle formation. Bobics has crossed the Csörög, daring the Russian cavalry to attack him.

A closer view of the confrontation above.

Russian Turn 3: the shell craters indicate that the Russian hussars and lancers have retired Disrupted after their charge failed to drive back Bobics's men. Some consolation in the form of the empty ammo boxes by the battery in Duka village, showing that the guns are low on ammo after causing a Hungarian casualty - though, as it turned out, this was then recovered overnight anyway.

 Turn 4 (the last before nightfall): satisfied with having kept my cavalry at bay, the Hungarian left falls back behind the Csörög. On the Russian turn, the cavalry fail to rally.

Russian forces lining the Csörög after their Night Interval redeployment. The cavalry in the foreground still have not recovered their composure. A massive gun line in the centre aims right towards Vác. Beyond the guns, a solitary Hungarian rearguard brigade is visible, about to skedaddle (and be blown away). Beyond it, the bulk of the Russian infantry and a few more guns poised to attack Vác.

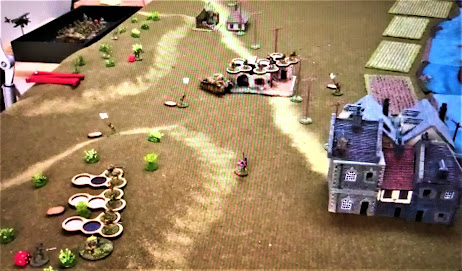
And a view of the Hungarians braced for the impending Russian assault. Front centre are General Leiningen and his best troops: the Polish Legion in their red czapkas, and a brigade including the famous 9th Honvéd Bn in their red kepis. Behind them, a formidable gun line defends the Török Hill objective. In the far distance, a third line holds the final rearguard positions.

Turn 5: the Russian assault columns approach Vác and their right wing crosses the Csörög.

Another view of Turn 5. The Russian cavalry are supposed to be on a sweeping move to outflank the Hungarian left, but it doesn't seem to be happening ...

Turn 6: Russians close right up to Vác , crossing the river in front of the town, but do not assault yet. Meanwhile, shell craters show where Russian attacks on the Polish Legion and the red kepis have been inconclusive and left everyone Disrupted.


Turn 7: crunch time! Attacks go in on Vác and the Polish Legion. The Russian cavalry (front centre and bottom right) has begun its sluggish outflanking move - those snake-eye dice betray a series of dreadful movement rolls.

Turn 8: After the crunch, the thud. All the Russian attacks bounced off. The twin craters and tent mark a Russian brigade that is decimated and spent. The Hungarians reform their line in the centre. General Görgei can be seen at the back, directing the imminent withdrawal. At the very top centre, Hungarian hussars depart. Bob was about to launch them against my Russian cavalry when he realised that he was required to exit one cavalry unit or forfeit a victory point. As he had got his other cavalry unit killed on Turn 1, the hussars had to leave the party early!

Turn 9: The Hungarians have successfully held both middle objectives to the end of Turn 8 and begun to withdraw their gun line. The Russian cavalry finally gets into gear and dashes through the woods to cut off the Hungarian retreat, forcing the guns to evade onto the road (which they wanted to do anyway). The Russian infantry has no subtle options so keeps pounding the Hungarian rear guard. 

Turn 10. Vác and the Török Hill have fallen at last. Russian columns press on after the battered Hungarian defenders. The Russian cavalry, though, has been balked by enfilading fire from a Hungarian battery on the commanding Kis Hermán Hill position at the rear (out of shot, upper right).

Turn 11. The end is nigh. Two Hungarian units in the vineyard are being overwhelmed by five Russian brigades. Russian cavalry menaces the battery defending the Kis Hermán Hill objective (upper right). A column of Hungarian infantry is about to desert the guns as Bob tries to reach his quota of troops withdrawn off the table.

Turn 11 seen from General Görgei's viewpoint (front of pic). The Polish Legion has succumbed but the other Hungarian infantry in the vineyard will live to fight another turn. Hungarian guns defend the Buki bridges objective.

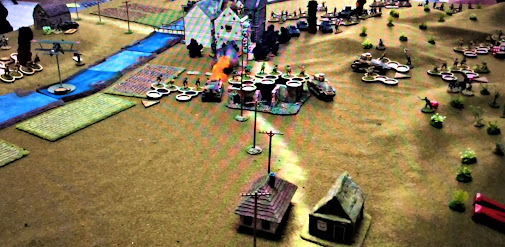
Turn 12. The game reaches its climax. Massed Russian cavalry charge up Kis Hermán Hill. Russian infantry assault a beleaguered rearguard unit (top centre) and storm the guns.

Game end. The Russian infantry have carried the bridge, but the guns on the hill repulsed the Russian cavalry. Thus the Hungarians have held 5 out of the 6 objectives. That would be enough for victory, except that they have fallen one infantry unit short of the number they were supposed to withdraw off the board. Thus their VPs are reduced from 5 to 4 and the match is drawn!

Summary

Bob made sure of the first two objectives on Day 1, but it unluckily cost him a precious cavalry unit.

He succeeded in forcing me to deploy at a distance for Day 2. Maybe he was lucky with my poor movement rolls for my cavalry, and none of the critical combats went against him, but on the other hand his artillery's dice were dreadful. The luck probably evened out, and his plan was sound enough for him to hold the second pair of objectives to the end of Turn 8.

The final third of the game was a frantic scramble, as fighting retreats often are. Bob had to strike a balance between withdrawing enough troops to meet the victory conditions and keeping enough on table long enough to hold the final pair of objectives. He almost managed it, falling just one infantry brigade short of the withdrawal target, and barely losing the Buki bridge objective in the last combat of the game, so had to be satisfied with a draw.

Reflections

Beautiful terrain is such an important part of the High Quality Gaming Experience. I really ought to make the effort to upgrade my own terrain collection.

The first rule is always to understand the victory conditions. In an unusual scenario like this one, it was especially important. Bob approached it with due care and attention, quizzing me to make sure he understood his victory conditions correctly, as well as the very significant redeployment conditions in the Night Interval.

Fighting withdrawals make for good games. Particularly for the defender, the choices about which troops to pull back and when, and where to stand and fight, present interesting challenges.

Fighting withdrawals are tricky to set victory conditions for, because of that 3-dimensional trade-off between space, time and forces. I'm happy that the scenario produced such a good close game and a tight finish (all three results possible on the last turn - classic BBB).

The luxury of time: on a Monday night at the club, time is at a premium and there is generally pressure to make decisions quickly and get on with it. For this battle we had all day and were able to approach it in a more leisurely manner. Critical decisions could be mulled over at length; we could take a step back between turns to take photos and appreciate the battle situation; we could pause for pizza ...

6mm figures make it easy to use proxies. My whole Hungarian army is built from proxies, of course - mostly ACW infantry in kepis - but at least they are painted the right colour. But you may or may not have noticed that those Russians in the photos, in their correct 1849-era spiked helmets, are wearing blue rather than green ... that's right, I don't have a Russian army for the '48, so my Prussian infantry (and Bob's Napoleonic Russian cavalry and artillery) did the job.

So good to catch up with an old friend in person after so long. A great way to start the New Wargaming Year!


PS - a reminder that, for anyone interested in this conflict, my book Hungary 1848: The Winter Campaign is available from Helion. The sequel, Hungary 1849: The Summer Campaign, is in press and should be published this year.