Showing posts with label 1815. Show all posts

Wednesday, 14 January 2026

Hard pounding at Ligny

Ligny is one of those famous battles that I knew "of "but not "about" - i.e., I knew the broad outlines of situation and outcome, but not really any details of the course of the battle itself. That was rectified by Mark's game this week.

Many readers will know Ligny well, but for the rest of us, here's the situation. It's one of the pair of battles that are the prelude to Waterloo, the other being Quatre Bras. Napoleon is trying to beat the Prussian army thoroughly and drive it back to Namur, away from Wellington's Anglo-Allied army, before turning on Wellington. His plan relies on frontal assaults pinning the Prussians in their defensive line along the Ligne stream until Ney can descend on them from behind their right flank. As Ney is unavoidably detained at QB, it doesn't quite work out like that. Most famously, d'Erlon's corps yo-yos between the two battlefields as both Napoleon and Ney send increasingly urgent messages demanding his help. In the end, although Napoleon earns a tactical victory in that the Prussians are pushed back, they are still in the game and able to rebound at Waterloo.

Let's launch straight into the photos of the game, then offer some Reflections at the end. Only five pics of the battle as it was such an intense fight.

So intense, in fact, that I awarded myself a stiff one of these afterwards! (I'd spent the day running a WWII game, Izbushenskiy, so you'll appreciate the battle fatigue was setting in by the time I fought Ligny the same evening.)


I commanded the main body of the French, facing Crispin (Mark just handling the French right wing against Dave W). Here's what I was up against: a Prussian force about 50% stronger, with some of its guns set up waiting for my advance, and ensconced in some tough defensive positions. The village on the left is St Amand; on the right, the eponymous Ligny. Normally in BBB villages are worth 1 level of cover, but in this scenario they rate 2. Likewise the steep-banked Ligne stream with its thick vegetation is double the usual stream obstacle for both movement and combat. (hence the hedges).

Figures are Baccus 6mm, all from Mark's collection, as is the terrain.

Plan view of the battle. Apart from the Prussian garrisons in St Amand and Ligny, all the troops in the foreground, south of La Ligne, are French. More will arrive but not until Turns 5+. Meanwhile, I had the tough task of trying to take some of those white Objective counters and fight across the stream. I was not optimistic, and when a few dice went wrong on the first turn or two I suggested we swap sides and start again ... but it was more a wry aside than a morale failure and we soldiered on.

Neither the time nor the space for subtlety, so in go two big assaults on the main villages. We boot the Prussians out of the southern half of each. Over the next two or three turns, with dogged determination and a bit of luck (plus superior troop quality) we get all of St Amand, but the Prussians hang on exchanging volleys with us in Ligny for most of the game.

What you can't see is some serious action left of pic. Committing so much against St Amand left my artillery somewhat exposed. Crispin took advantage by flinging a couple of cavalry brigades and a strong infantry brigade across the Ligne. He battered my one small infantry unit there and overran some guns. My reserve artillery was lucky to bring him to a halt.

Out of shot right of pic we, weren't having much luck either, as Grouchy's cavalry fought themselves to exhaustion (and then evaporation) pinning the Prussian left.

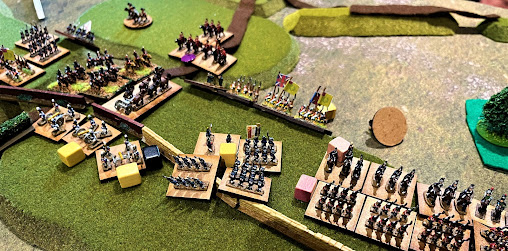
The arrival of our reserves changed things. In this pic, the Prussians still hold Wagnelé (left edge) and St Amand la Haye (next village to its right on the Ligne) but have fallen back elsewhere (that line of troops at top of pic). Those Prussians top left, heading leftward, are reacting to the arrival of a single French division (Durutte) from the Grand Old Count of Erlon's corps, which had crossed the Ligne. Durutte then unilaterally fell back again (rolled snake eyes while Passive) but he had done a useful job.

More importantly, the Imperial Guard joined in. The Old Guard (bottom right) didn't fire a shot but didn't need to. Their presence was enough to keep some of the Prussians at a safe distance and embolden my lads who'd crossed the Ligne to try and storm St Amand La Haye. It didn't work - Prussian artillery saw us off - but never mind, we could win elsewhere.

Note the Young Guard, the unit centre foreground in the Hameau de St Amand. Note also the cuirassiers, bottom left, eyeing the shaken Landwehr in Wagnelé.

The last act. As dusk falls, I mount a massed assault on Wagnelé. The Young Guard go in. They get some useful fire support from the infantry in the foreground. Crucially, although the cuirassiers failed to charge, the Horse Grenadiers of the Guard - who were out to the left of the previous pic - get the full move they need to avoid those Prussian dragoons (top left) and fall on the Landwehr's flank. That was enough to outweigh the tough defensive position and force the Landwehr out, giving the French the sixth Objective we needed for victory. Vive l'empereur!


Reflections

Quality Tells. The early turns were mutual attrition and not much progress. However, the French veterans could absorb casualties better than the trained or raw Prussians. The blue cubes in the pics above betray the growing number of Spent Prussian units. Thus, the tide turned, the Prussians getting significantly weaker while the French were reinforced.

Learning by Doing. As I said at the start, Ligny is a battle I knew of rather than about. Mark's game has now given me a good appreciation, not only of the shape and course of the historical battle, but also actually of the sheer intensity of the combat. That's quite a tribute to his scenario design.


Ligny will be added as a bonus scenario to Mark's "Napoleon's Bloody Big Battles!" BBB scenario book pdf edition, about to become available from SkirmishCampaigns ~February 2026.

Wednesday, 17 January 2024

January Gamefest: Sino-Jap, La Haye Sainte, Ligny, Norway 1940

January brought our traditional four-day gamefest: excellent company, splendid wargames, fine victuals, wide-ranging learned conversation - altogether the epitomy of the HQGE. To summarise four days of gaming goodness in brief, we played:

1. Tai'erzhuang (Sino-Japanese War, 1938) in 20mm using homebrewed rules.

2. La Haye Sainte (1815) in 28mm using modified BBB.

3. Ligny (1815) in 15mm using BBB.

4. Roa (Norway, 1940) in 15mm using homebrewed rules.

Here are about 15 annotated pics to give you a tiny glimpse of how much fun we had.


Tai'erzhuang, as visited last January as well. CB's armies are too beautiful not to use at every opportunity and the scenario merits replaying. In the foreground is an incense burner that added to the atmosphere, literally and metaphorically. The AFV right foreground is the fearsome Japanese SS-Ki flamethrower tank.

We played TEZ twice. First time up I was the Chinese mobile force, including Sdkfz222, CV3/33s, PzI and Vickers E, seen here arriving ontable and immediately rueing not spreading out more (the skull shows where Japanese mortars have already caused casualties). The khaki Chinese troops are Mexican federales figures, I believe, complete with goggles on their caps.

Scott joined me with a mighty Chinese motorcycle battalion.
(I think the figures are actually sold as Polish.)

Game 2: La Haye Sainte! Young Charlie's scenario. Basically BBB rules, but a unit is just a couple of battalions, musket range increased to 6" and made a little more deadly. Worked really well. Mark F and I commanded the British line. Looks like Sharpe is in the sandpit.

LHS viewed from the French side. For the scenario, it was divided into two triangular halves that could each hold one unit. CB's columns are about to go in. Special rules for pioneers with axes, obviously.

View of most of the table. I think it was 12'x4'. Five French infantry brigades and associated cavalry versus the Prince of Orange, Picton and Alten, plus heavy cavalry offtable. Looks like a proper traditional wall-to-wall Napoleonic wargame line-out, doesn't it! But there were still decisions to be made and maneuvers to be executed.

Black Watch and Gordon Highlanders. Between them and the French in the distance you can see a blurry thin blue line of Dutch troops. There were three of these Dutch/Belgian units out front. These started the game Disrupted. For their first activations on Turn 1, Mark and I rolled three successive pairs of snake-eyes, meaning all three units lost a stand and retired behind the hedge, the Raw ones becoming Spent immediately. I make that a 46,656-to-1 chance. Our luck improved after that.

The French assault goes in on the hedgeline. Our left centre was soon breached and we took heavy casualties all along the line. My Hanoverian militia evaporated. Only the high quality of the British infantry kept us in the game. We were reeling and creaking until Mark unleashed the Household Cavalry. The French attack had opened a gap between the French units now in La Haye Sainte and those in the centre, where a couple of their units had taken a pounding already. The British heavies smashed into these, broke a square and wiped out another regiment, winning the game for the Allies - just as they did when we fought the whole of Waterloo in 6mm last year.

And so to Game 3: Ligny! This was basically Dave T's scenario from the BBB group files, but adapted by Rob to add some what-ifs (which did not transpire). Rob had put in a lot of work in the weeks before, making sure the troops, terrain and scenario were all ready to go, and it paid off. Here we see Bluecher next to the windmill with the Prussian centre around Ligny. (Proper Ligny church model, top left.)

The whole Ligny battlefield. More Prussians will arrive from lower left and lower right. French march on from the top board edge. Ligny centre of pic, left of my Grosse Batterie that was soon dismantled by the Imperial Guard Artillery. Crippling scenario rules for Prussian low ammo didn't help.

Les français arrivent. We held Ligny for a long time against 3:1 odds and repeated assaults but were eventually ejected by the Imperial Guard. Meanwhile, overlooking the fact that most of the important objectives were in our left rear, I had encouraged CB to commit the Prussian right wing against the French left flank in the irrelevant top right quarter of the battlefield. This left Tim's Prussian left wing of mostly raw Landwehr to be crushed by imperious French cuirassiers. It was a tough fight but we ended up soundly beaten. CB blamed Tim's inexperience. I blame my tactical error of washing down breakfast with Calvados, not to mention elevenses and lunch too. We discussed the merits of tweaking the victory conditions etc, but really they worked fine to give appropriate structure to what was a magnificent game with a properly Napoleonic look and feel.

Anyone remember this WWII skirmish ruleset that Scott and I published over 20 years ago? For our last game (a short morning session before I left), Scott set up Roa. This was the first skirmish scenario he published, set in Norway in 1940. We used his homebrewed rules that he is calling "Arc of Fire 2" but that don't really have much of AoF left - more BBB DNA in there, plus ideas from various other places.


The snowy Roa battlefield. Germans arrive from the left. Norwegians start hidden. They aim to hold the house and/or the hill in the top right corner; the Germans will try to exit troops off the right edge.

The German advance encounters nothing but reindeer initially. Behold the mighty Panzer I! Better than anything the Norwegians have, anyway.

The first ambush is sprung. Snowsuits have their pros and cons:
harder to spot than feldgrau, but they don't half show the blood.

Situation when we had to call it a day: mass combat developing around the bridge and the house objective. Sheep top left are unperturbed and unwilling to leave the little green circles they have nibbled through the snow.


The real weather outside matched the Roa game inside.

So endeth another fantastic January gamefest. Now for a bit of online gaming, followed by a stint of the regular Monday club games, and of course the next Bash Day coming up in May. If you can make it to Daventry on Sunday 19 May, you can be assured of an HQGE of your own!

Wednesday, 26 July 2023

Waterloo: "I have never felt so emotionally immersed in a game!"

The grand projet of compiling a book of BBB scenarios for all of Napoleon's bloodiest, biggest battles approaches completion. One rather important ingredient of that set is Waterloo. We first visited this for the bicentenary in 2015, when we did a demo game at our local military museum; reprised it later that year; then I ran it for my US buddies in 2016. Mark has now taken my original scenario and tweaked and polished it a bit. This week we playtested his version.

Everyone knows Waterloo. Napoleon is trying to prevent Wellington and Blücher from combining against him, so he needs to beat Wellington before Blücher turns up. In game terms, he has to hold 4 of the 5 Objectives for a win or 3 for a draw. These are Hougoumont, La Haye Sainte and Papelotte, which define the Allied line (Papelotte also represents a wedge between Wellington and the Prussians); and Plancenoit and Mont St Jean representing the French and Allied lines of communications. The French also lose an objective if either of the two Old Guard infantry units becomes Spent. (I know there are wargamers who think it is stupid to make Hougoumont an objective. I refer you to my essay, 'Victory Conditions in Wargames'. See also the thoughts at the end of this post.)

Dave donned Picton's top hat. Crispin put on his Wellingtons. Phil, with his particular affection for d'Erlon's corps, took the French right, leaving me to command the left and the Guard. Mark refereed and controlled the Prussians once they arrived.

The Allied line looked dauntingly solid. Phil and I decided not to attack it head-on. Our plan was an initial right hook with both d'Erlon and Lobau, while we built a grand battery to pummel the Allied centre. Reille was to shift right and sit behind the grand battery to keep us balanced. As for where to commit the Guard, that would depend how the first few turns went.

Eight pics below tell the story of how this plan worked out, followed by some reflections on the game as usual.

View from behind the French centre. Allied position on the ridge at top of pic. Hougoumont behind its orchard top left, La Haye Sainte top centre, Papelotte next right. D'Erlon's corps in the lead upper right, followed by Lobau around La Belle Alliance middle of pic. Reille is queuing up lower left, with the Guard bottom left. The Corsican ogre himself lower right, complete with Mameluke. (Nice armies, Mark, but come on - flock those bases, please!)

British view from behind a thin red (and green, black and blue) line along the sunken Ohain road atop the ridge, with a few reserves behind the centre in and around Mont St Jean, and garrisons posted forward in the three defensive bastions of Papelotte, La Haye Sainte and Hougoumont. Note how the left is hanging in the air. This is what our right hook targeted, much to Dave's consternation.

One last panoramic pre-game shot, this time from the west. Top centre and left of picture are the woods through which the Prussians will eventually emerge. The Allied right is also somewhat open, though Hougoumont is an obstacle to any left hook and there is also Chassé's Dutch-Belgian brigade in Braine l'Alleud just out of shot at bottom left corner.

French Turn 3: plan view of almost the whole battlefield (still couldn't quite get Chassé in). D'Erlon was slow to move out, thanks to a series of poor activation rolls, but there are now six French units across the stream upper right beyond Papelotte and Smohain/Frischermont. Saxe-Weimar's Nassauers (not 'masseurs', Dave - that's a different game) have been expelled from Papelotte and are now Spent.

Close-up of the exploitation from Papelotte. Lobau's men are about to complete the rout of the Nassauers, then pile into Picton's best infantry and shove them back as well.

Now the French plan evolves. Lobau's success and the menace of Milhaud's cavalry on the Allies' left flank have drawn every reserve away from the Allied right. The grand battery has formed with Reille behind it in the centre. The time is right to commit the Guard and Kellermann's cuirassiers in a left hook. not least because there isn't much space anywhere else. Here we see them advancing along the ridge that leads around the left of Hougoumont. Green cubes denote 'Aggressive' and the purple counter 'Shock' - good things to have on your side when it comes to the assault.
The high point of Lobau's and d'Erlon's attack. Out of shot to the right, one of d'Erlon's divisions will storm an Allied artillery position and deliver deadly fire into the flank of the Hanoverian Landwehr bottom right. Top left, Allied reserves frantically march east to contain the breach. Top centre is our nemesis, the Household Brigade, kept in hand by Old Nosey himself. These heavy cavalry are about to unleash a series of devastating charges.

No photos of what ensued on the French left as I was too busy actually doing it. The left hook ran into some murderous Allied volleys but managed to push the supporting units back from Hougoumont. The Old Guard stormed the chateau, then survived a sanguinary counter-attack. The Allied right was in tatters, its fragile Dutch-Belgian formations Spent and the British ones severely reduced.

'Die Teutschen kommen!' The Prussians began arriving halfway through the battle. They reached the environs of Papelotte at the same time as the Household Brigade smashed d'Erlon. Lobau was unable to resist this fresh force on his flank and was brushed aside in turn. Papelotte was retaken, though the Prussian focus there meant Plancenoit was never threatened.

However, in the meantime, the grand battery had done its work and Reille had taken La Haye Sainte. Counter-attacks were bloodily repulsed and the Allied centre was largely shredded as well. Little stood between us and Mont-St Jean! Albeit our right was collapsing even faster than the Allied right and centre.

Thus, as night fell, the French held Plancenoit, La Haye Sainte and Hougoumont - another classic BBB honourable draw.

Reflections:

Waterloo - it's a classic. Obviously it gets played and replayed so much because it is so famous and such an emblematic pinnacle of a quarter-century of the Revolutionary and Napoleonic Wars. But it also gets replayed because it has genuine replay value. We players try all sorts of different plans to prove that we're smarter than Napoleon. Left hooks, right hooks, smashmouth, combinations thereof, and the ultimate question of where to commit the Guard ... Mark described our French plan this time as 'very elegant'. Maybe so, but it still didn't work!

Identifying (and identifying with) units. Another good thing about Waterloo is that the commanders, formations and regiments are so familiar. It definitely helps bring a game to life when we can talk about 'committing the Household Brigade' rather than 'those red cavalry', or say 'stand firm the 52nd!', or when Dave can command his beloved Nassauers, etc. That in turn helps with players' engagement with the game. Quote of the night: 'I don’t think I have ever felt quite so emotionally immersed in a game – from frustration to elation to admiration to regret and finally despair!' (and bear in mind this was not that player's first rodeo).

Marshalling large forces. Echoing what I said after January's Borodino game, with over 20 units a side you really feel as though you are shifting weighty masses of troops around the table. Committing the Guard becomes a much more substantial decision when it's five potent units (plus artillery) rather than just one or two. It definitely gives a meaty, bloody big battle feel and makes it easier to pretend you're a Marshal of France.

Hougoumont: red herring or precious prize? I mentioned the fact that some think it is stupid to make Hougoumont an objective. There is certainly a case to be made that the historical French attack on Hougoumont was poorly planned and executed and didn't need to happen when it did. I am less sure about whether Napoleon could have ignored entirely. In our game, it wasn't my initial focus - I wanted to win by scrubbing away the weaker and less well ensconced units supporting it - but the chateau was a thorn in my side, and I actually found I needed to storm the chateau to break the line behind it anyway. If Napoleon wants to ignore the chateau, that means ignoring the Allied right. What does he do instead? As the scenario stands, the French don't have to take Hougoumont to win, but making it an Objective rewards them if they do capture this key to unlocking one sector of the Allied position. I think that's reasonable.


Thursday, 28 January 2016

Back with a bang: Waterloo, Winter War, AWI, Iran-Iraq War ...

Excuse the gap in posts but I only recently got back from my annual January gamefest. This was even better than last year's, another outstanding High Quality Gaming Experience. Four days, nine games, a dozen good friends, countless shots of exotic alcohol ... So let's review the gaming.

Waterloo (BBB).
This was the scenario we put on at the Oxfordshire military museum last year. I ran it twice on successive days with different teams of players. First game: Allied dice on the right wing were absolutely dire throughout. The French were able to seize La Haye Sainte and Hougoumont, repel counterattacks and smash Allied units with massed artillery, and comfortably fend off the Prussians. A clear French win. Second game: a different story. More aggressive (and less unlucky) Allies contested everywhere vigorously. Hougoumont changed hands twice, La Haye Sainte three times, and the Prussians drew large French forces off to protect Plancenoit and their line of communications. The French were fortunate to escape with a draw.

BBB Waterloo in 15mm: initial positions

We did end up thinking that the scenario would benefit from the addition of Papelotte as an Objective, and cranking up the French victory target by one. I may modify it and replay it accordingly at some point.

Russo-Finnish Winter War (Check Your Six!)
Nick has all the Finnish air force unit histories  and has been creating scenarios for Finnish air battles 1941-1945. We got to fight two of these. The first pitted two Finnish Bristol Bulldog fighters against half a dozen Soviet I-16 Ratas, on I think day 2 of the war. I showed my appreciation of Nick's effort by shooting down his Bulldog for a Soviet win.

The second Winter War battle saw a dozen Soviet SB-2s trying to bomb an important Finnish railway station while being set upon by four Finnish Fokker D-XXIs, when four Ratas turn up to intervene. One of my SB-2s got heroic and defied engine damage, a fire, a rudder hit that sent him into a spin down to treetop level, and a persistent tailing D-XXI that killed the gunner, and still managed not only to unload his bombs but to cause maximum damage right on target before he was finally shot down. My Rata then scared a damaged D-XXI pilot into bailing out. Soviet win 26-23, I think.


Iran-Iraq War (CY6 Jet Age)
CB has a pile of scenarios ready to playtest for a planned Iran-Iraq War campaign book for CY6 Jet Age. He ran a really interesting fight for us: an Iraqi chemical bombing run against an Iranian causeway across a lake in the face of Iranian AAA and Hawk missiles, a Phantom, and some F-5s. First up I was in Iraqi Su-22s flying SEAD ahead of our bombers. I didn't manage to touch the AAA, but I did take down Nick's F-5. My teammates missed the causeway but destroyed all the AAA, and I think shot down more than we lost, so this was an Iraqi victory.

Then we swapped sides and fought it again. This time the Iraqis chemicalled the causeway bigtime, but didn't touch the AAA, and lost the dogfight. My F-5 gunned down CB's Su-22 in a head-on pass, then missiled Alvin's. Iranian win.

Lexington & Concord (Muskets & Tomahawks)
This was really a highlight of the weekend. Apparently in 1775 there was some minor colonial scuffle. My American friends were much more au fait with the details than I was. Anyway, Rob ran a game for us based on the scenario in the Canadian Wargames Group's "Whites of their eyes" campaign book. Rob's gorgeous 28mm figures and and Scott's beautiful terrain made for a great spectacle. We used the "Muskets & Tomahawks" rules. These are skirmish rules but Rob made each group of 5 to 10 figures represent a company, so we were able to do the whole battle. I'd never played M&T before but the rules were very easy to pick up, quick and fun to play, and the game romped along.

And the scenario was really excellent. It's a situation which would be fun with almost any half-decent ruleset, because both sides are obliged to manoeuvre and there is action all over the park. Added to that is the wonderful way in which CWG have woven the history in. We had to draw cards at frequent intervals for random events which might help or hinder either side. The ones I particularly remember enabled us to capture Samuel Adams and Paul revere; John Hancock just got away by the skin of his teeth. Other cards affected things like the weather, or British troops mistreating harmless civilians (costing victory points), etc. It was a tremendously exciting game. As the British, the endgame was especially tense, as we raced to get the last few units off-table and escape the zombie-like hordes of American militia closing in on us from all sides. Final score couldn't have been much tighter, 21-20 to the King's men, and a revolt nipped in the bud and would-be rebels dead or discouraged, damn their eyes, sir.

My tally for the year is now:

Played: 6
Won: 6
Drawn: 0
Lost: 0