Showing posts with label 1866. Show all posts

Tuesday, 9 August 2022

Baptism of fire - new players fight Kissingen (1866)

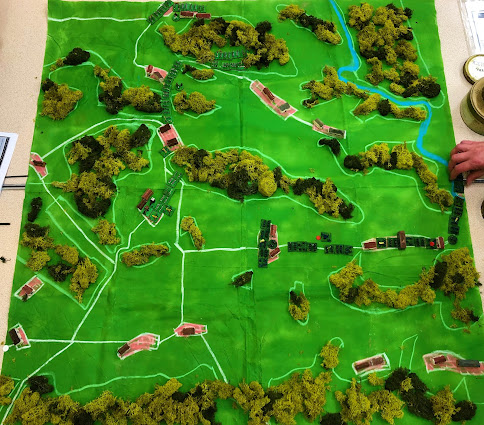
As if one enthusiastic recruit were not enough, Phil's recent arrival at Oxford Wargames Society has now been followed by Luke and Ben, who joined us for the first time this week. For their swearing-in ceremony, Mark laid on another little-known battle from the Austro-Prussian War of 1866: Kissingen.

At the start of the war, Austria had several allies in west and south Germany, notably Hanover, Bavaria and a composite VIII. Federal Corps of various contingents. These attempted to link up but were forestalled by Prussia's swift destruction of the Hanoverian army at Langensalza (one of my favourite 'training scenarios' for BBB). The Bavarians lost some initial skirmishes and fell back to hold the line of the River Saale. In the battle of Kissingen, the Prussians forced the line of the Saale around Kissingen, then held off a Bavarian counterattack on the heights around Winkels, preventing the Bavarians from joining up with VIII. Corps.

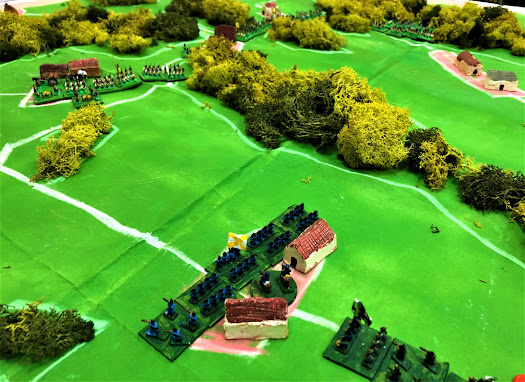
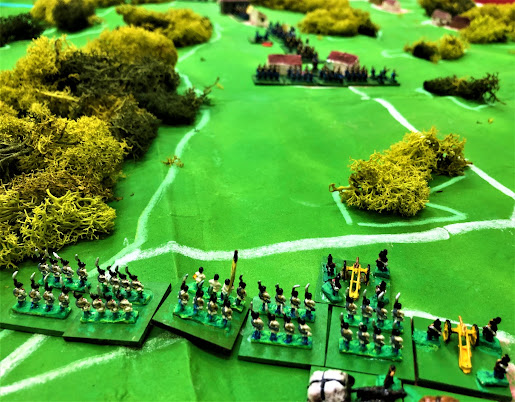
Some of Mark's Baccus 6mm Bavarians on the parade ground before deployment. He also has some in the soft cap that they wore in 1866 as well as the Raupenhelm. I told him he needs to get flocking - as we all know, beautifying bases makes a difference! - but of course, time spent flocking is time he can't spend writing more excellent scenarios for us.
 
Our game was a jolly romp and a good introduction for our new players, who took the Prussian side along with David B against me and Phil as the Bavarians. I had a bit-part, commanding the screen along the river. My battalion facing Luke and Ben in Kissingen itself was swiftly crushed by needlegun-armed Prussians stampeding across the bridge. My boys further north in Friedrichshall did rather better, holding up von Manteuffel (David) for several hours, much to his frustration ... until I got cocky and advanced my right flank battalion out of its nice defensive position in an objective village (Hausen) behind a river, only to find itself embarrassed, isolated and annihilated.

The serious action was in the centre and left. Flushed with success, Luke's Prussians pushed forward and found themselves in the killing zone of Phil's guns and longer-ranged rifles. His first regiment learned a hard lesson. But more followed, pressing on into Winkels itself while Ben's troops took two objectives on the heights in the south (our left flank).

As Bavarian reinforcements began arriving in force, the Prussians had a glorious chance to seize the remaining height north of Winkels. Our regiment there had been battered by Prussian fire and its guns driven off. Two Prussian regiments stormed up the hill - and the defenders rolled 12, the 3% chance they needed to halt the assault which would otherwise surely have crushed them.

This was the turning point of the game, after which swelling Bavarian numbers became inexorable. Such are the fortunes of war!

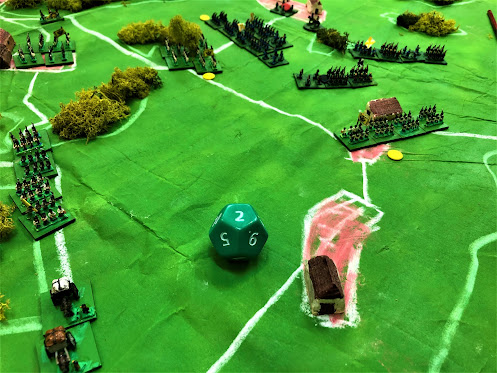
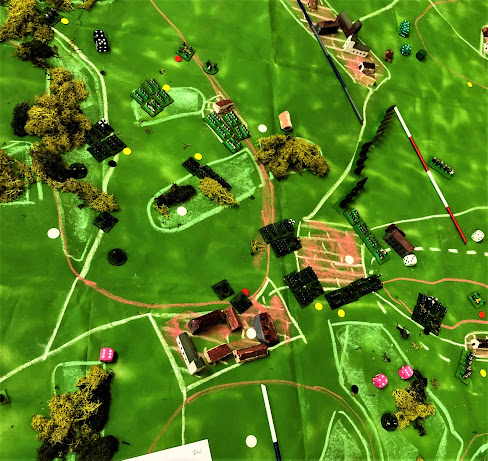
Only one photo of the actual game, sorry - I was too busy yakking:

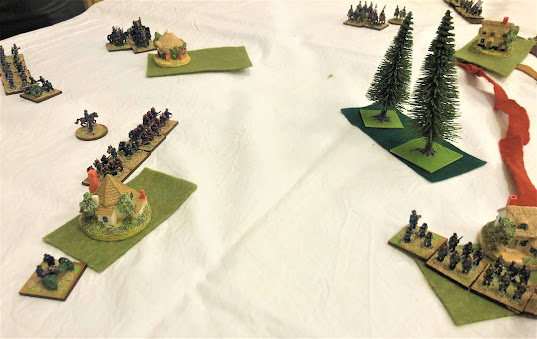
Those are not islands in the sea - the lighting just makes Mark's cloth look blue instead of green! The little village is Winkels in the centre of the battlefield. The heights either side of it are where the main Bavarian stand took place. Prussians approach from right of pic. Led by the Lippe-Detmold battalion, they have surged onto the further height and are about to expel its Bavarian defenders. The nearer Bavarian regiment has had its artillery silenced (yellow cubes) and is about to be half blown away by massed Prussian guns. The disrupted Prussians in the centre are about to rally to storm this height, only to be thwarted by a last desperate volley from the few remaining Bavarians there.


Reflections

Another fun scenario from Mark's expert pen: a game of two halves in which both sides get to move and attack, the Prussians first surging forward, then having to repel Bavarian counterattacks.

Pay attention to the briefing! I might have done better had I brought my potentially counter-attacking reinforcements on where they were supposed to arrive, rather than two feet more distant from the enemy. It was all there on the scenario handout. Oh well - generals can be careless as well as players.

Exotic units add colour. Two bases of troops on the Prussian side represented the entire Lippe-Detmold contribution to the war, a battalion in nice green uniforms with a fetching red and yellow Lippe flag (glimpsable in the photo above). The pleasure of little aesthetic touches like that is why we game with figures rather just cardboard counters.

There's so much history to enjoy. I knew there was significant action in southern and western Germany in 1866, as covered by Mike Embree's book on those campaigns, 'Too Little, Too Late' (on my to-read list), but playing this game has given me a better sense of what went on.

Great to have new recruits joining with fresh enthusiasm, and to watch their epiphanic joy as they discover just how much fun wargaming can be. All the new men have acquitted themselves very well thus far and are absorbing the ethos of our elite unit.

Tuesday, 5 July 2022

"Joy of 1866": the Joy of Six show, then Skalitz

Been an intense couple of days wargaming-wise. Sunday: my second ever visit to the wonderful Joy of Six show; Monday: a tense and exciting BBB Austro-Prussian War battle.

Joy of Six

Joy of Six, for anyone unfamiliar with it, is (in normal non-COVD years) an annual event in Sheffield UK run by the excellent folk at Baccus. It is dedicated entirely to wargaming in 6mm scale. I went along with my old friend Colin and new recruit Luke. I was committed in advance to helping Tim Carne run his Gettysburg game. However, the day before the show I learned that a game had dropped out, so I decided to throw a box in the boot of the car in case. A good move, as it turned out. When we arrived I was introduced to Pete of Baccus, asked him if he'd like another game, he said yes. Fortunately, the gap in the ranks was next to Tim's game. I'd brought a specially printed battlemat so we were able to roll out the battle of Isaszeg (1849), from the Hungarian War of Independence, and set the whole thing up in about 10 minutes. That done, I left a note on the table saying to find me next door at Gettysburg.

Tim's game was much admired, especially his very effective woods - cut from soft 'pebble' bath mats and sprayed green (I guess this one from Dunelm) - his armies were very nice too and the whole layout looked good. Special mention of his ingenious and convincing cemetery arch. He had a regular stream of interested persons passing comment, asking questions, taking photos, and of course a number actually sitting down to play. The game rocked along; the Union lost several units entirely quite early on and even with copious reinforcements never really recovered from those setbacks, so the Confederacy managed to reverse history. But it's more about the journey than the destination and all the travellers aboard seemed to have a good time. Meanwhile at the Isaszeg table, in the afternoon Colin introduced Luke to his first game of BBB. We talked to a lot of people and evidently the two BBB games provided a lot of ideas and inspiration. The fact that our layouts were simpler than the many more lavish productions was a nice contrast and showed games that were very 'do-able' for the average gamer.

In between whupping them Yankees, we did manage a tour of the show, drinking in all the wonderful sights on display. Others have done good photo reports, eg Whirlwind's here or Ithoriel's here, which is just as well as I didn't take any pics. I particularly liked Per's Swedes in the snow; the fabulous Imjin hills and paddy fields; the Khorramshahr cityfight; the CWC townscape ... there were plenty of traders present too, apologies to them that they didn't get any of my £££ this time, but I'd like to think I steered some custom to them indirectly by stimulating others to start new projects.

All in all it was just a great day, enjoyed equally much by newbie Luke and old lags Colin and me. So good to catch up with so many old friends and new and to enjoy such a feast of 6mm goodness.


Skalitz (1866)

Then it was back to the club for a regular Monday night's gaming. Crispin laid on the sequel to last week's Nachod game, Skalitz. Like Nachod, this was one we had only fought once before remotely as a PBEM. I'd revised the scenario a bit on the strength of that first playtest. The new version gave us a game that was very one-sided in terms of casualties - just like the real thing - but utterly gripping game-wise. The tension came from the fact that the Prussians were up against the clock. Turn 6 was the first deadline, by when we (the Prussians) could achieve an early victory if we could take 3 objectives. It was a turn of high drama as we launched mass assaults which took a second but just failed to capture the third. On to the next deadline, then: Turn 8, by when the victory count was four. On Turn 8 we stormed into two objectives to take our total to five; Austrian counterattacks ejected us from one, but narrowly failed to retake the other. Thus we won a turn early. Had their second counterattack succeeded, that would have taken us into a final Turn 9 in which we would have needed to recapture both and claim all five objectives for victory - by no means guaranteed.

The Austrian army was thoroughly battered, though, and the Austrian players did query the scenario balance. I may have over-corrected after the previous playtest, but on reflection I think perhaps not. The Austrians were unfortunate not to inflict a couple more casualties on our Prussians by fire in the early turns, and they launched some assaults mid-game that could have enjoyed more success than they did, yet the end-game was still pretty tight. OK as it stands, I reckon.

There now follow half a dozen photos of the Skalitz game with brief captions. If those don't excite you, I suggest you skip past them to find two sets of Reflections: first on Joy of Six, then on Skalitz.

The battlefield. Austrian columns are visible around the top centre of pic (west edge), about to push forward to meet the thin dark blue lines of Prussians arriving from the east (bottom of pic). The five objectives are the two woods in the centre; the gentle rise south of them (brown contour line with a white objective counter); Zlitsch (the church upper right); and Skalitz station (top left/centre). The Prussians also earn an objective if they kill both Austrian cavalry units, which explains why those stayed well out of the fight until the desperate last turn.

The Prussian advance guard moves to envelop the Austrian jaegers' outpost in the woods. The numbers don't look good for the jaegers but they are playing at home. They lasted a fair while.

Austrian columns arrive to beef up the jaegers' resistance and hold the forward position until Turn 6. Other Austrians lurk around the Prussian flanks, hence those Prussian flank units facing out.

Smash! Charge and counter-charge as the Prussians try to expel the Austrians from the woods and capture the adjacent rise. The Austrians get a bonus in the assault for their Stosstaktik - but only if they manage to survive the defenders' fire and close with the bayonet.

The crucial Turn 6 and there are a lot fewer Austrians than there were. That is largely explained by the black counters indicating Prussian units now low on ammo, having done much execution. (Yellow is disruption, blue is spent because of casualties, red indicates a half-strength artillery unit.) The Prussians haven't quite managed to clear the Austrians off the rise, though, and suffered some casualties of their own in the attempt.

Two turns later and the Prussians have just managed to achieve their victory condition. The woods and the rise have been taken. Zlitsch is still Austrian-held, but the station has fallen and the cuirassiers and jaegers in the south were unable to retake it. Game over, man!

Reflections on Joy of Six

Great to be back at a show again! Looking forward to my next one already (Colours, Newbury, 10 September - be there - free entry this year!).

Apart from the actual gaming, it is so stimulating to meet and talk with fellow gamers about all and sundry, including some legendary names in our hobby. Thank you to everyone who stopped by our two games to roll dice, to chat and share ideas, or just to say hello.

6mm has been my preferred scale since I was a teenager and I still love it. If I were to start again now, I might go with 10mm which still provides the mass battle effect I want but is easier for older eyes ... but I'm so invested in 6mm that I'm not changing now. It's still brilliant.

Huge kudos to Pete and Lindy of Baccus for such a wonderful show - and congratulations and best wishes for their impending nuptials!


Reflections on Skalitz

A super game for a Monday night, large enough to be interesting, small enough to be done and dusted in a couple of intense hours.

Asymmetry! Said it before, say it again: clashes between very different armies in terms of weapons and doctrine make for tactically interesting games.

The unusual victory conditions added extra drama. Usually it's saved up for the last couple of turns, but this delaying action scenario's phase lines meant more high points along the way. It could have backfired, I suppose: if we had actually taken three objectives for an early victory on Turn 6, we'd have been finished half an hour earlier, which might have been a bit deflating. So I wouldn't script every game that way, but for this one it worked well.

Potential campaign day? Dave W suggested running the two pairs of Bohemian border battles - Nachod & Skalitz, Trautenau & Soor - as linked micro-campaigns all on the same day, with teams of players rotating among them. People at Joy of Six were also asking about when we might run the next BBB Bash Day (our plans for Bash Day IV having been scuppered by COVID-19). Won't happen this year, but we should definitely start thinking about Bash Day IV for 2023.

Tuesday, 28 June 2022

Replaying scenarios: pros and cons?

Most of my wargaming for the past decade and more has been historical refights of nineteenth-century battles using the "Bloody Big BATTLES!" ruleset (BBB). Fortunately for us (if less so for many of the nations and peoples involved), the C19 covers a huge number of wars which generated a huge number of battles, so there's no prospect of us running out of fresh scenarios to game any time soon. Nevertheless, for various reasons, our group fights some battles multiple times. As we've done a couple of these refights this month, I thought this a worthy topic for another of my "Reflections on Wargaming". Basically, the question is: what is the point of going over the same ground again (and again and again)?

In my popular post on "Reasons not to refight historical battles", one of the main objections several commenters raised to any historical refight was "We know what happened": we already know what reinforcements will arrive where and when, which generals made what mistakes, there's no surprise element, it's obvious what one side or the other should have done. Replaying a scenario is effectively a refight of a refight, so if these factors are a problem the first time, surely they're a problem squared come the replay, right? Any novelty there might have been has to have worn off, the best plan for both sides will have been discovered if it wasn't already, we'll just be going through the motions. Why waste our time on such a tired game when we could be doing something new and different?

Well, let's take a look at this month's two re-refights and see how they played out and whether they were worth it. The games in question were Loigny/Poupry (Franco-Prussian War, 1870) and Nachod (Austro-Prussian War, 1866).


Loigny/Poupry

This is one of the scenarios in the BBB rulebook. I wrote it in 2013. Obviously we playtested it several times before publication, but it has made it onto the table several times since then as well. It has several virtues as a game: the terrain is reasonably easy to set up; both sides have plenty of manoeuvring to do and choices to make; it's a fun match-up of German quality vs French quantity.

I have never, ever seen it produce such an emphatic French victory as we saw this month. The battle revolves around three victory locations that define the German line. Two of them are vacant initially, as the only German troops on the table are the Bavarians around Loigny on the German right. It's a two-day battle, and on the first day the French only get one corps that arrives on their left to take on the Bavarians. Both sides get more troops on day two that arrive on the other half of the table around Poupry.

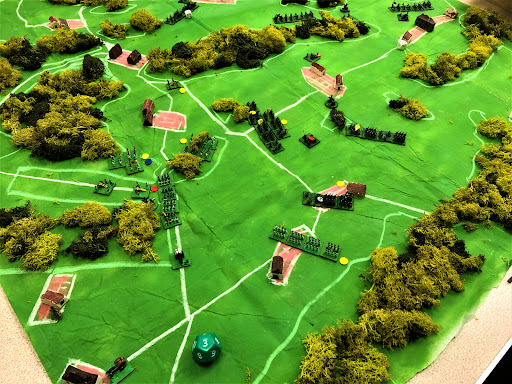
Initial setup. Bavarians deployed in the western (left) half of the table. French will enter from the south (bottom) edge. Three red counters barely visible are the three objectives. L-R: Loigny; Lumeau; Poupry.
 
Nevertheless, the German plan involved thinning their right immediately so as to race troops across to occupy all three objectives. There was certainly a logic to this: it is easier to defend villages than to take them, so stealing a march on the French in this way could have paid off. However, it meant that most of the German artillery was silent on day one, because it was moving away from the action around Loigny; and the troops left to defend Loigny were outnumbered and ultimately enveloped and overwhelmed. When the main forces arrived on day two, the Bavarian brigades that had raced across to Lumeau and Poupry found themselves isolated and outmatched in turn; the Hessians and Holsteiners doubling forward to help them chose to attack across the open ground on the extreme left instead of filtering through the woods and supporting the centre; massed French firepower drove them out of Poupry, and the Papal Zouaves led a massed assault to drive them out of Lumeau in the centre.

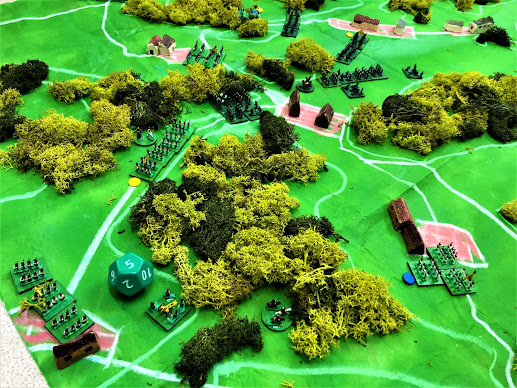
French left swings round to envelop  the Bavarians in Loigny (bottom right) who are about to be targeted by the French mitrailleuse. The opposing cavalry at top of picture did very little all game apart from cancel each other out. 

Western half of the table again, circa nightfall. The face-off in the villages top left lasted pretty much for all the next day with inconclusive mutual assaults, but that thick blue French line bottom of picture overwhelmed the defenders of Loigny and pressed on towards Lumeau.
 

Victors and vanquished alike were all stunned. Admittedly we had tweaked the scenario a little, treating the built-up areas as 'Villages' rather than 'Towns', which reduces their defensive value and makes it easier for the objectives to change hands. This perhaps favoured the French attackers more than the German defenders, but as there were lots of villages that the French could use from which to develop their attacks, it was a two-way street rather than a one-sided tweak, so we can't blame the German defeat entirely on that. The French may have had slightly the best of the dice, particularly in an artillery duel that developed in the centre and saw the German gun line driven back, but the dice weren't outrageously skewed either. It has to come down to the German plan misfiring.
  

Endex. All three red counters have turned blue to show they are now French-held. The German force has been reduced to a few scattered remnants in the top half of the picture north of the road between the objectives. French quantity beat German quality on this occasion.

So, was it stale and tired? No! Had the novelty gone? No! It was a most exciting and entertaining game that followed a most unexpected course. A previously untried German plan made for a very different battle from any of our previous refights and offered fresh grand tactical lessons. And, last but not least - it's always nice to field the Foreign Legion and the Papal Zouaves.


Nachod

This scenario is of more recent vintage: I wrote it in early 2020, just before COVID lockdown struck. Consequently it provided one of our first remote games that April (AAR here), but it hadn't yet made it onto the table for a face-to-face encounter. Crispin was keen to lay it on again. In fact he was the only one of our group this time who had played it first time round (I GM'd then), as we had some different personnel for the reprise, including a new recruit - Philip - whom we only met and roped in 5 minutes before kick-off.

It's a fun battle. The Prussians start with just a small advance guard on table, which has to deploy quickly into suitable positions to hold off advancing swarms of Austrians in increasing numbers until the Prussian main body arrives mid-game. This makes it a game of two halves, as the Austrians have to seize vital ground initially, then fend off the inevitable Prussian counter-attack. It also makes it a good game for a new player such as Philip, who was able to learn the rules while handling just a couple of units at first, then get more to do as more troops marched on.


Looking south across the battlefield. Prussians are marching out of the pass through Nachod, lower left; Austrian columns visible arriving from top right, with more to come on from the right. Pink lines are contour lines marking the edges of hills; white lines are roads; white counters are objectives.
 

The Austrians definitely had the rub of the green in the crucial early turns. A combination of dire dice on Philip's part and a careless error on mine, squandering von Wnuck's improvised cavalry brigade, saw the Austrians swiftly occupy the three (out of a possible six) objectives they needed for victory, inflicting heavy losses on our Prussians as they did so.

The tide turned, though. It took us half the game before we caused a single Austrian casualty, but once we got serious numbers on the table, Austrian losses mounted exponentially. Philip particularly remarked on seeing the asymmetry of weapons and doctrine between the two armies play out on the tabletop. In classic BBB fashion, several objectives were in play on the last couple of turns, thus all three results were still possible; but, again in classic BBB fashion, while we Prussians were able to kick the Austrians out of one objective, they comfortably held a second and just clung onto the tiniest toehold in another for a draw.
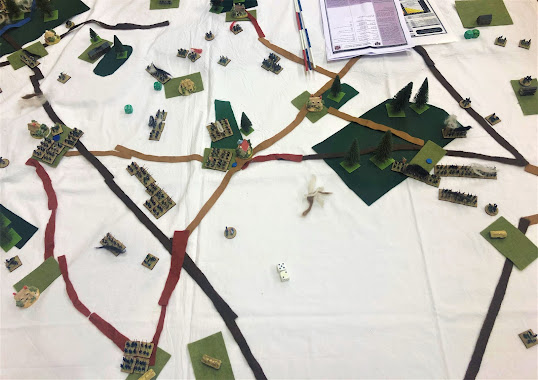
Game end. This scruffy table littered with counters and paraphernalia is an indication of how frenetic the game became as it entered the last few turns. The Prussians (on the darker bases) have retaken the wood in centre of pic, but have not quite managed to eject the Austrians from the square village to its right. The Austrian ranks have been thinned considerably, as they were historically: Ramming's corps was unfit to fight next day at Skalitz.

Given the mostly different players, it was only a refight of a refight for Crispin and me, but we certainly both got value out of it as we were playing different roles. It was also a rollicking seesaw game. It played out somewhat differently from the remote game too: in that, the Austrians steamrollered as far forward as they could and at their highwater mark held five of the six objectives, too many for the Prussians to roll them back from, hence a (suitably Pyrrhic) Austrian win; in this one, Crispin and Dave chose to consolidate once they had the minimum three for a win, but could only hang onto two for a draw.


Reflections

- The only real reason against (or perhaps two sub-reasons), (a) the risk of staleness/lack of novelty, and (b) 'we know what happened', were emphatically dispelled in both games. Both played out differently from their previous incarnations, Loigny radically so.

There turned out to be plenty of reasons in favour of wheeling out the same game again:

- It gives you a chance to try solving the same grand tactical problem with a different plan (which can backfire entertainingly, as the Prussian one did at Loigny)

- You can see the problem from the other side, as Crispin did by playing the Austrians at Nachod (he'd been Prussian in the remote game)

- If you've painted up some exotic unit like the Papal Zouaves that only featured in one or two battles historically, a refight may be the only way to get them on the table again in a historical scenario

- Refights allow exploring different 'what-ifs'. For Loigny, we tried a tweak that changed how the terrain effects were depicted (reducing the defensive value of the villages). Other scenarios offer historical options such as the arrival of troops that didn't quite get there historically, etc.

- Refights are obviously essential for playtesting. Nachod is still in draft. After the first outing, the remote game, I did a second draft that handicapped the Austrians by making them Passive. But we didn't apply that change in the second game, and having seen how that went I think it unnecessary.

- Some scenarios become 'old friends' because they offer enduringly enjoyable tactical challenges; others because they are easy and convenient to set up quickly for a club night. Loigny qualifies on both these counts; Nachod more so on the first (though Crispin had prepared another of his battlemats so actually we were able to just roll it out and set up in 5 minutes); the ones I always recommend as BBB 'training scenarios', Montebello and Langensalza, meet these criteria too.

- What is familiar to some may still be fresh to others. For Crispin, Nachod was a refight wearing a different hat; for me, it was a refight where I got to play rather than umpire; for Mark and Dave it was their first go at the scenario; and for Philip it was his BBB baptism of fire.

Final reflection:

- Saying it myself, I know, but BBB just makes for exciting, fun games - the HQGE. I hadn't played for a few weeks before coming back to these two games in succession. Both were dramatic and exciting in different ways: Nachod a classic ebb-and-flow, will-they-won't-they rollercoaster; Loigny more of an oh-my-god that just got worse and worse for the Germans to the extent that the German players had to laugh at their own misfortunes. The games were as fresh now as when we first started kicking rules ideas around in 2009, and showed why BBB has attracted such a diverse group of players to our corner of the club and remained our staple ruleset for over a decade.


===

Update 2 July 2022: this was another popular post that generated a good 100 or so comments on various forums. These are the links if you want to see the full discussion there:

TMP

Pendraken

TWW

LAF

To summarise/paraphrase the negative ones first:

“You can’t actually do a historical refight” or “I don’t like historical refights” or “Is a refight just an exercise in seeing who can roll better dice?”. (I like your cynicism, hammurabi70!) I think this was sufficiently addressed in my previous post on “Bloody Big BATTLES Blog: Reasons NOT to refight historical battles” so I’ll say no more on that here.

“Historical battles are too big for my table”. Hmm: well, that’s why we created BBB, to fit pretty much any battle on a modest 6’x4’ …

“Generally not – there are so many battles to choose from, there’s no need to fight any of them more than once unless you feel like it.” Isn’t that “no but yes”?

“Don’t use dice. As random number generators they are indifferent at best.” A bit left field, John – where did that come from? There’s a discussion to be had there, but probably in a future post rather than this one.

Some scenarios lose their charm, particularly if not balanced or not many tactical choices, or once you’ve worked out the optimal play. Certainly true. Others lose their charm if they rely on some surprise event/element that can’t be repeated. Even more certainly true. Deephorse sums it up well: “Ultimately it’s down to the quality of the scenario”.

“No – each game should push me to paint more figures. That means minimum repetition!” I quite like this one. For me, the primary motivation is the game, but I can sympathise with those for whom the game is secondary to the aesthetic of the collection of armies. Bravo.


As for the positive:

“Yes, if only to play the opposite side.” Several made this point. I might add, if the scenario itself is unbalanced, playing it from both ends evens that out in a way. Or maybe it just gives players two chances to complain that the scenario is biased against them and they couldn’t have won anyway …

That “what if?” question. It’s the main reason for doing a historical game to start with; it still applies to refighting the refights to explore all the options or even see if a plan that failed can succeed with a bit of better luck.

Replaying the same scenario with different rules has value. Certain scenarios can become standard ones for testing rulesets.

Replaying the same scenario with different armies in a different period has value. Fighting Waterloo with the armies from Gettysburg was the example given. I’ve played Blenheim with Napoleonic armies.

Scenarios, historical or otherwise, are a good way to get a game started; replays reduce the (practical and mental) effort to set up.

Several commented from a gamemaster/umpire point of view. Of course if you’ve prepared a game for a convention, for instance, you probably want to run it a couple of times beforehand to test and practise it; and you might want to run the same game several times at one or more conventions, or even just for different groups of players at your club.

Yes, especially if you’ve invested in designing a scenario, creating bespoke terrain, painting specific armies or units for it – you should replay at least a couple of times to justify the effort!


Summing up: the consensus (among those who actually like to do historical refights at all) was that not every scenario is suitable, and you wouldn’t want to do the same one again and again forever, but there are so many good reasons in favour that “yes, of course you should do refights of refights”.

Huge thank yous to everyone who took the trouble to comment – it’s enthusiastic feedback like yours that keeps this blog going.


Tuesday, 8 February 2022

Bohemian border battle: Soor (1866)

Last month I enthused about our Trautenau game from the Austro-Prussian War. This week we fought the sequel, Soor (also known as Burkersdorf).

Soor was one of the battles fought along the Bohemian border in 1866. At Trautenau, the Austrian X Corps under Gablenz had repelled the Prussian 1st Corps. The next day, Gablenz discovered the Prussian Guard Corps had crossed the border further south and was threatening to outflank his right and cut off his line of retreat. A running battle developed as the Austrians tried to escape to the southwest through Soor. X Corps got away but was badly mauled, losing over 6,000 men vs about 1,000 Prussian casualties.

Our game therefore revolved around how many Austrian units could retreat off the designated exit. Or I should say, exits (plural), as there was about 75% chance that a second exit road would become available to them during the game. This was one possible result from a random events table which was rolled on every Prussian turn. The other possibilities included early release of the Austrian rear guard; arrival of help from Austrian IV Corps on the southern flank; Prussians stalled for a turn because of commanders' uncertainty; or a random Austrian unit obliged to halt or assault.

The whole battlefield fitted on 4'x4', on a larger ground scale than Trautenau. Last month's Trautenau scenario on 6'x4' was fought on roughly the upper left quarter of this map. The Austrian columns snake south from Trautenau (just out of shot, top centre) to Burkersdorf (middle left); they have to escape via the white counter at Soor, lower left table edge. Alternative exit may open at Altenbuch (centre of left edge). Prussians are queuing up from the east to march through Staudenz and cut off the Austrians' retreat.

The Prussian advance guard starts in Staudenz. Knebel's depleted brigade and the Austrian corps artillery await the Prussians at Burkersdorf. Austrian baggage wagons can be seen in Burkersdorf.

The thin white line! The same situation seen from Knebel's point of view. Those guns did a good job.

We Austrians benefited from some crucial dice in the first two turns. First, our fire halted the Prussian advance guard on Turn 1, meaning all the units marching down the road in column behind it were halted for a turn as well. Then at the start of Prussian Turn 2, the random events table sent us aid in the form of part of Brigade Fleischhacker of IV Corps materialising in Kaile behind the Prussian flank. 

Consequently, after Prussian Turn 3, although we had suffered some casualties (one regiment with a blue Spent counter, several with yellow for Disruption), both our baggage units were well on their way to the exit, with an infantry regiment and a couple of artillery units destined to follow. That would provide 5 against our target of 7 units exited for a draw or 8 to win. But where would the others come from? Four infantry regiments are still stranded out of sight above the top left of picture, with Prussians racing forward from the right to intercept them.

Once again, the random events table came to our rescue. This is the situation at the start of Austrian Turn 5. Two of the Austrian rearguard regiments and some guns have evaded the Prussian interception force and reached the vicinity of Altenbuch on the west edge of the table, with Gablenz in the woods nearby to motivate them. At exactly this perfect moment, the random roll opened up an alternative exit for us at Altenbuch, and all three units duly made their movement rolls to escape. The pursuing Prussians' needleguns mowed down our rear ranks, but not enough to stop us exiting our 8 units. Hurrah - another pyrrhic Austrian victory!

This all happened so quickly that we were able to reset and play through the whole game again. The second game was very different: the Prussians did a better job of closing off the primary exit early, so we only got three units off there; the second exit never opened up at all; Austrian Stosstaktik failed to break through the Prussian needleguns; we were quite thoroughly trapped and wiped out. 

Reflections

Random events tables are fun but, well, random. The random roll each turn did inject unpredictability and therefore excitement, which is good. On the other hand, the two games' very different outcomes were affected quite strongly by the random events, perhaps more than by players' plans. That's OK sometimes - I've used random events tables a few times before, eg for Coulmiers (Franco-Prussian War) - and it was certainly good value on this occasion. But you wouldn't want every game to be like that.

Fighting withdrawals make for good games. This was demonstrated by last month's Vác (1849) game too. At Soor, essentially you have two columns colliding at right angles, which is nice geometry for producing lots of manoeuvre and tactical choices for both sides.

Stosstaktik vs Needlegun - give me that asymmmetry. In our Trautenau game, the needleguns were outranged and defeated. Here at Soor, those Prussian breechloaders were devastating.

Four players plus an umpire is a very good formula. Crispin laid on the game for us, arbitrated as required, and policed the scenario special rules etc. Two of us on each side meant we all had enough to do, we could play in parallel (Mark vs Dave on our left, me vs John on our right) and get through the turns quickly.

Playtesting: the two radically different results did make us review and revise the victory conditions a bit. Even so, for an untested scenario, it gave us two damn fine games and needed very little tweaking. The untweaked version is one of the 100 or so freely available from the BBB groups.io files. (Go on, join the group - it's easy, no hassle, and >900 members can't be wrong.)

How fast and exciting was that! OK, so the first game was cut a bit short as the Austrians escaped on Turn 5 (out of 8). But we fought the second game to the bitter end. That's 13 turns of action, plus resetting the battlefield between games, yet the two games combined took just two and a quarter hours. It was intense!


Wednesday, 26 January 2022

Back in Bohemia: Trautenau (1866)

 After last week's loooong games, it was back to a more typical club night this Monday. Without making any particular effort to force the pace - in fact, with a fair amount of relaxed chat and banter along the way - five of us cantered through the whole 10-turn game in just two hours' play.

The battle in question was Trautenau, from the Austro-Prussian War of 1866. This was one of the border battles in Bohemia as the Prussian armies invaded through the passes. Historically, Trautenau was the one the Austrians won, albeit pyrrhically, obliging the Prussian 1st Corps to pull back through the pass it had emerged from but suffering four or five times as many casualties (>5,000 Austrian against some 1,300 Prussian).

We last visited the APW in September when John and I embarrassed ourselves at Gitschin. Before that, we fought another pair of the border battles in 2020, Nachod and Skalitz. Pitting short-ranged but deadly Prussian needleguns against the longer-ranged but slower-firing Lorenz rifle and Austrian Stosstaktik always produces enjoyable tactical challenges. Trautenau was no exception.

Crispin ran the game for us. His terrain deserves special mention. I've already applauded his marked-up mats that create convenient roll-out battlefields. Today let me pay tribute to his hills. Most of the ones he used for Trautenau were just picked out of his existing collection (the 'polystyrene jigsaw' approach, albeit his are wood). However, the centrepiece - the long ridge that culminates in the key heights of the Hopfenberg, Kapellenberg and Galgenberg - he had sawn to shape specially.

John and I took the part of the Austrians against the two Daves as the Prussians. The battle is a mobile one. It starts with the Prussian advance guard outside Trautenau confronting one Austrian brigade on the heights. Three more Austrian brigades arrive on Turns 2, 4 and 5. The Prussians receive a similar number of reinforcements on Turns 3, 4 and 5.

The view from the south. Trautenau is just visible behind the commanding heights, top left. Prussians are approaching from top right except for one small detachment via the road top left. All Austrian reinforcements have to march on via the road bottom left. White counters mark objectives. Trautenau and the three heights around it are four of these. Then there is a second line of three: the villages of Hohenbruck (upper left) and Alt-Rognitz (centre right) and the wood between them. The villages also have a red counter to denote that they are 'forward objectives'. The Prussians must hold one of these at game end to achieve the 6 total they need for victory; they have to have held one at some point in the game to earn a draw.

Initial set-up from the Prussian perspective with Prussians queueing up to march through Trautenau. The river is impassable except at Trautenau or at the Parschnitz ford (foreground). A line of Austrians crowns the heights to greet the Prussians. The Prussians' left flanking manoeuvre will have to contend with a succession of wooded ridges, the nearest - the Parschnitzer Berg - being a steep one.

The action was quite fast and furious, so we didn't pause for breath and to take more photos until Turn 7. Von Pape's reinforced advance guard has kicked Mondl's Austrian brigade off the heights with heavy losses, leaving two Austrian batteries top left stranded. Clausewitz is pushing more Prussians up to form a line in the woods. A Prussian cavalry column (centre right) tried to outflank the Austrians but got lost in the woods for most of the game and never did anything useful.

Turn 7 as seen from the Prussian side. The Austrian infantry have formed a solid second line defending the two objective villages and the wood between them, with a couple more batteries at the Hohenbruck junction. The ground between the opposing lines is ominously open. Over the remaining turns the Prussians tried repeatedly to assault, break through and take the wood or Alt-Rognitz, but weight of concentrated Austrian fire repelled them each time. Austrian victory!

Reflections

Terrain matters (1). Crispin's special effort to represent the pivotal hills really helped to represent the action around them accurately.

Terrain matters (2). We got a sense of the challenge the Prussians faced: bashing through a heavily defended pass on their right, or straggling through extensive difficult terrain on their left.

Firepower! After recent Napoleonic or 1848 games with short-range smoothbore weapons, this 1866 action with rifled weapons and breechloading needleguns gave a refreshingly different flavour. The Prussian needleguns demonstrated their lethality in the close combat around the heights. When it came to crossing the open ground to assault the Austrian second line, massed longer-ranged Lorenz rifles with artillery support came out on top.

Maintain the aim! I had read the scenario properly in advance and kept the objectives and reinforcement schedules in mind at all times. John and I therefore marshalled our troops appropriately and (with a little help from Bohemia's terrain and Prussia's poor movement dice) redeemed ourselves after our lamentable performance at Gitschin.

Mobile battles are fun. The nature of this pretty evenly-matched encounter battle meant both sides had lots of movement, and lots of decisions about where to commit reinforcements.

Commanders are crucial. In the historical battle, the Austrian Gablenz was as decisive and aggressive as the Prussian Bonin was shambolic and hesitant. Bonin had mixed up his formations, which caused confusion; some of his troops were particularly fatigued from long approach marches; and during the battle, some Prussian units retreated after misinterpreting signals. On the tabletop, this meant Bonin wasn't represented, and all Prussian units were rated Passive (a -1 on movement). Without those command penalties in our game, the Prussians would have moved fast enough to get into the forward objectives before the Austrian second line could form.

***

The scenario is in the BBB group files as usual.

Friday, 1 October 2021

Austro-Prussian War: Gitschin (1866)

Time is a bit short this week, but it would be remiss of me not to give suitably honourable mention to the fine game Crispin ran for us at OWS on Monday. This was an Austro-Prussian War action, Gitschin.

It's an interesting battle because, not unlike last week's Hegyes outing, one side's mission changes radically halfway through. Once again it is the Austrians who have this awkward problem to deal with. They start the battle determined to hold a defensive line and halt the Prussian advance. Then, when they are already inconveniently heavily engaged, a courier arrives with the order to withdraw.

Crispin addressed this in scenario terms by requiring the Austrians to hold three out of four objectives on the defensive line until either Turn 5 or Turn 6 (determined by a die roll on Turn 6 to prevent unduly gamey actions by the Austrian players). If they fail, they lose instantly. After that, victory is decided by how many Austrian units manage to escape off their home road exits.


View from the southern corner of the battlefield behind the Austrian lines. Austrian columns can be seen marching forward to occupy the line against the Prussians who will march on at top of picture. More are off-camera in the distance to the right. Saxons will arrive left foreground on Turn 2. In the foreground is the town of Gitschin. The two roads leading off the bottom edge are the Austrians' escape routes. Buildings hand-crafted by Crispin.


John and I took on this difficult job, John holding the Austrian right while I commanded the left, including our Saxon reinforcements. The radical asymmetry in weapons and tactics soon became apparent. Initially our longer-ranged rifles and deployed artillery disrupted and delayed the Prussians' approach. However, as soon as they got close, skirmishers with needleguns demonstrated their superiority to Stosstaktik and devastated our ranks.

Nevertheless, we were still solidly in control of the defensive line by Turn 6, when we were fortunate enough to be allowed to withdraw immediately rather than hold on for an extra turn. Less fortunately, though, we had paid insufficient attention to the inevitable need to retreat eventually, so too many of our troops had ventured too far from home.

To make things worse, Dave W on the Prussian right unleashed a deadly volley of 11s and 12s. The critical one was against the Saxon Kronprinz brigade on our southern flank. This happened as I was trying to move it into Podhrad to enfilade the Prussian 6th Brigade. Had this succeeded, it was have seriously hindered the Prussian attempt to cut us off at Gitschin. Instead, the Saxons were cut down in droves, prevented from reaching the cover of the village, pinned in the open, immediately rendered Spent and therefore easy meat for the Prussian charge that inevitably ensued.

From that point it became a desperate scramble to escape. One of my Austrian brigades was too far forward to get back. The other had a chance but ended up driven into a marsh being gunned down from behind and unable to extricate itself. I did salvage the Saxon cavalry and Leib brigade, though, so we just needed one unit of John's command to escape for a draw or two for a win. His one possible infantry unit failed a movement roll on Turn 7, so on the final Turn 8 it all came down to his remaining cavalry unit. Could they manage a half-move and also avoid being mown down by the Prussian infantry nearby? Of course the dice blew it and they didn't move at all - Prussian victory!

Ignominious defeat! Crown Prince Albert of Saxony (that's me) about to be captured in Gitschin along with his artillery and Poschacher's battered Austrian brigade stuck in a marsh. Right of picture is the Austrian cavalry column, deciding - perhaps wisely - not to risk riding across the front of those nasty Prussian needleguns in the foreground.
 

Reflections:

Crispin's ready-to-(un)roll battlemat looked good and saved us valuable set-up time.

The scenario was ideal for a Monday night - not too many units, not too many turns, plenty of movement. It took under two hours to play.

Once again, having the mission and situation change mid-game made for a really entertaining challenge.

Likewise, asymmetrical armies generated interest as they force players to choose the right tactics to exploit their strengths and the enemy's weaknesses.

First principle of war is maintain the aim. John and I lost because we failed to do that: we focused too much on fighting the enemy in front of us and too little on making sure we had enough units close enough to the escape routes behind us.

Usually the dice even out, and I wouldn't say they were especially unkind to us this time either. However, sometimes one or two critical rolls really matter. The volley that stymied my Saxons' flanking manoeuvre was crucial.

I want some Austrian grenadiers!


The scenario is freely available in the BBB group files here. There may be more Austro-Prussian BBB action at OWS soon as I wrote scenarios last year for Trautenau and Soor which have yet to be played. These are in the files too.

Tuesday, 9 June 2020

Austro-Prussian 1866 PBEM - Skalitz

It's a hard life being a wargames oligarch. True, there are worse places to be quarantined than on the BBB megayacht. But when the panic buying broke out, it put serious strain on the helicopters, and I was forever tripping over the hoarded champagne and caviar. And while I can't fault the bevy of BBBBabes for their athleticism, their conversational talents are limited.

Steinmetz and his Prussians finally reach Skalitz station:
"We apologise for the late arrival of this army corps, due to Austrians on the line."

It has therefore been a relief to be diverted by Play-By-Email wargaming (PBEM). Our previous online excursion was to the Battle of Nachod, from the Austro-Prussian War of 1866. (See my blog post about it here.) The natural sequel to this is the Battle of Skalitz.* After his success against Ramming's Austrian VI Corps at Nachod, the Prussian General Steinmetz forged ahead toward Skalitz the next day. There his 5th Corps encountered Archduke Leopold's Austrian VIII Corps, the rear guard covering the rest of the Austrian army as it moved northwest. A disjointed delaying action ensued, culminating in another bloody defeat for the Austrians.

As Nachod and Skalitz form a nice pair of battles - a 'micro-campaign', as you might say - it made obvious sense to keep the same teams of players. Thus OWS provided the Prussian high command again, while the South Oxfordshire Generals (SOGs) supplied the Austrians.

Both sides commenced hostilities with bold plans. The Prussians had first move, and despite starting with only four regiments on the pitch, promptly diverted one on a long left hook to threaten Skalitz station behind the Austrian right flank. The Austrians responded by having all three of their brigades advance toward the central woods. They had already committed the whole of their jaeger screen to the Eichwald. They also moved all their guns toward the central rise, which proved judicious: once deployed there, they were in constant action for the rest of the battle.

The Prussian artillery was less fortunate. One Austrian regiment in column of march raced so rapidly toward the Prussian right that von Loewenfeld's artillery was caught exposed and had to evade back to the Schafberg, while the advance guard's guns ventured too close to the Austrian jaegers and were similarly forced to pull back again. This set the tone for the battle, as the Prussian guns spent much of it out of position or even isolated and unable to redeploy. This nullified what should have been the Prussians' significant advantage in numbers of guns.

The Prussians' initial probe into the Eichwald was therefore rebuffed with some casualties at the hands of the jaegers. Adapting audaciously to the Austrians massing in the centre, the Prussians added a right hook to the left hook already under way, creating a double envelopment. Von Loewenfeld's right flank detachment shifted its weight away from the woods and toward Zlitsch, while making Fragnern pay a heavy price for committing himself in the open at the start. An Austrian regiment was spent, and the Austrians found themselves having to react to threats behind both flanks. It was at this point, on Turn 4 - with the full weight of the Prussian 10th Division about to enter the fray as well - that the Austrian CinC said 'I can feel the game slipping away'.

But then the Austrians enjoyed several turns of consistent favour from the dice gods. Despite their poor command and control, on both flanks they managed to get regiments to respond just in time, fall back or pivot, and forestall the Prussians getting into the objectives there (Skalitz station in the south, and part of the village of Zlitsch in the north). Although they suffered heavy casualties, these were not as heavy as they should have been, given the superior Prussian rifles and tactics. As for the Prussians, they struggled to get their troops to move, and their repeated assaults in the Eichwald were repulsed every time by the jaegers' fire, despite these having run low on ammunition early in the action.

The scenario is 9 turns long but provides for the Prussians to achieve an early victory if they take 3 objectives by turn 6 or 4 by turn 8. (This forces the Austrians to put up at least some fight for the central woods, as they did historically.) In our game, the Prussians never came close to these. It was not until Turn 9 that they finally took their first and only objective, wiping out Fragnern's Austrian brigade and rampaging through Zlitsch.

In game terms, then, it was an emphatic Austrian victory, leaving the Austrians as clear 2-0 victors in our micro-campaign. Looking at the outcome of the battle, the Austrian players managed a better casualty ratio than their historical counterparts, at around 2.5:1 against them rather than the horrendous 4:1 in the actual battle. The game result still left Archduke Leopold's corps seriously battered; he was also in a rather awkward situation, with the bulk of his force committed in or around the Eichwald, and von Loewenfeld's Prussian force now behind his left flank. However, Steinmetz's corps was also in poor shape by now, so perhaps Leopold would have got away OK - he'd managed to preserve some cavalry to cover his withdrawal - and he had certainly held up Steinmetz much more successfully than happened on the day.

The degree of the Austrian players' success owed a fair amount to the dice, but still, their plan was sound and well-executed. The Prussian plan was also a viable one that came close to succeeding. However, partly through luck, partly through skill or judgement by one side or the other, the Prussians did not manage to make best use of their superior firepower: the dice were unkind; much of their preponderant artillery was out of action for much of the time; and because of time pressure, 10th Division never shook out into a proper firing line, instead attempting repeated assaults in depth that proved futile. A critical factor, though, might be said to be one tiny Austrian jaeger unit. This 2-base unit was the Austrians' campaign reward for having won at Nachod, and added about 5% to their force. Thus reinforced, their jaeger screen obtained early success, whose effect snowballed over the course of the game. Had the Austrians not had those extra jaegers, it could have been a very different story. (I did a solo dry run of the scenario without them, in which the Prussians managed an early win on Turn 6.)

This battle and its predecessor, Nachod, produced a most entertaining and instructive micro-campaign. Suitably encouraged, my attention now turns to creating a similar micro-campaign for the other nearby pair of Austro-Prussian border battles at Trautenau and Soor.

(Anyone wanting to see the full blow-by-blow AAR of this game in the form of annotated photos can find it on Colin the Wargamer's blog. The scenario is freely available in the BBB group files.)


*It is a little-known fact that the 1966 centenary ceremony at the railway station that played an important role in the battle inspired Jamaican pop sensations The Ethiopians to pen their hit song, "Last Train to Skalitz". As a result of this, Skalitz lent its name to a whole popular music genre. (Possibly. May need to check my references on that.)