Showing posts with label beautiful models. Show all posts

Tuesday, 16 September 2025

Moby Dick whale hunt

OWS was honored (US spelling is deliberate) by some special visitors this month: my good American friends Tom Ballou and Sean Barnett.

Tom had been wanting for a while to put on a game at a UK show. This year he finally got around to contacting major UK shows such as Salute, Partizan and Colours, but without much luck until four weeks before the event, the Colours organizers got back to confirm they had a table for him. Little did Tom know, this was the one all our OWS team had had to cancel because of real life getting in the way! Clouds and silver linings ...

Anyway, the trip went ahead and, at quite short notice, Tom and Sean flew over to England. As they were going to be in the area, Tom offered to run his Colours game for us at OWS as well. Yes please!

Now, the game in question wasn't exactly a wargame, certainly not a Bloody Big Battle - but there was plenty of blood, and they don't come much bigger than the main protagonist: Moby Dick! Yes, this was a whale-hunting game in which the infamous cetacean was a dice-driven NPC, while each of us players commanded a whaleboat trying to turn him into lamp-oil and dollars. Readers with qualms about the ethics of a game like this may want to look away now.

This was my boat with its green gunwales. Each crew consisted of a harpoonist, four oarsmen and a steersman.


The mighty whale, covered with harpoons and lines trapping an unlucky seaman. Note the attendant sharks frolicking nearby and looking forward to eating the scraps.


The first three boats get into harpoon range. The disc top right has two sides, "Happy Whale" or "Angry Whale", which affects how fast he moves.
MD starts happy. Guess what harpooning him does.

MD surges angrily forward. The boats that harpooned him find themselves dragged along behind on the 'Nantucket Sleigh Ride'. The red counters indicate how much blood is in the water to attract sharks ...

... which could be bad news for sailors who go overboard, like the ones bobbing in the water here.

Meanwhile, MD is about to charge off the edge of the board. A clever game mechanic says at that point he dives out of the game. The boats then circle nervously, wondering where he will breach again. Hovering seabirds provide a clue. Dave T had had no luck all game, I don't think he'd yet hurled a harpoon, so he was hoping MD would show up close -

- but not that close! Turns out MD's favourite flavor is orange. Could Dave pass the necessary skill rolls to avoid MD's immense maw?

Nooooo! The whaleboat is crushed and its crew devoured.
MD is now Happy Whale.

Ishmael floats on Queequeg's coffin on a very uninviting cold grey sea. (This will mean more to you who have read the book or seen the movie than it did to me.)

With the exception of unlucky Dave, we were actually very fortunate and finally managed to slay the fearsome beast. This was partly because his random movement dice failed to make him dive, partly because Nick O made some monstrous damage rolls.

Regardless of the outcome, it was a tremendously entertaining ride along the way. Apart from the game mechanics, the fun was enhanced considerably by our GM, Tom, in his Captain Ahab hat, adding atmosphere with anecdotes and excerpts from the book, and expatiating knowledgeably about 19th-century whaling.

Apparently the game was created by another gentleman whose name I don't know but would love to credit, and who ran it for years at conventions. Tom played it, loved it, and with its creator's permission codified it and now presents it himself. All the models are Tom's work (can't tell you the manufacturers, sorry). We had a splendid time and I can definitely award Tom the HQGE.


Tuesday, 11 April 2023

Golan Heights tank battle: Nafah (1973) (oh, and Ramillies again)

The long Easter weekend provided a rare opportunity for a game with Bob Mackenzie. As I'm getting plenty of BBB horse and musket action at OWS these days, I put in a bid for a tank battle and Bob kindly obliged. (Earlier in the week I also got another go at Ramillies - see brief report at foot of this post.)


The setting was the Yom Kippur War in 1973. Bob's scenario can be found along with many other good things on his website. The scenario depicts the action around the Israeli base at Nafah on the Golan Heights on the second day of the war. The Syrians have broken through on this southern sector of the Golan and are hooking right to cut off the Israeli defenders on the northern sector. The Israelis are responding by frantically scrambling troops from all directions to fill the gap.

It's a classic contest of quantity versus quality: roughly four big Syrian brigades vs three small Israeli ones. Especially in the early moves, the Syrians have a big numerical advantage which they can exploit to envelop the few defenders who start on the pitch and to race towards undefended objectives on the far side of the table. However, it doesn't take much for the poor quality Syrian units to become spent and therefore much less useful in attack and very vulnerable in defence.

The 17 photos below tell the story of the game. They're followed as usual by my reflections arising from it. (And then by a brief Ramillies photo-AAR and more reflections on that too.)

View looking NW. All Syrians enter from SE (bottom table edge). They will find a couple of Israeli units in the middle of the table and a tiny garrison in Nafah (the buildings). Syrian objectives are Nafah, the three road exits at top, and the top right hill (Tel Avital).

Not sure which is more fearsome: Israeli Centurions, or Israeli artillery (in this case, M7 Priests). All the models in this game are from Bob's collection - mostly Heroics & Ros, I believe.

More Centurions, this time supported by M50 155mm - oh, and some recce jeeps (who will wisely enter the table last after the serious fighting is over)

Had to give these exotic creatures a pic of their own: T-34/122, a Syrian conversion.

The meat and potatoes: Syrian T-62s (there were also a lot of T-55s).

On Turn 1 my 51st Brigade tried to bully the isolated Israeli delaying force. Sukhoi Su-7B joins the fun. Unfortunately the Centurions have us outnumbered more than one to two ...

Same episode seen from the other side of the table.

Turn 3. The only Israeli units are the now damaged 266th Bn, 188 Bde HQ, and the Nafah garrison. The small 2-model 82nd Bde has been wiped out. However, most of my units are Disrupted (marked by craters) and the two at right and bottom of pic are Spent and Low on Ammo (marked by hospital tents and ammo crates). The poor quality Syrian units can't take nearly as much punishment as the Israelis.

Turn 4 and Israeli counter-attacks arrive from two directions, NW and SW, hitting my front and left). Here comes the frontal hit - I think my mech bde miraculously survived this time but still had to fall back.

The hit from the left was brutal and soon put paid to any ideas I might have had about storming Nafah. The quality difference gave the Israelis a +2 advantage in every assault and fire combat. This is huge on 2D6. Oh, and my Sukhois are done for the day and it is time for Israeli Skyhawks to arrive.

The metaphorical and literal high point of the Syrian attack: 43 Bde's Mech Bn ensconces itself on the top of the Tel Avital objective and sets up its Sagger missile launchers. 

Turn 6, the halfway mark. Most of my force mills around in the middle of the table. The Syrians are all rated Passive, a -1 penalty on all their activation rolls when in good order. That doesn't half slow your blitzkrieg down. No such problems on the Israeli side as their 96th Tank Bn ploughs on through my left flank. 

By now, the Israelis have got four artillery units into action. Here we see those M50s close up. All that firepower was devastating.

Turn 7. Not so many Syrian green unit labels visible now, and more white Israeli ones are pushing forward from the left of pic and in the centre. Two arty bns park on the road exits at top edge. One joins the Skyhawks in obliterating my hilltop battalion, top right. So much for that objective.

It was one-way traffic for the next three turns as the Centurions steamrollered my disorganised, outflanked, rubbish formations. Turn 10 sees me commit my last intact unengaged tank battalion - unengaged because it failed to move for four successive turns despite the bde HQ being next to it ... every artillery piece and aircraft in Israel opens up to make sure it's not going anywhere. Holding zero objectives meant I was one short of a draw. I can console myself with the fact that it's still a pretty historical result. Bob said I'd done better than he did when he played the Syrians.

In fairness, I had inflicted a dreadful toll in white metal alloy on Bob's force - no fewer than 8 strength points. That's a lot of damaged Centurions.

Against the Israelis' 8 SP lost, I think I count a mere 43 Syrian casualties. Clearly a Pyrrhic victory for the Israelis, then.

Reflections:

I do like tank games. As with C19 horse and musket, the mix of the three different major arms (infantry, armour, artillery) makes the tactics interesting and produces battles with depth and scope for manoeuvre - a good recipe for fast-moving games with changing situations.

Nice scenario. It's almost as though Bob follows his own advice - see his great essay on scenario design. Room for manoeuvre, grand tactical options for different plans, both sides having to move a lot, action across most of the table ...

Victory conditions: Bob did say he felt the victory conditions were too difficult for the Syrians. He has now adopted modified conditions based on my suggestion. The Syrians no longer have to hold objectives, they get victory points just for reaching/taking some 'high water mark' locations. The Israelis for their part get VPs by reaching locations along the Syrian baseline, representing the degree to which they cut off or crush the Syrian force. (And giving those Israeli jeeps something useful to do.)

Quality vs quantity: always a nice contrast. The game demonstrated very well how the quality difference produced the actual historical result. It prompted a long post-game discussion between us about the importance of leadership, right down to NCO level, as illustrated in many a conflict down the ages.

Knowing the rules helps. We were using Bob's WWII/Moderns adaptation of "Bloody Big Battles!", BBWW2B. On previous occasions I've enjoyed Bob's WWII and modern games but had to rely on Bob a lot because I found the rules a bit fiddly, I guess because of the wide variety of armour and anti-tank ratings and resulting complex interactions. This time, almost all the tanks were effectively the same, it was crew quality that made the difference, so I found it easier. Even so, ignorance cost me at times: eg, if I had known my Saggers were so useless and my infantry so vulnerable, I might have had 43 Mech Bn hide behind the objective rather than on top of it.

Beautiful models. Bob is a craftsman and it is a pleasure to play his games and use his armies.

===

Now let us step back nearly 300 years to the War of the Spanish Succession. Matt reran the scenario we played last August (AAR here). This time I commanded the French left wing. AAR in the photo captions, followed by further reflections.


Initial French set-up before the allies deploy. Essentially: beefy garrisons in each of the three main objectives (fortified villages) and also in the village on the river on the right flank. Massed cavalry on the heights guard the open ground on our right. More cavalry in reserve behind our left wing.

The bourbon fleur-de-lys flutters gaily over Autre-Eglise, whose gallant defenders will soon become gallant attackers to threaten English-held Foulz.

Marshal Villeroi himself stands ready to hurl his cavalry reserve forward to support the attack on Foulz.

The allied dispositions are revealed, presaging determined and repeated assaults on Ramillies itself (lower left), with cavalry in support to push back our right wing.

How it ended up. Red labels are allies, pale labels are Franco-Bavarian. Left of pic, early high dice for my defenders' fire soon stymied any thought Matt had of taking Autre-Eglise. This encouraged Mark and me to commit reserves and push towards Foulz. However, the marshy valley and some deadly British volleys in return stalled us. Top left can be seen two British cavalry units who must have been commanded by the Duke of York, as all they did all battle was march slowly and with frequent halts to and fro along the Foulz ridge. Right centre: Ramillies fell to the fourth British assault, I think. Mark mounted a couple of counter-attacks but couldn't retake it. However, he did hang onto Taviers, and although his cavalry were pushed back they prevented the allied horse from breaking through to the road exit objective in our rear. Thus, the allies barely scraped a draw.

Reflections:

Linear warfare! With Matt's rule mods, this is a very different game. It becomes crucially important to plan a couple of moves ahead and ensure your troops are pointing in the right direction from the start. It definitely feels as though it captures the essence of 18th-century warfare. It certainly had us all pretending to have powdered our wigs and starched our lace so we could bow and flourish appropriately before inviting our opponents to fire first.

What to do with cavalry? I demonstrated again that I am a light infantryman at heart and should not be trusted with horse. (Just self-deprecating for effect - maybe I could have done better with them but I didn't do anything disastrous either.)

The fun factor of special units. In amongst all the regular field and light artillery, Matt mixed in a couple of units of siege guns and mortars with special capabilities. Siege guns rated Devastating but had to reload (miss a shot) after every shot; mortars negated one column shift for cover. Players had fun firing with these and trying to nullify them.

Beautiful models (again) - just a feast for the eyes.


Thursday, 7 October 2021

Sherlock Holmes and the Wicker Man

And now for something completely different ... as if our recent post-apocalyptic diversion into the Gaslands were not fantastical enough, this week Bruce's talented pen brought us some alternative Victorian SF/Fantasy in the form of his scenario for 'Sherlock Holmes and the Wicker Man'. I trust I don't really need to introduce the eminent detective, Holmes, but some readers may not be familiar with the classic horror movie, The Wicker Man. The film is about a Scottish isle whose inhabitants still cleave to old pagan ways, including the occasional human sacrifice to ensure rich harvests. In Bruce's spin on the plot, Sherlock Holmes is on the island in disguise, investigating the islanders' misdeeds, and summons his sidekick Dr Watson urgently, who arrives with five policemen. These valiant few have to sneak/fight their way past/through Lord Summerisle and assorted henchmen and villagers to rescue a captive from being burned in the giant wicker man.

Bruce's time in lockdown was not entirely wasted. His brush is as talented as his pen and he unfurled a splendid layout for our eyes to feast on. The ruleset was Osprey's "A Fistful of Kung Fu", which apparently uses the engine from the "Song of Blades and Heroes". SBH I was faintly aware of, AFKF I had never heard of, the rules engine I had never encountered but a jolly clever one it is. The basic mechanisms were easy to grasp; we learned their tactical subtleties as we went along.

Mark J and I found ourselves on the side of the old gods and their Hebridean worshippers. Dave T and Nigel were the forces of law and order and civilisation. I'll let the photos tell the story.

The magnificent Wicker Man complete with hapless 28mm maiden trapped inside him and bonfire piled up around him, cultist poised to light it. The Wicker Man is well over a foot tall.

The table seen from the point of view of Watson and the approaching bobbies. They had to get through the wood or orchard, past a couple of dozy cultist sentries. All the other enemies were busy with their pagan ceremony until the alarm was raised.

Some of the islanders. Could that master of disguise, Sherlock Holmes, be one of these? That one on the left looks dubious. Fine paintwork by Bruce.

Lord Summerisle conducts his pagan ritual, backed up by a cultist, his alluring sidekick Willow, and one of his three gamekeepers, oblivious to the policemen sneaking through the trees behind them ...

A big punch-up ensued around the central wagon. Watson perished there, as did a couple of coppers. Willow was wounded but got away, luring a policeman after her.

Holmes is revealed! He could easily despatch those two villagers, but he has more urgent business to attend to. He dashes towards the Wicker Man! He strikes Lord Summerisle to the ground! He scales the ladder and unties the damsel in distress! But ...


... a welcome committee gathers at the foot of the ladder as flames begin licking up the Wicker Man's timber shins. All the police have fallen or scattered. Only the dastardly Summerisle and his cohorts remain. Holmes's chances of survival look remote ...

Thus the game ended in a triumph for the forces of evil, and Conan Doyle will have to either start writing about a new character or resort to penning prequels. There will be a bumper harvest on Summerisle this year.

This was splendid good fun. From my (evil) side of the table it did seem like too hard a job for the goodies, so maybe Bruce will tweak it a bit before its next outing. (For another outing there must surely be - too much work has gone into the Wicker Man not to use him again!) But the game was at least as much about the journey as the destination, and a thoroughly entertaining ride it was. Bravo, Bruce!

Monday, 29 March 2021

6mm Hungary 1848 army on parade

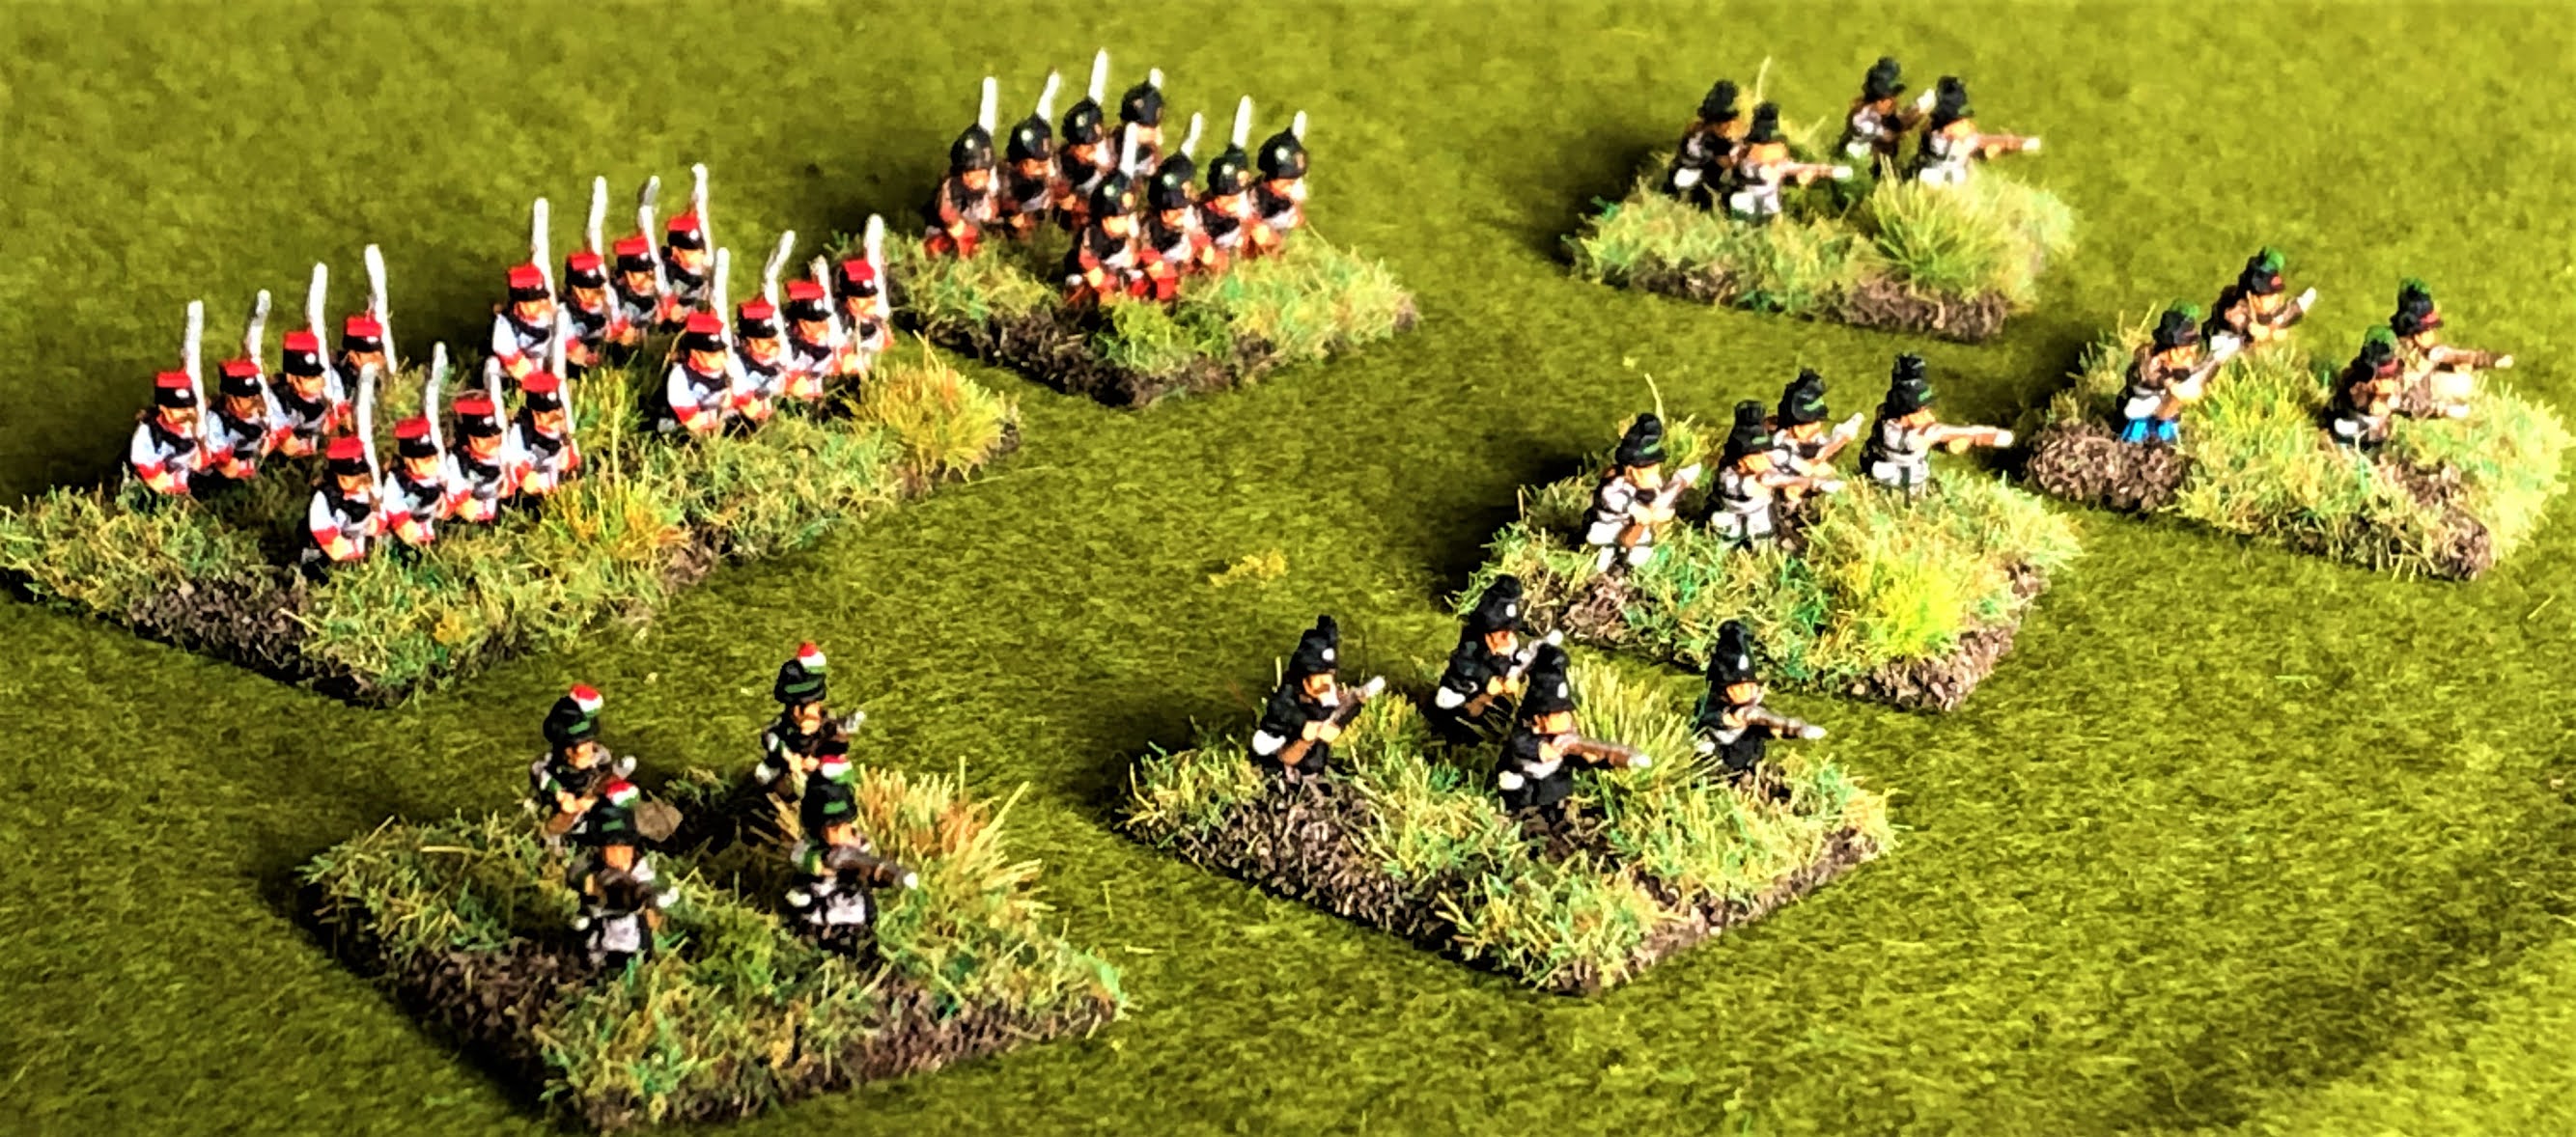
This post is to showcase my beautiful new 1/300 scale (6mm) Hungarian army for wargaming the Hungarian War of Independence of 1848-1849. The figures are from Baccus (mostly adapted from their American Civil War range), painted and based by the talented Richard Morrill, flags by Maverick Models. My camerawork can't really do these little works of art justice, but still, here they are in all their glory:

The generals: Poeltenberg in green, Gorgei in red arguing with Dembinski in the red hat, etc. 
Figures from the ACW generals pack. The broken cannon wheel is a nice touch.
 
A rabble of rowdy rebels! Militia armed with scythes and pitchforks. These featured in the battles of Schwechat and Temesvar in particular. You have to admire Richard's work on the red-white-green polearms and the embroidered waistcoats. Figures are English Civil War peasants. 
 
Artillery! Some gun carriages in red-white-green, others just red-green on wood, others plain wood.
Sadly the photo doesn't really show you Richard's exquisitely delicate scratch-built rocket launcher (the crew at top left). Guns and gunners Prussian Napoleonic, I think.
 
No Hungarian army would be complete without hussars. Four different regiments are represented here: 4th Sandor, 5th Radetzky, 6th Wurttemberg, 1st Csaszar (I think).
Austrian Risorgimento hussar figures, I believe.
 
Former imperial regiments raised in Hungary provided a core for the new Hungarian army. They kept their white tunics initially but changed the flags, braid and badges. Oh, and Richard painted the red-white-green sashes around the officers' waists! Austrian infantry from the Risorgimento range. Not quite the right shako for the 1840s, I know, but in 6mm you can get away with a lot.

Hungary's own new army was the honved (roughly 'home defence'). The standard uniform was blue kepi, brown tunic and blue trousers, but there were quite a few variations, as shown here: red or white kepis, black shakos, grey tunics ... Check out the red braid on the officers' chests, more fine brushwork by Richard. There are also a few conversions: these are ACW Union figures who came with more standard-bearers than I needed, so Richard converted the surplus ones into sword-wielding officers.
 
Not the best troops in the army, but some of the prettiest: national guard units in bright blue, green and grey varieties. Figures are ACW Union troops in frock coat. Amazing paintwork on these tiny characters - Richard has used shading and highlighting!
 
Last but not least, some 'exotics'. The Polish Legion are ACW Union in frock coat, with tiny squares of cardboard to turn their kepis into red czapkas. Next to them, ACW infantry converted into grenadiers. Those greenstuff bearskins are textured and have had recognisable grenade badges painted on them!
Front row left to right: Tyrol Jaegers with their distinctive red-white-green feather; German 'Death's Head' Legion; and honved jaegers in grey and brown varieties.

The army is based for use with the "Bloody Big BATTLES!" rules. You will find reports of many Hungary 1848 BBB games on this blog (use the label "1848" to find these).

For uniform references I relied on Zoltan Barcy & Gyozo Somogyi, "A Szabadsagharc Hadserege", and Ralph Weaver, "The Hungarian Army 1848-1849".

Richard's talents are in high demand, so if you want him to paint an army for you, you might have to queue for a few months (I did). However, he tells me it does depend on the size and nature of the order, and the best advice is to get in touch and he'll see what he can do. His website at Monty's Wargaming World has his contact details, as well as loads of info and links to photos.

I hope you've enjoyed this parade of an unusual and colourful army. If you want to learn about the actual historical army's exploits, let me modestly steer you towards my book, Hungary 1848: The Winter Campaign.


Monday, 11 November 2019

Soviet MT-LB for potential new wargamer

A new baby recently joined the extended family. I am taking upon myself the honour of bestowing his first tank. Since his initials are MTLB, there was really no alternative ...


MT-LB: brutally functional (and so is my painting)


I have always had a soft spot for the Soviet MT-LB APC. Just like the original, the S&S Models version has the major advantages of being cheap, simple to manufacture, and robust enough to withstand handling by small children.

My compliments to S&S for swift and efficient service. A couple of blobs of superglue and slap on some green paint, and hey presto. I know my slapdash effort won't win any prizes, but it took me no time to do, and I'm sure it will be appreciated by its target audience.


Tuesday, 6 February 2018

Carentan 1944 anniversary game - playtest

My friend Jean-Louis at the Guerriers du Marais wargames club in Normandy would like to do a game next year to mark the 75th anniversary of the battle for Carentan. We have therefore created a scenario covering a week of battle, 7-13 June 1944, and this week saw its first playtest.

We are fortunate to have in our group a master craftsman, Colin, whose blog shows you some of his modelling techniques. Colin's work has taken him to remote places such as Mongolia and Tibet where opportunities for entertainment are limited. Consequently he has whiled away many long hours painting gorgeous 6mm armies and scratchbuilding historically accurate buildings for Normandy - in fact, as luck would have it, actually from Carentan.

Believe it or not these Shermans are not 15mm, not 10mm, but 6mm scale!
Combat Command A, 2nd Armored Division, about to roll through 
the scratchbuilt (and scratch-demolished) houses of Isigny.
Fantastic craftsmanship by Colin, marred by my unpainted unit base ...

So we laid on a game to give his handiwork an outing and test the scenario. This was a popular night at the club, there were eight of us clustered around our Normandy table. Jim, another of our more skilful modellers, contributed some convincingly damp-looking marshes for the extensive inundations around Carentan.

The battle starts out very much an infantry fight, in fact para versus para, as the Screaming Eagles of 101st Airborne sort themselves out and take on Fallschirmjäger Regiment 6 in the marshes. It's a subtle contrast, though: the FJ have high intrinsic firepower from all their MG42s and mortars etc, good for defending with; the US paras are more lightly armed, but full of gung-ho aggression, and with artillery, airstrikes, and naval gunfire on call to support their attacks. The Yanks being rated veteran also have a better chance of recovering losses during the mid-battle "night interval".

Then in the second half both sides get some armour. For the US, CCA of 2nd Armored Div rumbles on from the more open east end of the table, along with a task force from 29th Inf Div. These bump into some newly arrived infantry Kampfgruppen and Osttruppen, while behind Carentan itself, the might of 17th SS Panzergrenadier Division "Götz von Berlichingen" pedals on ... yes, it's Romanian Volksdeutsche on bicycles, backed up by a few StuGs and Marders ...

The ruleset was my own experimental WWII variant of BBB. We've used this a couple of times for early war but this was its first taste of 1944. It was also the first scenario I'd written for it from scratch rather than adapting, and it was a few months since we last tried them (and for some players they were totally new), so I was a bit apprehensive about the play balance and we were a bit rusty and slow in play at first. Despite all that, we got through 8 of the scheduled 10 turns in two and a half hours - enough for everyone to be happy to call it a draw - and the boys all seemed to enthuse about the game. I had some qualms that I might have underrated the Yanks, who were struggling a bit at halftime, but they bounced back and evened things up in the second half.

Overall a big success, then: the rules were fun to play, a realistic and balanced scenario, some really beautifully crafted troops and terrain on the table, and players clamouring to do it again. :-)

I have posted a few more photos in Flickr and will put the scenario in the BBB Yahoo group files after some polishing.