Showing posts with label modern. Show all posts

Thursday, 3 July 2025

Sabre Squadron - Arab-Israeli

I don't only do horse and musket. WWII or modern games involving tanks also meet my criteria for interesting tabletop wargames. In the 19th century, it is infantry, cavalry and artillery that provide the balanced triad that produces suitably complex tactical challenges and interesting games; in the 20th century, tanks take over from cavalry and the same applies.

I have therefore been angling for a while to get in a game of Sabre Squadron. This is a ruleset for company-level wargames "from the Cold War to the Digital Age". This week Nick O finally obliged and ran one for us.

The background was the Yom Kippur War of 1973. The scenario was set on the west side of the Suez Canal, after the Israelis had counterattacked across it. I was given a company of Israeli Centurions and a company of paratroopers to seize a bridge across an irrigation canal in the Egyptian rear. Will's Egyptian infantry company and supporting armour was tasked with holding it.

This kept us amused for three hours. It was two games in one. First, the superior quality of Centurion tanks and Israeli crews blasted the Egyptians out of the objective and shrugged off the Saggers and T-55s trying to stop them. Then the Israeli paras ensconced themselves on the objective, a load more T-55s tried to counterattack, Israeli quality again beat Egyptian / Soviet quantity.

Here are some photos of the action. Reflections at the end include my impression of the rules.


View from the Israeli entry edge: an idyllic scene of date palms and canal-side villages, about to be disturbed by the clank of armour and the rumble of guns.

I brought my force on in balanced formation: one tank platoon either side of the road, one leading the mechanised paras up the road, HQ tanks central.

Egyptian infantry about to leap into their defensive positions in the village. All figures Heroics & Ros. Nick says he painted them when he was a teenager. Does that make them veterans?

Meet Mr Sagger! The Soviet AT-3 wire-guided antitank missile was a nasty shock for the Israelis. Fortunately Will only had these couple and I managed to dispatch them without loss.

One platoon plus HQ on overwatch while the infantry push through the date palms towards the village.

Egyptian reaction: one T-55 platoon rumbles up the road ...

... and another takes position on the rise behind the village. I told Will I wasn't sure whether the T in T-55 stood for "Target" or "Terrible".

Nevertheless, I showed some respect and shifted my central platoon right with a view to adding to my firepower there.

Big beasts among the trees: paras about to debus at the plantation edge, with a Centurion platoon in support.

The paras draw fire from the village and also from another Egyptian company in the plantation beyond it to the left. A column of smoke on the road reveals what's about to happen. Having already seen off the Saggers, the Centurions will wipe out the T-55s and the infantry in the village. Our only loss will be one Centurion in the plantation disabled by artillery fire.

After that emphatic and rather one-sided success, we reset. My paras occupied the village to hold the bridge. Some of my Centurions were deemed withdrawn for business elsewhere. Will got to bring on another couple of companies of T-55s to counterattack. 

Coming on in the same old way. Who'd volunteer to lead an Egyptian tank column? This lefthand Egyptian company did eventually manage to register a few hits on HQ troop but didn't actually break any Centurions before being seen off.

The righthand company advanced past the plantations, killed a Centurion (the artillery took out a couple more) and pummeled the paras a bit, but not enough to winkle them out. Then it too went up in flames.

Reflections

Nice to Push Some Tanks Around. I do like a decent tank battle now and again. (And it's healthy to play something other than BBB occasionally too.) Tanks have so much character. And they do make a battle move along.

Hidden Deployment/Movement? It would be even more interesting to play this with a bit more fog of war: hidden deployment for the defender, maybe hidden movement for one side or both. Something to think about for next time.

Terrain. Nick's terrain was simple but effective. Most of our BBB games are on green fields, so his desert table looked exotic. I particularly liked the palm trees.

The Rules.  The rules worked well. Troops can move useful distances across the table. We had tactical choices to make. Moderns being moderns, there were necessarily some stats to look up for tank armour and gun penetration initially, but once we'd got these down, firing was slick and quick to resolve. I like the morale system, which allows a chance of catastrophic failure. The on-table results felt plausible. All in all, I'd be happy to play Sabre Squadron again.

Thursday, 15 June 2023

Ukraine with FFT

My mate Graham spent the 1980s in Germany defying the Soviet threat. He still has a bucket-load of 1/300 West German and Soviet tanks from those days when he was winning the Cold War by playing it out on the tabletop.

We decided to dust them off to explore what is happening in the Ukraine right now. Apologies to any readers who feel current tragic real-world events are not an appropriate subject for a game. This was an exercise in technical curiosity, no political dimension and no bad taste involved. We set up a notional scenario loosely based on the Ukrainian offensive apparently in progress right now just to see how things might go. I say 'loosely' because we had only the sketchiest idea of what the Ukrainian and Russian forces look like and how they operate.

The scenario situation is that three battalions or so of Russians are dug in along a river line, some minor tributary of a larger tributary of the Dnepr. They have only a little armour on-table but a mechanized battalion in reserve. The Ukrainians will probe with three recce companies initially before deciding where to commit their main body.

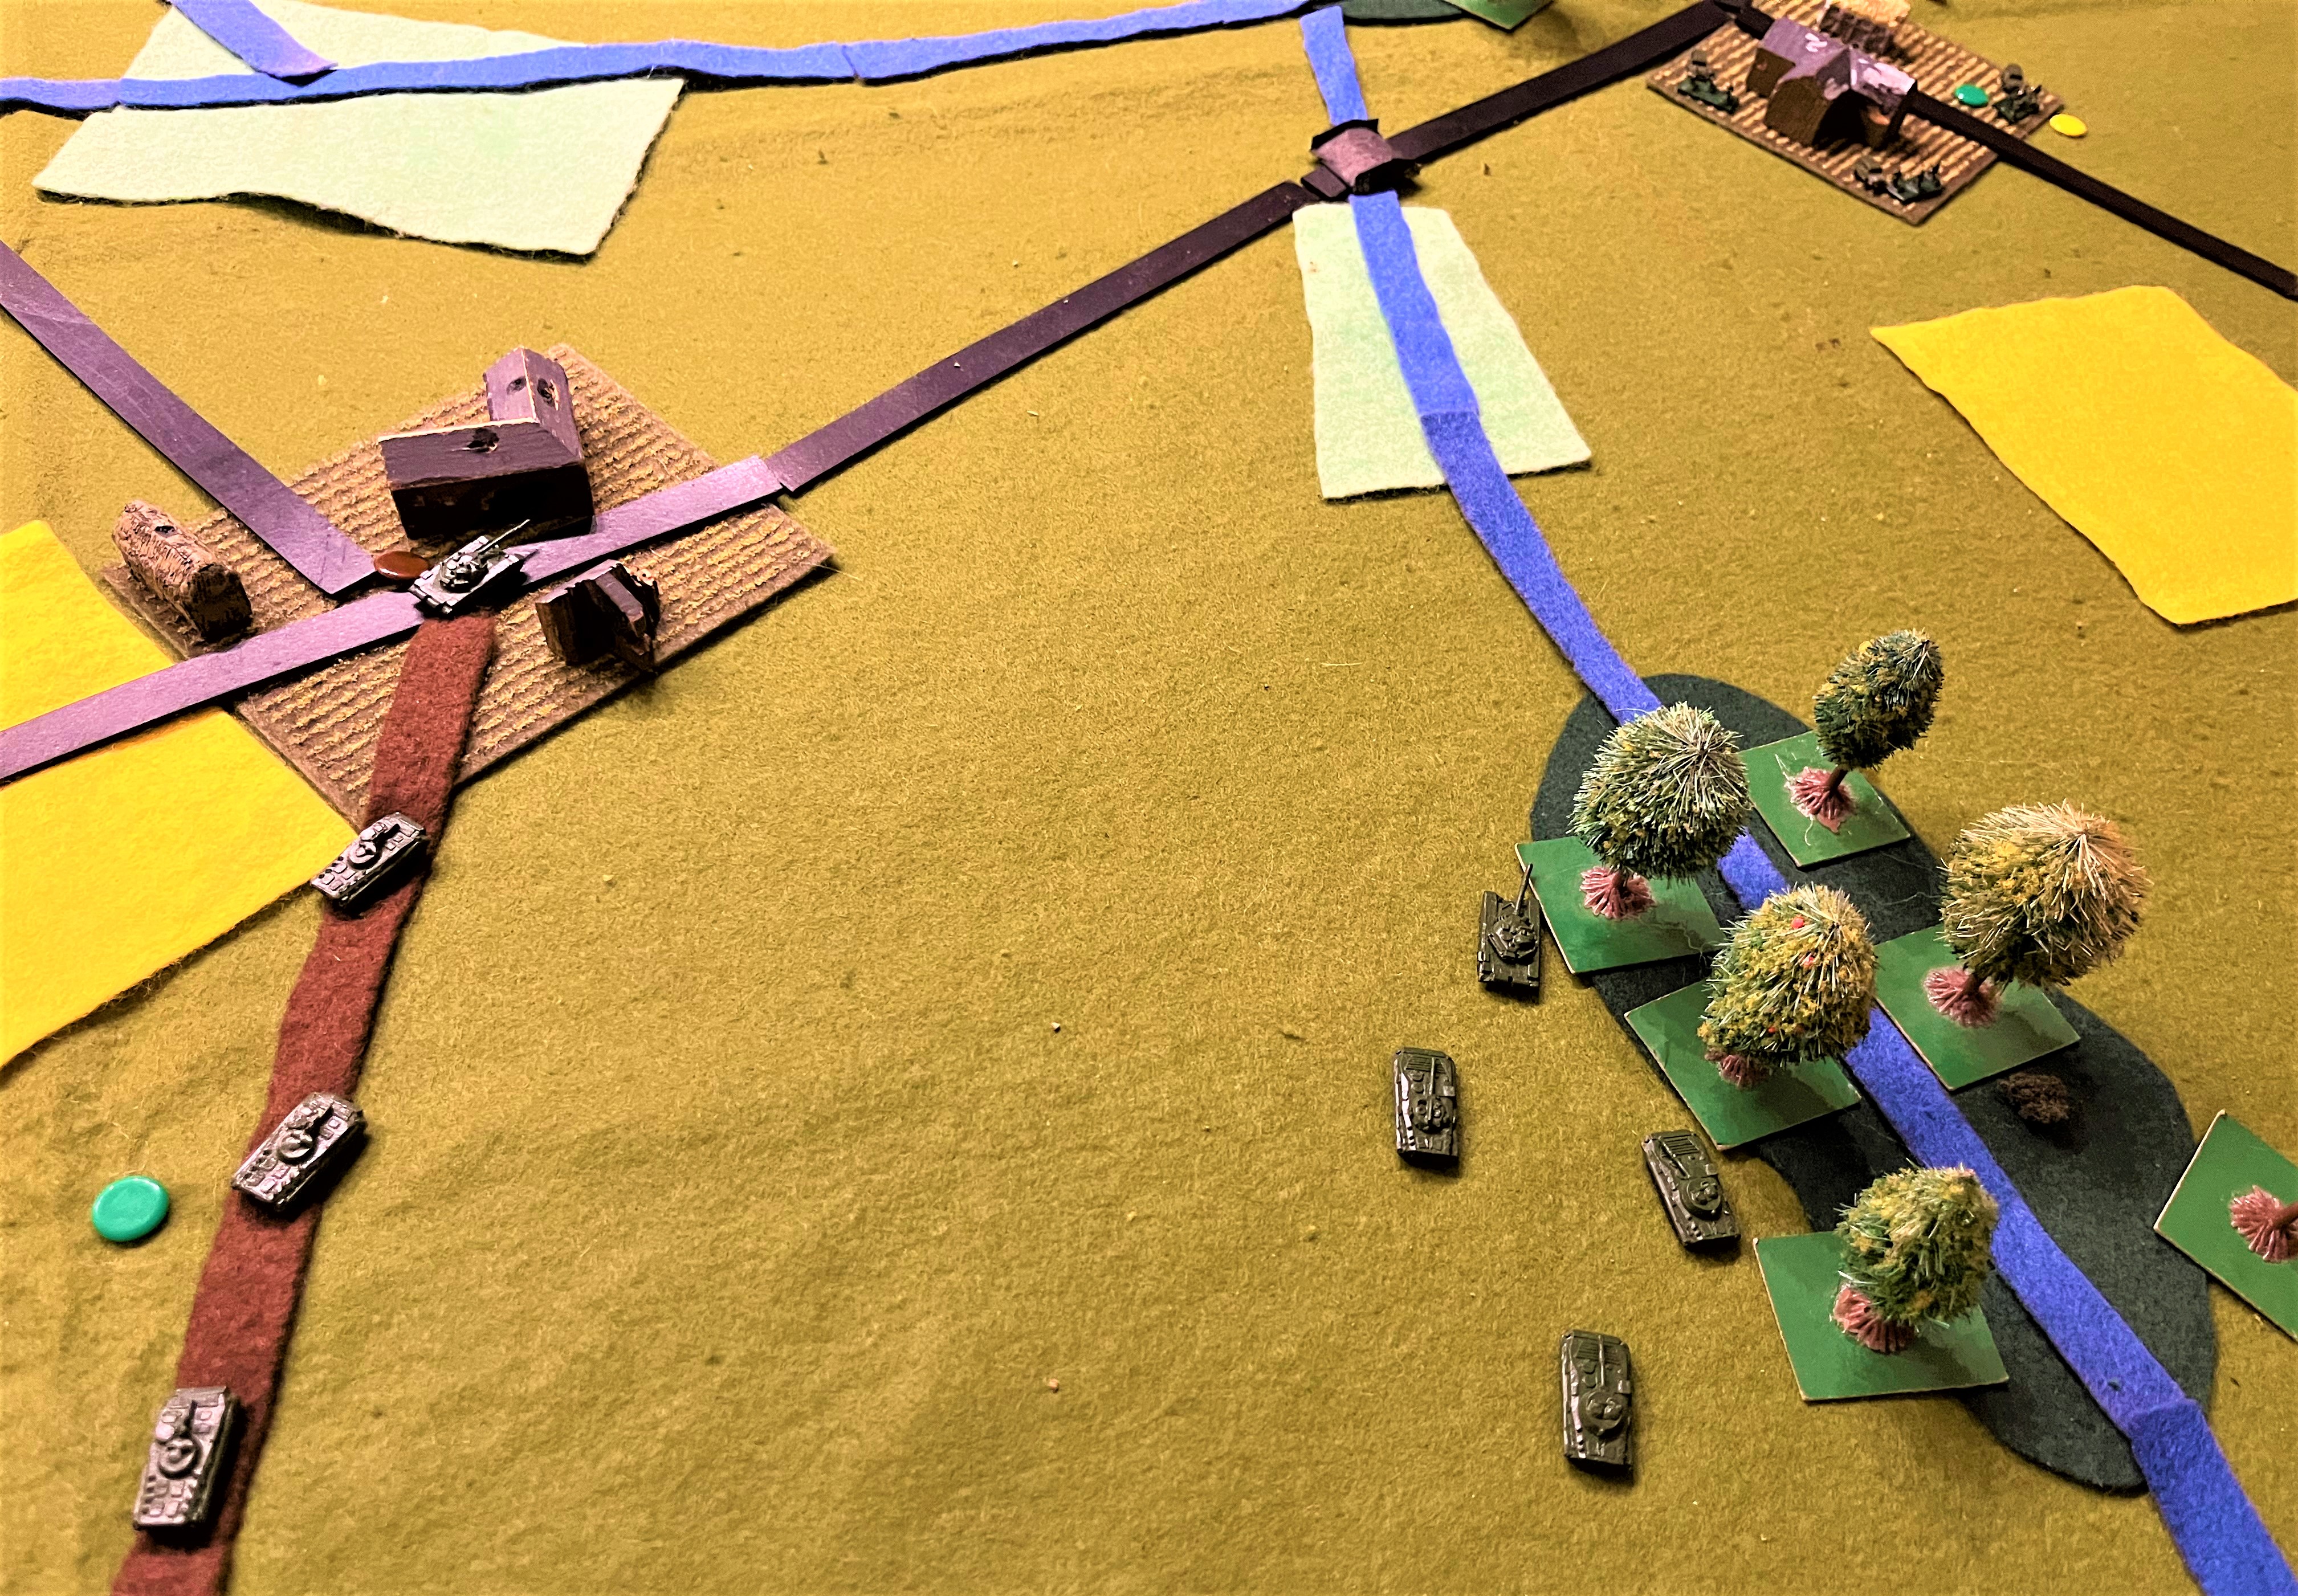
Here is some grainy drone footage of the battlefield, looking north from the Russian side. Mostly open country with occasional villages and small woods. Light green patches are marshy ground. Yellow patches are Ukrainian sunflower fields. The main river runs across the centre of the table from left to right, with minor streams feeding it. Three bridges cross the main river. The Ukrainians' nominal mission is to take one of these for a draw or two for a win.

Ukrainian recce probed the eastern bridge first and found it strongly defended by two infantry companies (one dug in behind the bridge, the other in the sunflower field top right) supported by a mech company in the village in the foreground. Plumes of smoke top of pic show how Luchs armoured cars fared against T-72s' 125mm rounds and BMPs' missiles. However, Ukrainian troops have got into the village top left and are about to bring down lots of artillery fire on the Russians.

Then the Ukrainian scouts snuck away to the west to investigate the central bridge. Amazingly, they found it undefended! (Rather than plot a prepared defence and map it, I had scattered twice as many counters as I had Russian units, then rolled a D6 as each was 'bumped'. On 4+ I deployed a company, otherwise it was a dummy. I had five or six counters around this bridge but they all evaporated. Our rationale was that the Ukrainians must have struck a seam between units like at the famous 'Bull Bridge' during Operation Bluecoat in 1944 - perhaps between the Wagner group and the Russian army?) The Ukrainian recce promptly jumped in and seized it, backed up by some prowling Leopards top of pic.

We decided that would probably trigger a Russian counterattack, so over the next two moves I brought on the reserve mech battalion. Here the first two mech companies approach from the southwest (we made reinforcement arrival points semi-random).

Graham's artillery fire had been singularly ineffective until now, struggling to roll any 5s or 6s. This is the reason why - he was using a couple of D3s. His luck improved after we realised this.

The Russian counterattack develops as a third mech company arrives from the southeast to envelop the Ukrainian defenders of the central bridge. Unfortunately for the Russians, the Ukrainians have decided to reinforce success, so more Leopards and Marders are arriving top of pic.

The ruleset we used was 'A Fistful of TOWs' (FFT). Combat in FFT is swift and lethal. Within a couple of turns, most of my mech battalion was burning wrecks as superior NATO equipment and training demonstrated the quality gap. The Ukrainians lost a few as well, but with their armour virtually all gone, the Russian infantry - though numerous - had no real option but to hunker down in their trenches. We stopped there, but the Ukrainians had secured a draw and looked good for an eventual win.

And to finish: a parade shot of just a fraction of Graham's collection that never made it onto the table. M113s, Jagdpanzers, Gepards etc, all in functional factory finish.

Reflections:

Just a Game: The first thing to say is that this bore little relation to reality. I just read yesterday that Ukraine is reporting advances of "200 to 500 metres" in fierce fighting, whereas our game of bold armoured manoeuvre produced a relatively swift and easy 3km+. I suppose what is actually happening is more like a WWII infantry assault against prepared defences, with lots of fire support on both sides to pin everyone down, and the Russians apparently conducting "manoeuvre defence" - planned fighting withdrawal through successive defensive lines - rather effectively. Our game was closer to a hastily improvised defence (albeit with trenches): none of the minefields and obstacles that I am sure the Russians have, minimal Russian artillery rather than the considerable support and effective fire plans they evidently have, we underrated the infantry's anti-armour weaponry, the undefended bridge was a highly unlikely fluke, and I played the Russian infantry as essentially passive rather than reacting as intelligently as they seem to be. Also, having read some studies that comment on the effects of drone surveillance and the resulting need for dispersion and mobility, I would have liked to add some scenario special rules to reflect those, but as I last played FFT a decade or so ago and Graham had never used them, that would have been a complication too far. All that said, I suppose our game with its unrealistic and unsuccessful Russian tactics at least partly illustrated why they have opted for the alleged manoeuvre defence instead.

Quality vs quantity: always a good match-up. You could say the game was rigged in that we rated the Russians as "Average" in FFT terms and the Ukrainians as "Good". This quality difference then plays out in both to-hit rolls and saving rolls. This really told once the HEAT and APFSDS started flying.

Lack of practice makes imperfect: although Graham and I are both broadly familiar with the characteristics of the modern kit we were using, how that translates into tabletop interactions using an unfamiliar ruleset is a different story. Our inept fumbling and consequent poor tactics probably made the game even less realistic than it already was.

Get the toys on the table: the gap since my last post betrays the fact that I've gone a few weeks without a game. It was good just to push some models around and roll some dice; doubly so because I rarely get to play a moderns game and some variety in gaming diet is both healthy and refreshing.

Unpredictability makes for interesting games: the semi-random mechanisms for revealing Russian defenders and for arrival of reinforcements worked very well, producing surprises of both pleasant and unpleasant varieties for both sides. While the undefended bridge was improbable in the intended real-world setting, it is by no means without precedent in other real-world situations, and it was great for creating a game narrative and giving both players something unexpected to react to.

Recommendations for future research (as academic papers usually end by saying): Notwithstanding my previous blog post about what dull games frontal assaults usually are, I just might try a more serious version of this, making a proper effort to set up a thoroughly prepared Russian defence - complete with successive defensive lines, obstacles, fireplans and planned withdrawals - and then try to crack it with a similarly well thought-out Ukrainian plan. It would take some effort but that could be justified by the reward.


Tuesday, 11 April 2023

Golan Heights tank battle: Nafah (1973) (oh, and Ramillies again)

The long Easter weekend provided a rare opportunity for a game with Bob Mackenzie. As I'm getting plenty of BBB horse and musket action at OWS these days, I put in a bid for a tank battle and Bob kindly obliged. (Earlier in the week I also got another go at Ramillies - see brief report at foot of this post.)


The setting was the Yom Kippur War in 1973. Bob's scenario can be found along with many other good things on his website. The scenario depicts the action around the Israeli base at Nafah on the Golan Heights on the second day of the war. The Syrians have broken through on this southern sector of the Golan and are hooking right to cut off the Israeli defenders on the northern sector. The Israelis are responding by frantically scrambling troops from all directions to fill the gap.

It's a classic contest of quantity versus quality: roughly four big Syrian brigades vs three small Israeli ones. Especially in the early moves, the Syrians have a big numerical advantage which they can exploit to envelop the few defenders who start on the pitch and to race towards undefended objectives on the far side of the table. However, it doesn't take much for the poor quality Syrian units to become spent and therefore much less useful in attack and very vulnerable in defence.

The 17 photos below tell the story of the game. They're followed as usual by my reflections arising from it. (And then by a brief Ramillies photo-AAR and more reflections on that too.)

View looking NW. All Syrians enter from SE (bottom table edge). They will find a couple of Israeli units in the middle of the table and a tiny garrison in Nafah (the buildings). Syrian objectives are Nafah, the three road exits at top, and the top right hill (Tel Avital).

Not sure which is more fearsome: Israeli Centurions, or Israeli artillery (in this case, M7 Priests). All the models in this game are from Bob's collection - mostly Heroics & Ros, I believe.

More Centurions, this time supported by M50 155mm - oh, and some recce jeeps (who will wisely enter the table last after the serious fighting is over)

Had to give these exotic creatures a pic of their own: T-34/122, a Syrian conversion.

The meat and potatoes: Syrian T-62s (there were also a lot of T-55s).

On Turn 1 my 51st Brigade tried to bully the isolated Israeli delaying force. Sukhoi Su-7B joins the fun. Unfortunately the Centurions have us outnumbered more than one to two ...

Same episode seen from the other side of the table.

Turn 3. The only Israeli units are the now damaged 266th Bn, 188 Bde HQ, and the Nafah garrison. The small 2-model 82nd Bde has been wiped out. However, most of my units are Disrupted (marked by craters) and the two at right and bottom of pic are Spent and Low on Ammo (marked by hospital tents and ammo crates). The poor quality Syrian units can't take nearly as much punishment as the Israelis.

Turn 4 and Israeli counter-attacks arrive from two directions, NW and SW, hitting my front and left). Here comes the frontal hit - I think my mech bde miraculously survived this time but still had to fall back.

The hit from the left was brutal and soon put paid to any ideas I might have had about storming Nafah. The quality difference gave the Israelis a +2 advantage in every assault and fire combat. This is huge on 2D6. Oh, and my Sukhois are done for the day and it is time for Israeli Skyhawks to arrive.

The metaphorical and literal high point of the Syrian attack: 43 Bde's Mech Bn ensconces itself on the top of the Tel Avital objective and sets up its Sagger missile launchers. 

Turn 6, the halfway mark. Most of my force mills around in the middle of the table. The Syrians are all rated Passive, a -1 penalty on all their activation rolls when in good order. That doesn't half slow your blitzkrieg down. No such problems on the Israeli side as their 96th Tank Bn ploughs on through my left flank. 

By now, the Israelis have got four artillery units into action. Here we see those M50s close up. All that firepower was devastating.

Turn 7. Not so many Syrian green unit labels visible now, and more white Israeli ones are pushing forward from the left of pic and in the centre. Two arty bns park on the road exits at top edge. One joins the Skyhawks in obliterating my hilltop battalion, top right. So much for that objective.

It was one-way traffic for the next three turns as the Centurions steamrollered my disorganised, outflanked, rubbish formations. Turn 10 sees me commit my last intact unengaged tank battalion - unengaged because it failed to move for four successive turns despite the bde HQ being next to it ... every artillery piece and aircraft in Israel opens up to make sure it's not going anywhere. Holding zero objectives meant I was one short of a draw. I can console myself with the fact that it's still a pretty historical result. Bob said I'd done better than he did when he played the Syrians.

In fairness, I had inflicted a dreadful toll in white metal alloy on Bob's force - no fewer than 8 strength points. That's a lot of damaged Centurions.

Against the Israelis' 8 SP lost, I think I count a mere 43 Syrian casualties. Clearly a Pyrrhic victory for the Israelis, then.

Reflections:

I do like tank games. As with C19 horse and musket, the mix of the three different major arms (infantry, armour, artillery) makes the tactics interesting and produces battles with depth and scope for manoeuvre - a good recipe for fast-moving games with changing situations.

Nice scenario. It's almost as though Bob follows his own advice - see his great essay on scenario design. Room for manoeuvre, grand tactical options for different plans, both sides having to move a lot, action across most of the table ...

Victory conditions: Bob did say he felt the victory conditions were too difficult for the Syrians. He has now adopted modified conditions based on my suggestion. The Syrians no longer have to hold objectives, they get victory points just for reaching/taking some 'high water mark' locations. The Israelis for their part get VPs by reaching locations along the Syrian baseline, representing the degree to which they cut off or crush the Syrian force. (And giving those Israeli jeeps something useful to do.)

Quality vs quantity: always a nice contrast. The game demonstrated very well how the quality difference produced the actual historical result. It prompted a long post-game discussion between us about the importance of leadership, right down to NCO level, as illustrated in many a conflict down the ages.

Knowing the rules helps. We were using Bob's WWII/Moderns adaptation of "Bloody Big Battles!", BBWW2B. On previous occasions I've enjoyed Bob's WWII and modern games but had to rely on Bob a lot because I found the rules a bit fiddly, I guess because of the wide variety of armour and anti-tank ratings and resulting complex interactions. This time, almost all the tanks were effectively the same, it was crew quality that made the difference, so I found it easier. Even so, ignorance cost me at times: eg, if I had known my Saggers were so useless and my infantry so vulnerable, I might have had 43 Mech Bn hide behind the objective rather than on top of it.

Beautiful models. Bob is a craftsman and it is a pleasure to play his games and use his armies.

===

Now let us step back nearly 300 years to the War of the Spanish Succession. Matt reran the scenario we played last August (AAR here). This time I commanded the French left wing. AAR in the photo captions, followed by further reflections.


Initial French set-up before the allies deploy. Essentially: beefy garrisons in each of the three main objectives (fortified villages) and also in the village on the river on the right flank. Massed cavalry on the heights guard the open ground on our right. More cavalry in reserve behind our left wing.

The bourbon fleur-de-lys flutters gaily over Autre-Eglise, whose gallant defenders will soon become gallant attackers to threaten English-held Foulz.

Marshal Villeroi himself stands ready to hurl his cavalry reserve forward to support the attack on Foulz.

The allied dispositions are revealed, presaging determined and repeated assaults on Ramillies itself (lower left), with cavalry in support to push back our right wing.

How it ended up. Red labels are allies, pale labels are Franco-Bavarian. Left of pic, early high dice for my defenders' fire soon stymied any thought Matt had of taking Autre-Eglise. This encouraged Mark and me to commit reserves and push towards Foulz. However, the marshy valley and some deadly British volleys in return stalled us. Top left can be seen two British cavalry units who must have been commanded by the Duke of York, as all they did all battle was march slowly and with frequent halts to and fro along the Foulz ridge. Right centre: Ramillies fell to the fourth British assault, I think. Mark mounted a couple of counter-attacks but couldn't retake it. However, he did hang onto Taviers, and although his cavalry were pushed back they prevented the allied horse from breaking through to the road exit objective in our rear. Thus, the allies barely scraped a draw.

Reflections:

Linear warfare! With Matt's rule mods, this is a very different game. It becomes crucially important to plan a couple of moves ahead and ensure your troops are pointing in the right direction from the start. It definitely feels as though it captures the essence of 18th-century warfare. It certainly had us all pretending to have powdered our wigs and starched our lace so we could bow and flourish appropriately before inviting our opponents to fire first.

What to do with cavalry? I demonstrated again that I am a light infantryman at heart and should not be trusted with horse. (Just self-deprecating for effect - maybe I could have done better with them but I didn't do anything disastrous either.)

The fun factor of special units. In amongst all the regular field and light artillery, Matt mixed in a couple of units of siege guns and mortars with special capabilities. Siege guns rated Devastating but had to reload (miss a shot) after every shot; mortars negated one column shift for cover. Players had fun firing with these and trying to nullify them.

Beautiful models (again) - just a feast for the eyes.


Monday, 11 November 2019

Soviet MT-LB for potential new wargamer

A new baby recently joined the extended family. I am taking upon myself the honour of bestowing his first tank. Since his initials are MTLB, there was really no alternative ...


MT-LB: brutally functional (and so is my painting)


I have always had a soft spot for the Soviet MT-LB APC. Just like the original, the S&S Models version has the major advantages of being cheap, simple to manufacture, and robust enough to withstand handling by small children.

My compliments to S&S for swift and efficient service. A couple of blobs of superglue and slap on some green paint, and hey presto. I know my slapdash effort won't win any prizes, but it took me no time to do, and I'm sure it will be appreciated by its target audience.