And lo, 'tis done: the final battle in our 15-month, 15-game Hungary 1848 campaign has been fought.
The climactic battle of Temesvár (nowadays Timisoara in western Romania) is notable in a couple of ways. It is the decisive final battle of the war and also the largest, pitting about 30,000 Austrian and Russian attackers against 60,000 Hungarians. It is remarkable in that it was decided entirely by the artillery and cavalry, with the infantry scarcely firing a shot and certainly not crossing bayonets. This is because many of the Hungarian infantry were unarmed raw recruits, and all of them were exhausted and demoralised by constant retreating. The action opened with the usual artillery duel along the whole front; there was considerable manoeuvre by both sides, including several Hungarian spoiling attacks, one even by infantry; but ultimately the Hungarian artillery ammunition ran out, some raw troops on the right broke under fire, and this turned into an infectious rout covered by the hussars. Allied casualties were light, Hungarian losses devastating (mostly prisoners or just 'missing'), and most of the Hungarian formations were left worthless for combat.
Translating such a battle to the wargames table is a challenge. Do you script in the infectious rout? Do you make the Hungarian infantry unfit for combat from the start? Or do you give them a real chance of inflicting a bloody nose and pause for thought on the allies as their commander, General Bem, intended?
I opted to downgrade the Hungarian infantry's combat abilities significantly but not cripplingly. Any 'Aggressive' ratings were stripped away (even from the fabled Polish Legion). Even the best units were made Fragile, penalising them in both assault and movement. Most were rated XF - 'Extra Fragile' - making them much more likely to run away once disrupted. Many were rated as Ragged Volleys to reflect their armament with scythes rather than muskets.
The result was an excellent game, but one that only partly matched the history. Much of the Hungarian force was routed but, as the Austrian commander, I made some poor decisions that earned me a very bloody nose indeed. If you're interested in the detailed action, read the photo-AAR below. If not, you might want to skip to the end to see my reflections on the game.

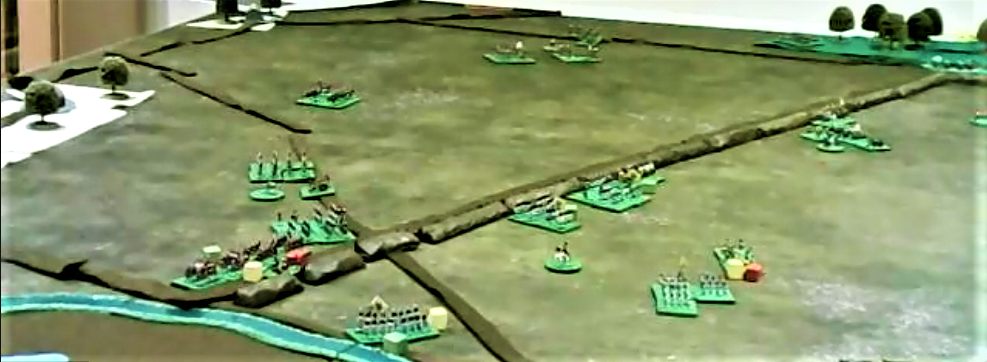
The battlefield is bisected by the marshy Nyárad stream, the line the Hungarian C-in-C Bem tried to defend. Off-table to the SE (top edge) is the Austrian-held fortress of Temesvár, whose epic siege is about to end. The yellow patches indicate that much of the battlefield was covered by tall maize, limiting visibility. White counters are the objectives: at top, the bridges leading to Temesvár; below them, an inn on each road, roughly representing the Hungarians holding a line; bottom right, two villages on the allied line of communications; and on the left, the stone bridge on the highway leading to Arad and the possibility of Bem linking up there with Hungary's other remaining field army under Görgei. All the Hungarians are on top half of the field already. Allied advance guard is lower right of picture. Main body arrives bottom right Turn 1; others bottom left T1 or 2 and (out of view) left edge T 2 or 3.
Ramberg's III Cps on the start line on the Austrian right.
The "10,000 scythe-armed national guards" around the Szt András inn on the Hungarian right wing
(in reality probably the several battalions of unarmed recruits belonging to X Corps). These are the troops who historically sparked the Hungarian rout.
Lázár's IX Corps in the Hungarian centre (including the Polish Legion) links up with Kmety's division which is about to cross the Nyárad on their left.
End of Turn 2. All of the Austrian left wing, Liechtenstein's IV Corps, has arrived. His grenadiers march onto the heights above Szt András (bottom right) while Brigade Siegenthal pushes forward on the left (bottom left). The Hungarians brace themselves to receive the attack. Note the wagon and white counter next to the line of poplars: this represents the Hungarian baggage train trying to escape to Arad. In the unlikely event that the wagon manages to cross the Nyárad and survive, the Austrians will lose a victory point. Meanwhile, top right, Panyutin's Russians are visible advancing to the Nyárad.

End of Turn 2 on the allied right: a formidable Hungarian force under Lázár and Kmety is debouching across the Nyárad (top right) to threaten the allied line of communications. The Italian Legion has been left to hold the Besenyő inn (top left). Wallmoden's cavalry (bottom right) have given ground while the infantry march up and the guns deploy along the road. Top centre, I pushed Brigade Dossen forward to delay the Hungarian advance. This was careless - what I thought was a unit of hapless raw recruits was actually the honvéds of Division Jászvitz with their dangerous jaegers. I would soon rue this move.

End of Turn 3 and things are looking good on my (allied) left. Siegenthal has stormed across the Nyárad (left of photo), rendering a raw Hungarian unit Spent (blue counter) and disrupting the honvéd line behind it (yellow counters = disruption). Herzinger's grenadiers press forward to the Nyárad (bottom centre). That unit in line in the maize field, upper right, is a bold Russian jaeger regiment.
Also T3: more Russians push forward in my centre to threaten the Besenyő inn (left of picture). The corps heavy artillery has deployed to soften up the Italian Legion defending the inn. (Green counters = Devastating 12-pdrs.) However, the Hungarians have rumbled up two artillery units - 48 guns - to canister Dossen and drive home just how serious an error I had made.
End of Turn 4 and on my left, it just gets better and better. Siegenthal has inflicted another blue Spent counter on a second raw Hungarian unit. Herzinger's grenadiers are across the stream and ready to join in the fun. The Russians in the centre are fending off weak Hungarian counterattacks and preparing for their own assault on the Besenyő inn (top right).
But on my right, the tragic waste of Brigade Dossen is complete and they are back in the box. On the positive side, the Hungarian flanking move has barely moved at all, as my horse artillery is compounding their poor movement rolls to delay them.
Not satisfied with squandering Brigade Dossen, on Turn 5 I committed an even worse sin on my left. Siegenthal's success caused a rush of blood to my head. I launched both my potent grenadier brigades against a honvéd line that looked thin but was armed with jaegers and two artillery units. The jaegers repelled one brigade with loss and the combined canister fire wiped out the other entirely - note the embarrassing gap in my ranks in front of my general by the road. Stupid, stupid, stupid.

Turn 5 was quite exciting on the right too, but better for me. My 12-pdrs began tearing holes in the Italian Legion (top left). The Hungarian left-flanking force tried to assault Wallmoden's cavalry division. The cavalry prudently evaded to safety; their guns smashed back the infantry attacking them frontally, then managed to survive the hussars' charge as well. My gallant horse artillery can be seen heading for the line of poplars, leaving a cluster of yellow-countered Disrupted Hungarians behind them. One of the yellow counters belongs to my Brigade Wolf (white coats, top centre, near their general). Undeterred by the loss of their sister Brigade Dossen, I sent these on another spoiling attack, this time with greater success.

Turn 6: the good news on my left is that the Hungarian jaegers are low on ammo (black counter). The bad news is that they've used it all to wipe out the rest of my grenadiers (big gap lower centre). Brigade Siegenthal by the Arad bridge looks very lonely. With hussars creeping towards my left flank (top left and top centre-left), barring the way to Arad just got much harder.
Progress on my right, though. With only two turns remaining and quite a lot of my troops in the way, the Hungarians at top right are probably still too far away to threaten my line of communications seriously. Two Russian regiments have ejected the Italian Legion from the Besenyő inn (top left) and captured their guns. Thus, the three objectives in this picture are looking secure; I need one more for a draw and two to win. Also, notice the single-base cavalry unit on the bridge at centre left, Brigade Veigl. This will shortly have an important part to play.

End of Turn 7. The disaster on my left gets worse. Now Siegenthal's brigade has gone as well - those whitecoats you see on the bridge to Arad are the victorious honvéds, closely followed by their baggage train. All is not lost, though: the Russian jaegers have driven back their foes in the centre, then wheeled left to storm the Szt András inn - my fourth objective - while Haynau himself canters forward with Veigl's cavalry (centre-right), seeking to dash across a bridge for that fifth objective to claim a win.
Turn 7 on the right: the Hungarians have the consolation of overrunning my horse artillery but are forced to accept that my line of communications is out of reach and secure.
End of Turn 8, the final turn of the game. The Hungarian baggage crosses the Arad bridge, costing me an objective! Drama around the Szt András inn as well, which desperate scythemen briefly recaptured, only to be definitively expelled again by the Russian jaegers. I have four minus one = three objectives, one short of a draw ...
... and it is the commander-in-chief who achieves it, just as Haynau did historically when, as dusk fell, he led a mad dash through the debris of the Hungarian army to the gates of the fortress to relieve the siege!
Reflections
As a game, it was great: plenty of options and decisions and movement for both sides, see-saw action, and a rollicking finish with objectives changing hands repeatedly and the result in the balance right to the end. Don't change the scenario!
Yet, as history, it felt strangely unsatisfactory. It reproduced the Hungarian thrust around the allied left, and recreating Haynau's mad dash at the end was wonderful. But the intense infantry fights we had just didn't happen in the real thing, and it's hard to know how (or whether) to prevent that. I think the answer is to offer a scenario option that ups the Austrian victory target while (probably) handicapping the Hungarian infantry further, making them either more shaky under fire, or even worse in close combat, or even more reluctant to move, or a combination of the above - all depending on a random die roll. This could be a good way to represent the imponderables of army morale and come closer to the historical event for players who want that and who don't mind if the game is a bit more one-sided as a battle.
Good to field Crispin's new Hungarian army for the first time. That now makes three of us at
OWS with full armies for both sides for the '48. I doubt any clubs outside Hungary could match that.
Exotic troop types enhance a game. Those extra-fragile scythemen may not have had much combat value, but they provided plenty of entertainment value. The baggage train was a nice addition too.
You can't legislate for stupidity. I am still shaking my head at my own recklessness in squandering not one but three brigades with such rash advances. I bet my opponents Mark and Crispin couldn't believe their luck. I don't know how I got away with a draw despite that. Maybe my judicious use of Haynau and Veigl's cavalry made up for it.
We completed a campaign! Inevitably, travels and lockdowns and other real-life inconveniences meant it took a little longer than planned and some of the core group missed out on some of the games. Because of these interruptions, we also lost some of the feeling of campaign continuity, though we managed to retain the overall 'story arc'. Even so, one campaign battle a month (and some of them being fought more than once) for fifteen months is a respectable achievement. Generals and formations acquired personality and character in our eyes over time and became old friends. After spending so long immersed in the drama of the '48, we have absorbed its history. No doubt we will visit it again, but for now: Mission Accomplished!
Next mission: compile all the campaign scenarios together, write an introduction, design a cover and publish "Bloody Big Hungary 1848 Battles!". Actually, that work is almost all done already in anticipation of this last game. I should therefore be able to get BBHB published very soon. Start saving your forint/Schilling!
PS - if these reports have got you interested in the Hungarian War of Independence, you might want to take a look at my books on it from Helion: