Wednesday, 22 September 2021

Hungary 1848 #11: Hegyes

Our Hungary 1848 campaign continues. The 11th of our planned 15 games took us to the southern front for the first time for the battle of Hegyes. This was the largest battle on that front, inflicted some of the heaviest losses suffered by the imperial side, and was Hungary's last major victory of the war.

The situation was an unusual one. Under pressure from invading Austrian and Russian armies in the north and west of the country, Hungary's government had decided to mass its forces in the south, knock the imperial Army of the South out of the war, and then base itself on the fortresses of Arad and Temesvár. The imperial C-in-C in the south was Jellachich, Bán of Croatia, commanding an army mainly composed of 3rd- or 4th-line Grenzers. He was holding the line of the Franzenskanal between the Danube and the Tisza in what is now northern Serbia. The Hungarian forces converging on him took one end of the canal, forcing him to choose: should he fall back behind the Danube immediately, or thrust forward to give the Hungarians a bloody nose in an attempt to deter and delay them?

Opting for the latter course, he took some 12,000 men on an overnight march to seize the village of Kis-Hegyes and its bridges over a minor river, the Barra, which he knew were Hungarian-held. Unfortunately for him, a similar-sized force of Hungarians under the English general Richard Guyon, well aware of Jellachich's approach, was hunkered down in Kis-Hegyes and the neighbouring villages of Szeghegy and Feketehegy. At 3:00 a.m., Jellachich walked into a division-scale ambush. His initial assaults on the villages were repulsed and Hungarian hussars lapped around his flanks. Hearing gunfire in his rear as well, he realised he was in danger of being cut off and captured. His assault turned into a fighting withdrawal which he executed rather well, but he lost over 1,000 men.

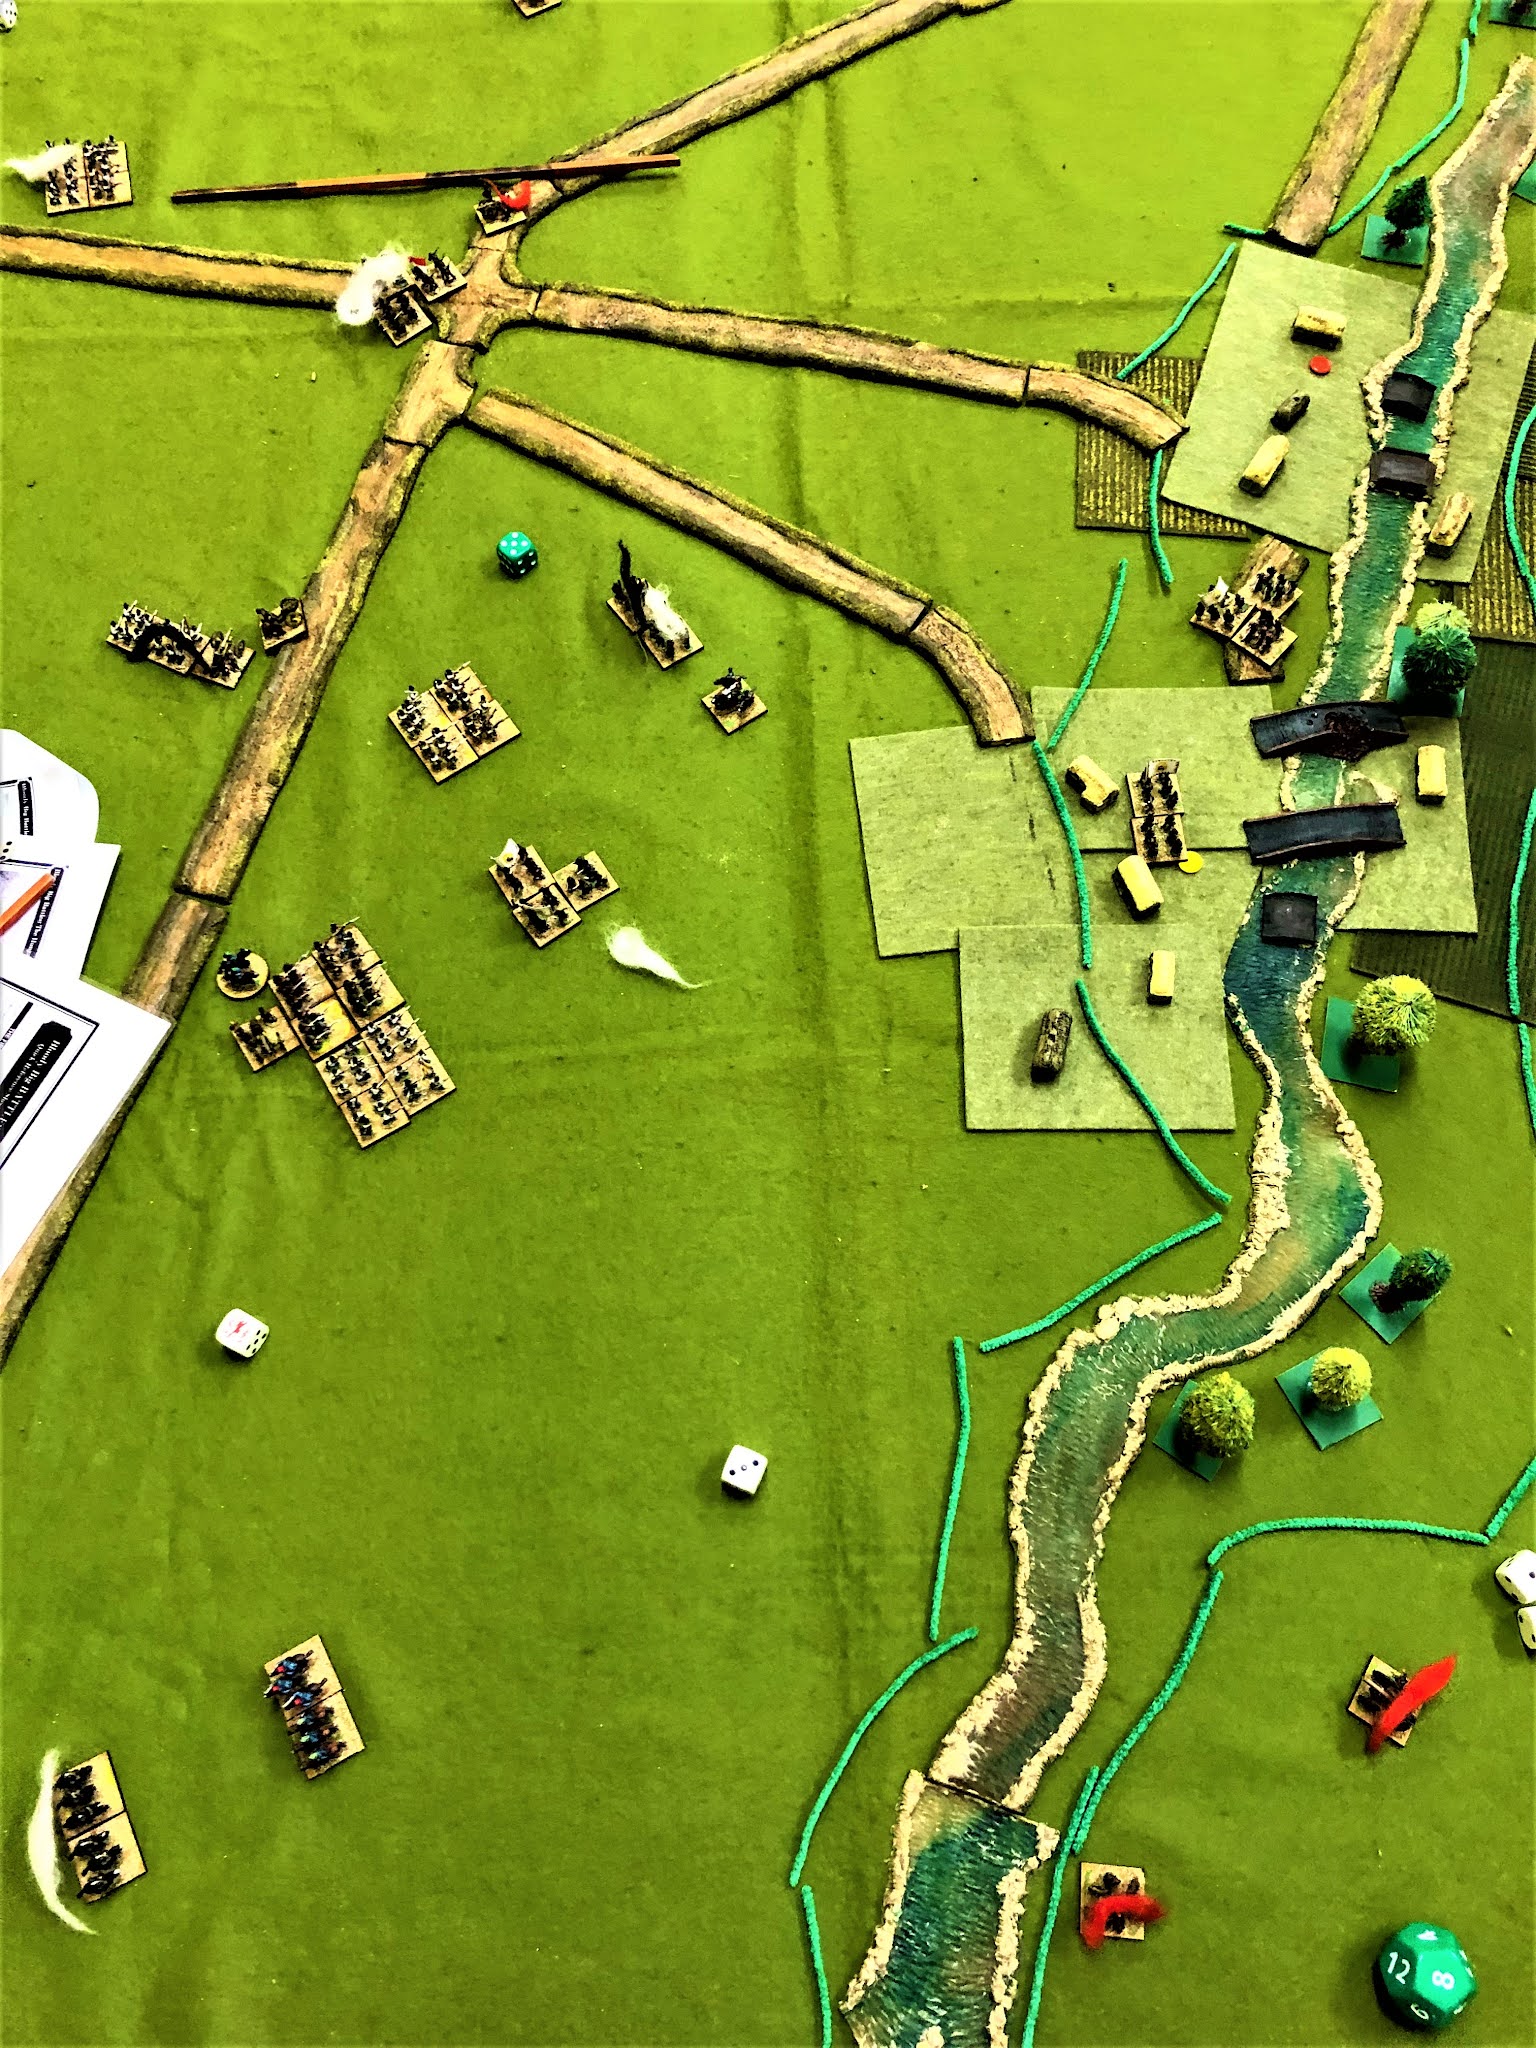
Unusual terrain: the Barra has carved itself a gully through the flat plain of the Bácska. The steep banks of the gully are denoted by the green lines of pipecleaners. Three sprawling villages straddle the tree-lined river, with vineyards on the slopes behind them. Jellachich's force has arrived from bottom left, then executed a wheel to the right to deploy for battle. The Hungarians lurk unseen in ambush.
 

This is tricky to capture in a wargame scenario because of the problem of hindsight. Unlike Jellachich, we players know that his assault is probably doomed to fail, and we know that an outflanking force will threaten to cut his line of communications. Rather than the usual simple formula of judging victory by who holds which objective locations at the end, I defined three strategic objectives for the Austrian side:

1. To seize one of the three villages, even if only temporarily;

2. To have at least one of the two Austrian cavalry units survive to cover the retreat and to have lost no more units Spent or destroyed than the Hungarians;

3. To have no Hungarian unit closer to the two line of communications road exits than all Austrian units.

The Austrians needed to achieve all three of these for a win or two for a draw (and had to have assaulted a village with at least two units).

The point of this mix of objectives is that the Austrian mission changed halfway through the battle from "seize a village" to "run away!". Thus the Austrians have to make a good-faith effort to attack the villages initially, but they are not required to hold any at game end.

The Austrian problems are compounded by a scenario rule to reflect the nervousness that gripped Jellachich's force when they heard cannon fire from the rear. Starting on Turn 4, the Austrian side must dice each turn to see if the whole Austrian force becomes Fragile. If it does not do so by Turn 6, it is ruled Complacent instead, and a Hungarian unit shows up in the Austrian flank or rear, followed by the Austrian reserve that historically got sent back to protect the retreat.

Last but not least, because this was an ambush, none of the Hungarian units are deployed on table initially or even plotted on a map. Instead, the Hungarian players can simply deploy them in a village as soon as the Austrians move within 3" of it, or in any village in their own turn.

I was a bit anxious about these unusual scenario special rules pre-game because 'funky' rules do not always work out as intended. I needn't have worried: they provided us with a distinctively different battle that still gave a close and exciting game and a decent representation of the historical battle.

As was always going to happen, the first Austrian unit to move up against Feketehegy (the Erzherzog Wilhelm and Piret infantry) was ambushed by a Hungarian firing line anchored by a battery at each end. The hapless Wilhelms/Pirets were immediately reduced to half strength, Spent, and played no further significant part in the battle.

However, the Hungarians could not be everywhere. They did declare troops in Szeghegy as well, but not enough to prevent Budisavlievich's Grenzers from pressing into the village. Intense fighting in and around both villages ensued.

At the northern end of the line, the Hungarian right wing (commanded by our new comrade and BBB novice, Simon) debouched from Kis-Hegyes. All that was in their way was Castiglione's cuirassiers. These carelessly loitered long enough to be blown away by Hungarian artillery, meaning the Austrians could not afford to lose their remaining cavalry on the other flank if they were to have a chance of winning.

At the start of Turn 4, the dice decreed that 'Austrian Anxiety' came into play, word spread through the Austrian ranks about the enemy advancing in their rear, and all Austrian units became Fragile. The Austrian players' morale was creaking at that point too, but I pointed out that they still had a chance of victory if they could clear one village. One Austrian unit in Szeghegy duly turned to the right and attacked the flank of the Hungarian defenders of Feketehegy, clearing them out and planting a yellow Habsburg victory counter in it.

 Circa Turn 5: the Austrians have cleared the large village of Feketehegy (upper right). Hungarians from the north approach the Austrian left anchored on the crossroads (upper left). Both sides' cavalry are disrupted after a clash on the southern flank (bottom right).
 

As the Hungarians from the north closed in, the Fragile Austrians were compressed back towards their precious line of communications exits. On their southern flank, there was a tense series of cavalry actions between hussars and cuirassiers, the latter being superior in combat but having to be cautious.

On the last turn, all three results were possible. The Austrians had suffered one more unit than the Hungarians Spent/destroyed; if they could kill the hussars in the south, they would rectify that and win. Conversely, if the Hungarians could get either hussar unit closer to either road exit, that would produce a Hungarian victory. In the event, neither transpired, and it was yet another classic honours-even draw to conclude an exciting and different game.
Game end: the Austrians have been driven back but managed to cover their line of communications. Red markers bottom right are on the Hungarian batteries that delivered the initial ambush but were then driven off with loss.

Reflections:

BBB proved again how easy it is for new players to pick up: Simon said he was daunted at first but comfortable by the end.

The simple special rule for the ambush deployment produced the right effect.

The mix of objectives to reflect the Austrian change of mission mid-battle likewise worked. (Phew!)

Perfect scenario for a Monday night at the club: simple terrain to set up, ~10 units a side, enough variety of troops to be interesting, both sides have to manoeuvre. Eight turns long so we were done in two hours' play, despite going in slow time initially to introduce Simon to the rules.

Our regular multi-player format is good for flexibility! When Simon was looking for a game, it was easy for us to fit him in as a third player on the Hungarian side. Conversely, we were expecting three Austrian players - one couldn't make it, but the game went on without him, whereas in a one-to-one game, if one player drops out, the other player's evening is written off as well.

And finally, John and I relished one thing remote gaming can't really provide: the post-battle pint together in the pub.

Sunday, 19 September 2021

A healthy varied gaming diet

This year's ongoing project is to playtest all the scenarios for my planned Hungary 1848 BBB campaign book (10 out of 15 now done). These battles have kept me and the gang very much engaged. Even so, a change of diet now and then is healthy. Happily, over the last couple of weeks I've played three quite different games.

Gaslands

Two new members, Simon and Martin, joined OWS and laid on Gaslands for us. This is a kind of car wars game in a Mad Max type post-apocalyptic setting. The scenario was a race, but one in which we could shoot or ram our fellow competitors. We each had a team of two cars. I chose two that closely resembled cars I used to own (apart from the rockets). Our referees had a lovely layout which we duly charged around, cheerfully machine-gunning and ramming each other. With four newbie players, we didn't quite complete the circuit, but Bruce's sturdy van was comfortably in the lead when we wrapped up and my poor little sports car was scrap metal ...

Six teams surge from the start line, Bruce's van in pole position.

Excellent lighthearted fun, a nice change from historical gaming, and great to meet two new members who will enliven OWS. Incidentally, Simon is the proprietor of Syborg 3D Printing, producing a terrific range of 15mm vehicles, aircraft and terrain for WWI, WWII, post-war and more.

Fetching Gaslands scenery and oil slicks. Terrain matters!

Lützen 1813

Back to BBB but not to Hungary. Mark has been working his way through all of Napoleon's biggest battles. This time it was the turn of Lützen, a battle about which I knew effectively nothing until now. This was Napoleon's first victory of the spring campaign of 1813, an attempt to knock the Prussians out of the war and dissuade the Austrians from joining in. It makes a good game because initially the Russian and Prussian are on the attack, trying to beat up Ney's isolated corps; then as French reinforcements arrive, the allies have to fend off Napoleon's double envelopment. Thus everyone gets to do lots of maneuvering and make important decisions. Mark's scenario was particularly good because he drew the frame wider than most maps of the battlefield tend to do, so he made all that outflanking space available for people to make mistakes in.

View from the French side. The Imperial Guard (and friends) have counterattacked up the road from Luetzen (offtable bottom right) and retaken three of the four central villages, as well as both flanks, but failed to cut the allied line of communications (road exit at top) - a draw.

We fought this in two sessions: the first remotely, the second in person in Mark's Kriegspielium. That made a big difference. In the remote session, seeing just a segment of the battlefield at a time made it hard to appreciate how the sectors connected and interacted - so for instance I didn't realise some of my artillery in the centre was vulnerable to enemy cavalry on my right until they pounced. Having the overall view of the whole battlefield made it much easier to understand what was going on. Not a complaint - the limited 'fog of war' view is probably more realistic than the 'helicopter' view! - and either approach can work, it was just unusual to have the chance to get both views in the same game.

Close-up of Napoleon himself among his grognards in recaptured Kaja, Rahna and Gross Goerschen.

As for the course of the game itself: broadly historical, I think. A big slugfest in the centre over the four strongpoint villages; then pressure on both allied flanks from French reinforcements; and finally the Imperial Guard smashing into the middle. Honours even, objective-wise, meant everyone went home happy with a draw. A terrific scenario that doesn't need any further revision.

Agincourt

I was entrusted with a 10-year-old boy to entertain for a Saturday. Fortunately he has been indoctrinated, is already army-barmy, and was eager to roll some dice. I was recently given two boxes full of 15mm Hundred Years War figures, painted and based, but somewhat the worse for wear after decades in a barn. My apprentice and I spent a happy hour or two just sorting them out and getting rid of the goose poo, cobwebs and dead beetles. Next step was a 3-minute video, "Battle Stack: The Battle of Agincourt tactics", pitched at just the right length and level for an excited youth who just wanted to get the toys on the table. Once he knew what the historical battle was, he had a jolly time setting up a sort of Agincourt terrain. I say "sort of" because my French had it even harder, having to cross a river into the teeth of entrenched bombards and organ guns.

A rare sight in my war room - something pre-Napoleonic! Linear, yes; limited, yes; dull, no.

I didn't have a suitable rulebook to hand so we played DBM - that is, De Bellis Made-it-up-as-we-went-along ... let's say inspired by DBA/DBM (command pips and opposed die rolls) but simplified for speed and with movement 'kriegspieled' rather than measuring. This exceeded my expectations: after 90 minutes or so I kept trying to surrender, but His Majesty the King of England was having such a good time he would urge me to charge again and again. I did overrun the bombards and the cocktail-stick chevaux de frise, and I did get rid of a lot of English longbowmen and men-at-arms, but eventually ground to a halt and was permitted to concede defeat.

This was surprisingly good fun for all concerned. It was also educational for my young pupil: he now understands the importance of maneuvering your medieval troops in "battles" rather than modern skirmish lines; and how lethal the longbow was; and has had a first taste of command pips as one way of representing a commander's limited time and attention and influence.


Back to the staple diet of BBB Hungary 1848 tomorrow, but refreshed and invigorated by having enjoyed some different games in between!


Thursday, 26 August 2021

"The entire work is a treat for military specialists and lay readers alike" - Clausewitz 1796 reviewed on H-War

Delighted to see our translation of Clausewitz's history of Napoleon's 1796 Italian Campaign receive this excellent review by Doina Georgeta Harsanyi (Central Michigan University) for H-War. Some quotes from her assessment of the work:


"Military historians and army officers will find much to enjoy in this theoretician’s take on a well-known sequence of events."

"The narrative is rich in perceptive insights"

"excellent critical apparatus"

"Richly researched footnotes"

"The entire work is a treat for military specialists and lay readers alike"


I am very grateful to Dr Harsanyi for her thorough review and generous comments.

Wednesday, 25 August 2021

The Road to Vicksburg: Champion Hill (1863)

Having enjoyed Vincent Tsao's Marengo scenario at our last club outing, we gave another of his scenarios a run at the club this week, this time from the American Civil War: Champion Hill (16 May 1863).

This gave Dave W a chance to get his 10mm Pendraken ACW troops onto the table. We chose sides by the expedient of who was wearing what - Dave and Bruce were both in blue, which made them the Union, leaving me and Colin as Confederates (though it would be a stretch to describe my red T-shirt and Colin's camo pants as 'butternut').

Champion Hill was a small but important action. It was Grant's seventh attempt to reach Vicksburg so as to cut the Mississippi. Hitherto he had been thwarted by Confederate fortifications and raids on his supply lines. On this occasion he broke through, inflicting heavy casualties and fragmenting the Confederate army, enabling him to establish the siege of Vicksburg.

The game starts with the Rebs in a tricky position. Basically Grant has managed to get round the northern end of their line and mass against their left, which is anchored on Champion Hill. All that holds the hill is a poor quality force under Cumming & Reynolds (Raw and Fragile, in BBB terms), which is supported by an artillery battery but begins the battle already Disrupted by having been rushed up there.

View of the whole battlefield. Union line top left facing Confederate line on Champion Hill. More Union will approach from top centre and top right corner. Bowen's and Loring's divisions in column on road bottom right.

Fortunately for the Confederates, historically McClernand (facing their front with his XIII Corps) was very slow to get off the mark. The scenario limits how close to the enemy XIII Cps units can move initially. This gives the Rebs a brief window in which to fend off the flank threat and even turn the tables by pouncing on the Union supply column at Champion House. Whether or not they manage to do that, the second half of the battle will see Union weight of numbers turn it into a fighting withdrawal towards the road exits to Vicksburg and an effort to prevent the Union getting troops down those roads.

Rebel's eye view of the impending threat from behind the Champion Hill line. White puff shows the defenders' initial disarray. Union wagon train visible lurking behind Champion House top right. 

We weren't able to fend off the flank threat. That's not entirely true: it did take the Union three turns to kick us off Champion Hill. But we lost a lot of troops trying to hang onto it, and the dice were cruel to us. Dave's long range artillery threw consecutive 11s to smash Buford's brigade as it hastened north towards the Hill, rendering it Spent and of negligible combat value. On the Hill itself, despite getting a second battery up there and moving S.D. Lee and Barton's brigade to enfilade the decisive Union assault, we couldn't repulse it: with two shots at firepower of 16 and 20 (pretty lethal in BBB terms), I rolled 4 and 3 - enough to Disrupt the bluebellies but not stop them.

And now a view from the Union side a turn or two later. The Union troops have got onto the hill and driven back the Confederate infantry who are Spent and Disrupted. They are flanked by two batteries now, whose canister should have kept the Union at bay a little longer, but it was not to be. 

Our most potent unit, Bowen's division, did attempt to get back on the Hill but failed. Lee and Barton had two chances to overrun Stevenson's weak brigade on the Union extreme right and open the way to the Union wagon train, but here too the dice let us down. Stevenson survived long enough for reinforcements to join him and the window slammed shut.

The scene immediately after the Union took the Hill. Lee and Barton lower left about to try (and fail) a desperate left hook towards the Union wagons. Bowen, upper right, about to try (and fail) to storm back onto the Hill. Routed rebs lower right will take no further useful part in proceedings.

That was around Turn 5. The battle was pretty much over in the north at that point: the Union had Champion Hill secure and its wagons untouchable, but Bruce saw no realistic chance of taking the bridge across Baker Creek, only the risk of excessive casualties from trying.


Game end on the northern part of the field. Battered Confederates falling back to hold Baker Creek bridge; Union not bothering to pursue them seriously.

In the southern sector it was a different story. All that was between McClernand and the Vicksburg road exit was Tilghman & Featherstone and a few guns. Three Union divisions converged on them, driving them back. At the start of Turn 7 we calculated that two successful assaults could see the Union achieve the road exit objective. Turn 7: two Union divisions assaulted; one was repelled by fire, but the other smashed the Confederates back 9" with loss and exploited 6" after them. Turn 8: the pursuing division needed to repeat its performance. It succeeded in charging; it shrugged off the feeble defensive volley; it won the resulting assault, forcing the rebels back another 3" - but not quite off the table. One more pip on the dice would have done it! A real knife-edge finish and a great way to end the game.

While the action petered out in the north, it hotted up in the south. Initial stand-off gave way to long range firefight and then to close assaults. Here the rebels have been driven out of their protective woods and cling on to the last inch of table to deny the Union another objective. 

Objectives-wise, both sides held one (Champion Hill vs the Baker Creek Bridge). The Union hadn't quite got off the road exits, but the rebels hadn't hurt the Union supply column. The decisive factor was casualties: the Union had inflicted more than double its own losses. Consequently the game was a Union victory.

Reflections:

The virtuous simplicity of BBB: Bruce had not played since February 2019, yet he picked the rules up again immediately, no brain pain or fumbling and stumbling.

Vincent's Victory Point scheme was a little complicated for us (4 VP for this, 5 VP for that, a VP per base for the other); could probably be reduced to a more standard simple BBB format of 1 per objective achieved. But it worked as is.

Victory can rest on small margins. Whether or not an individual unit reaches a crucial location in time; whether a particular assault succeeds or fails; how effective a single volley happens to be ... the result of the whole battle can turn on any one of these. Although we Rebs lost (and felt very battered), it was easy to see how the boot could have been on the other foot.

10mm is a great scale for achieving that 'mass battle' visual effect with figures that are still large enough to be easily identifiable.

The imperfect symmetry of ACW: although the blue and the gray use the same limited array of weapons and tactics, and although the uniform variations are relatively few compared with contemporary European armies, the opposing armies were not bland. Our small forces had enough nuance and difference (some Aggressive units, some Fragile, some Passive, the whole range of Raw/Trained/Veteran) for there to be significant tactical choices arising and flavour resulting.

A big thank you to Vincent for another fine evening's entertainment!

The scenario is freely available in the BBB group files.

Wednesday, 18 August 2021

Hungary 1848 #10: Breakout! Third Battle of Komárom

The '48 campaign furnished us with another epic game, fought remotely over two successive Monday evenings. We were joined by a new comrade, Mike E, a retired US army officer who cut his teeth on SPI hex boardgames but had never really tried miniatures gaming.

Histoically, after the inconclusive Second Battle of Komárom (our previous game) there was a lull of a week or so. The Hungarian C-in-C, Görgei, was suffering from a head wound. He was briefly dismissed while unconscious by an unhappy Regent-President Kossuth but reinstated after protests from his outraged army. He decided on a last desperate attempt to break out southwards from Komárom but, still not fit to take the field, he had to let Klapka command. The result was a poor plan, poorly executed, and the Hungarian army's sortie was repulsed.

The scenario portrays the command confusion on the Hungarian side by omitting Klapka, representing only the two best Hungarian corps commanders (Leiningen and Pöltenberg), and making Nagysándor's under-performing 1st Corps and Pikéty's cavalry division Passive. There are objectives spread around the table, variously representing the main Austrian defensive line, the Austrian line of communications beyond, the route east to Budapest, and the Hungarians' own fortifications. As Görgei recognised at the time, the balance of forces makes a genuine breakout virtually impossible, so victory is measured by what 'high water mark' the Hungarians achieve in terms of objectives taken temporarily as well as those held at the end.

I can only describe the first session as 'vivid'. Running these games is always quite demanding both physically and mentally but I was almost light-headed by the end of this one. The action was fast-moving, unpredictable and exciting.

The Hungarian initial deployment: 1st, 3rd, 7th and 8th Corps in a semi-circle outside their fortifications, about to emerge from the fog and surprise the Austrians (mostly off-camera, spread out in an even wider semi-circle, with their allied Russian division off-table for the first half of the game). River Danube in the foreground. Light green areas are vineyards. Yellow fields are there to remind players that the tall maize limits firing ranges to 6" everywhere.
 

The tone was set on Turn 1 when Schneider's brigade defending the Ács wood on the Austrian left rolled snake eyes and abandoned its abattis. This forced a swift change in the Austrian players' plan. They had intended Schlik to lend some support to Wohlgemuth in the centre, but instead had to commit his whole corps - and all the reserve artillery - to hang onto the wood.

Hungarians establish themselves in the southeastern part of the Ács wood. Upper right of picture, Sartori's brigade is disrupted but manages to retain a crucial toehold to prevent the Hungarians claiming the objective - the Habsburg yellow counter stays!
 

In the centre, Wohlgemuth held Herkály puszta as a bastion. The Hungarians chose not to storm his gun emplacements for the time being but flowed around it and took Csém puszta in the south.

Hungarians mass in front of Herkály puszta, waiting for the right moment to assault. Top left of photo red counter shows that the vacant Csém puszta has fallen to the hussars.

Close-up of Csém puszta. The Polish Legion and their supporting hussars, somewhat disordered after seeing off Ludwig's cavalry brigade, await the arrival of Panutine's Russian division. (Figures are Austrians - green counters denote that they are supposed to be Russians - my Russians are in a box somewhere.)
 

In the east (the Austrian right), Bechtold and Wolf faced off against most of Nagysándor's corps, much as they did historically.

Stalemate in the east: infantry trading shots across the Szilla stream, cavalry eyeing each other warily.
 

Turn 4, the last move of our first evening's play, was a critical one. There was a moment when a reasonable movement roll would have enabled Rakowsky's hardcore veteran brigade to assault the last discomfited Austrian defenders of the Ács wood, with a high chance of ejecting them and claiming the wood for the 'high water mark'. Instead, Rakowsky remained disrupted and vulnerable to the ensuing Austrian counterattack, and an Austrian brigade began sneaking along the bank of the Danube towards the Hungarian fortifications.

Sneaky Landwehr dodging roundshot from an understrength Hungarian battery as they sidle past the Danube vineyards. 
 

Battle resumed a week later. Two of the three Hungarian players were now on holiday, leaving Graham to hold off the Austrians alone. His situation looked grim but he put up a spirited fight. The stand-off on his left continued. On his right, he was gradually driven out of the woods, and Reischach's Landwehr managed to steal into his redoubts. Fighting raged in the centre. The Hungarians threw Jablonowsky out of Herkály puszta. The Austrians rallied, brought up their gun line, and counterattacked. The Poles held up three times their number of Russians for three hours before giving way. The 'red kepis' stormed the Austrian artillery and scared off half of the guns. Hungarian musketry held off one counterattacking brigade, but could not stop the other. It piled into the disrupted, depleted defenders who, low on ammo, were forced to concede the objective. 

Endex: Herkály puszta falls to the Austrians. Remnants of Hungarian 1st and 7th corps in the foreground. Hungarian guns left of picture deter oncoming Russians, but red kepis top centre are unable to stop the final assault.
 

The end result: the Hungarians had held the necessary five objectives at one time or other, but only retained two at game end, one short of their target, thus it was an allied victory. Still, it was a much tougher job for the allies than had seemed likely at half-time, and it took Reischach's improbable infiltration of the Hungarian redoubts to swing it. It certainly produced an exciting finish.

Reflections:

The simple yet subtle BBB approach to command & control proved its worth. Making some of the Hungarian army Passive and just giving it two corps Generals and no C-in-C worked well to recreate its poorly coordinated performance on the day.

A wargame can change your view of the history. Nagysándor and Bechtold get criticised by historians for pinning each other and not intervening more actively in the decisive sector. Yet when it comes to moving their troops on the table, you can see why they acted that way and how it could have gone badly if they had done as their critics advocate, and perhaps have more sympathy for them accordingly. This is not the first time a BBB game has given such an insight.

Objectives: setting these can make or break a scenario. In this case, the number of them and their distribution around the table resulted in the game reproducing the shape of the historical battle reasonably well, while providing interesting choices and challenges for the players. Deciding what number of objectives constitutes victory was tricky but history provides a 'par score', and I'm happy with the targets this scenario sets now.

How much should casualties matter? As Graham said, at half-time it was obvious that he wasn't going to break through, so realistically he would have preserved his army and pulled back behind his entrenchments. But then you'd think you could say the same for Klapka, yet the historical battle went on for eight hours, I suppose partly because it was fought across such a wide area and it was hard to get the full picture or to react quickly to change it. There's certainly a case for including casualty totals or ratios in the win/lose equation, but as a general policy I prefer not to, as discussed on this blog before.

Never give up! Even though things looked dire for the Hungarians at half-time, they came within a couple of dice of salvaging a draw or even snatching victory. Time-limited scenarios and the vagaries of the movement and combat tables mean there is usually a chance, albeit a small one, of extreme rolls changing fortunes.

A new player is refreshing. Mike fitted right in. He'd done his homework and read the rules beforehand. Happily, BBB seemed to hit his 'sweet spot' with its balance of big battle manoeuvre and tactical flavour. And of course, it's always good for a new player's morale to end up on the winning side.

***

Next up will be a change of scene as we finally leave Komárom and move to the southern front for a corps-sized ambush: the battle of Hegyes.

Monday, 2 August 2021

Hungary 1848 #9: Second Battle of Komárom

It's been two months since my last post about our Hungary 1848 campaign, our refight of Pered. That's due in part to summer holidays, but also to the fact that playtesting battle #9, the Second Battle of Komárom, did not go entirely smoothly.

We had an initial rather disappointing playtest. I'd tried too hard to make funky special rules for reinforcements recreate the unusual course of the historical action. As the players themselves pointed out, these induced 'gamey' player behaviour (which backfired). Furthermore, it wasn't a particularly exciting game, as the action was mainly limited to a to-and-fro slog in one sector of the table.

I rewrote it, replacing the problematic reinforcement rules with something more conventional. I did a solo rerun. This went better.

But then for a sanity check I looked in detail at the history again. Oh woe! For games #1-#8, I'd done this before the playtest and revised the scenario to reflect my recent research. I'd evidently failed to do so for this one. The draft scenario wasn't wrong, exactly, but by starting the action before the preliminary skirmishes it really made it impossible for the game ever to follow the shape of the actual battle. This is because the battle proper started after the Austrian commander, Haynau, thought it was over and was sending his troops back to camp, which a tabletop player is never going to do.

The situation is this. After Pered, the Hungarian army has retreated into its great fortress and entrenched camp at Komárom. Haynau has marched on Komárom along the south bank of the Danube, easily driving back a few Hungarian outposts. His aim now is to tighten his cordon around Komárom and cut its communications with Budapest on the south bank. If he can provoke a major battle outside the fortress, even better, but he does not feel ready to assault the fortifications and explicitly forbids his subordinates to do so.

C19 map of the fortress and the area around it. (Circa 1860s - the fortification on the Sandberg was built after the war, and the railway is new too.) From the Austrian Second Military Survey map collection here.)

Thus the allies advance, flags flying and drums beating, and make an imposing show of force around the Hungarian lines. Some hussars sally forth with their horse artillery but are soon driven back to the shelter of their fortified camp. Benedek's brigade seizes the village of Ó-Szőny on the eastern flank, cutting the riverside route to Budapest. Haynau is satisfied he has achieved his aim and orders his major formations to withdraw to camp: Schlik's I Kps to hold the Ács wood, Panutine's Russian division to retire south to Nagy-Igmánd, and Wohlgemuth's IV Kps to march off to Mocsa in the southeast.

Unfortunately in an excess of zeal one of Schlik's brigades (Reischach) had exceeded its orders, chased off a Hungarian sallying force, and pursued it actually into the redoubts. This produced a counterattack directed by Görgei in person (who also turned his own guns and sabres on routing Hungarian troops to forcibly rally them). The Hungarian counterattack against a force that had now been ordered to withdraw anyway threw I Kps into disarray. Görgei seized the opportunity and launched a large-scale attack on I Kps, aiming to inflict significant damage before the rest of the allied army could intervene.

The scenario map.

This is the moment at which the revised BBB scenario for our last playtest started. Both sides have some troops disordered by the preceding skirmishes. The Austrians only have I Kps and Benedek at their disposal initially. IV Korps is some distance from the action and obliged to move towards Mocsa for three turns unless it rolls a 6. The Russians are off-table and will enter on T4, T5 or T6, depending on the dice.

IV Korps marching serenely away from the action. Lovely day for it.

This playtest went much better. A well-marshalled Hungarian assault on the eastern flank saw Benedek expelled from Ó-Szőny and wiped out in short order.

Benedek's men await their doom.

Not so smooth on the main front in the west: Hungarian columns and limbered guns debouched from the redoubts, but the units intended to screen them failed to coordinate their advance. This presented Schlik with an opportunity he duly took, launching his brigades into a renewed attack. This promised great things but failed to deliver, as the dice were kind to the Hungarian defenders' fire and less so to the Austrians' closing assault.

Hungarian 2 and 7 Corps massed in the fortified camp. Those in the foreground are about to shake off the white smoke of their Disruption, but will fail to advance as planned on Turn 1.

Schlik's corps in front of the Ács wood, about to go over from defence to attack.

This initial Austrian reverse gave the Hungarians an advantage on the western front that they were able to exploit inexorably over the remaining turns, to the point that three of Schlik's four brigades were wiped out by the end and the wood objective lost.

The allied dice were not much kinder in the crucial matter of reinforcements. Wohlgemuth missed his three chances of rolling a 6 so he reached Mocsa before he could turn around. From there he was able to head north and retake Ó-Szőny on the last turn, but no more than that.

The Russians failed to arrive on T4 but at least they managed to get both brigades on-table on T5. This resulted in a swirling melee around the two objectives that historically formed the allied line extending from the Ács wood: the manor farms of Herkály Puszta and Csém Puszta. The decisive factor here was the allies' decision to split the Russian division and send part of it straight up the main road in the hope of getting a foothold in the redoubts, a gamble that could have gained them the extra objective they needed for victory. However, it cost them the central objectives that would have saved a draw.

The end result, therefore: a deserved Hungarian win, but an entertaining game with action all over the pitch, very different from the previous version. I pronounce this scenario fit for public consumption. A few reflections below.

My tabletop was graced by a ship-mill for the first time. I described these forgotten contraptions previously here. As the contemporary map above shows, there were no fewer than 20 of these things next to the Monostor (though probably not at the time of this battle, as they tended to get rounded up to make improvised pontoon bridges, or else burned to prevent said improvisation). The endlessly creative Colin the Wargamer kindly scratchbuilt and donated this one to me. See his own blog for how he did it. The wheel actually goes round!

Reflections:

The virtues of continuity: after multiple '48 battles, all the players are thoroughly conversant with the troops' capabilities. Elite units like the Polish Legion, or the 'red kepis' (9th honvéd battalion) or the Austrian cuirassiers are like old friends. But on the other hand ...

Variety is the spice of life: I don't think anybody's bored of the campaign, but after repeated playtests of both the First and Second Battles of Komárom on the same battlefield with similar forces and similar situations, I'm sure we'd all welcome a change of scenery to offer fresh tactical challenges. Unfortunately the next battle in the chronology is ... the Third Battle of Komárom. (And there is a Fourth Battle of Komárom as well, but that is almost at the end of the war.) Oh well. There are a couple of different objectives, so it should still be different enough to be interesting. Anyway, before then it will be back to the club for some face-to-face Napoleonic gaming, which will be refreshing.

Variable reinforcement arrivals add interest. Just that small uncertainty of whether the Russians would appear on Turn 4, 5 or 6, and the chance that IV AK might turn round before Turn 4, made the Hungarian players wary and introduced extra tension and excitement.

Remote gaming creates fog of war. I've mentioned it before, but this time it was a different player who remarked how he liked not having the usual clear overview and degree of control you get when everyone's around the table.

Last but not least: terrain matters. Love the ship-mill!


A detailed historical description of the Second Battle of Komárom will feature in "Hungary 1849: The Summer Campaign", in preparation for Helion for publication in 2022 as the sequel to "Hungary 1848: The Winter Campaign".

Wednesday, 28 July 2021

Schleswig-Holstein shall be German! Isted (1850) photo-AAR

As I had the rare luxury of being a player rather than an umpire for once, and as I know some readers like full AARs, I am deviating from my usual summary AAR format to treat you all to a blow-by-blow battle report with plenty of photos and detail, albeit limited to what the webcam showed me.

This was a remote game hosted by Mark S in his newly extended study. To christen his new war room he ran Isted (1850), the major battle of the First Schleswig War. (We played this back in 2015, as recorded on TMP and as also fought by Steve ‘Wargaming Addict’ – see his AAR here.) 

The situation is that diplomatic pressure has forced Prussia to pull out of the war, enabling Denmark to go on the offensive against the remaining Schleswig-Holstein forces. The asymmetric armies make for an interesting tactical challenge. The Schleswig-Holstein forces – let’s call them ‘Germans’ for convenience – have only one General (their C-in-C) and are Passive. This makes them much less agile than the Danes, whose C-in-C gets three subordinate Generals. Fortunately for the Germans, they are on the defensive so have less need to move, and they have a larger proportion of rifle-armed troops than the predominantly musket-toting Danes. Furthermore, a quarter of the Danes are raw conscripts.


Map from Mark's BBB scenario for the battle

I took charge of the Danish 1st Division alongside Mark J commanding our 2nd Division. Crispin took the part of the German C-in-C, LtGen Karl Wilhelm von Willisen. (Incidentally, Willisen was a serious military theorist, writing four volumes on ‘Die Theorie des grossen Krieges’. He is little known nowadays. This may be because his writings are less incisive than Clausewitz’s; or it may be because he lost the First Schleswig-Holstein War.)

As the scenario already stipulated dispersed arrival times and destinations for the Danish forces, Mark and I did not put as much effort into our plan as we might have, beyond agreeing we would try to exploit our superior agility by moving into gaps between enemy formations, avoiding his artillery, and seeking opportunities for converging assaults. In retrospect we should perhaps have paid more attention to prioritising objectives.

Still, it all seemed to go OK initially. This first photo, German Turn 1, shows the German vanguard from the Danish point of view. The first Dannebrog flag is just visible waving at bottom of picture as my 4th and 5th Brigades avoid frontal assault, preferring to march around the German left towards the Claypit objective. Willisen has committed his reserve artillery which is straggling up the road to guard Isted.


German T1, looking from Danish 1 Div’s point of view. Buildings handcrafted by Colin. Figures are FPW Prussians proxying for Schleswig-Holstein Germans.

On Turn 2 I was able to get 5th Brigade onto the flank of the vanguard, while 4th Brigade got in range of the Claypit and the Bogmose marshes. However, the defenders’ fire took a toll of my gunners, so my artillery support was delayed in deploying.


Danish Turn 2. 1 Div battle line deploys along the stream. Danish rocket battery in the foreground. Danes are mostly ACW Union proxies but with Danish flag stands added.

The Danish Guards also arrived on Turn 2. By Turn 3 they had pushed forward to get into a firefight with the other end of the German vanguard. Unfortunately their supporting conscripts were rather tardier leaving the start line.


Danish T3: Guards and Jaegers advance in the centre against a solid German line in front of Isted. Formidable German reserve artillery deployed astride the road in grand battery. Yellow 'cheeses' indicate units disrupted in the firefight. The dreaded 'Danish Blue' cube means a Spent unit.

On Turn 3 the Danish 2nd Division marched onto the table on the left wing. A couple of German units had begun moving forward from behind the Langsø lake. Our 2 Div had a chance to jump on either or both of these with superior numbers, but the movement rolls let us down.

I had no time to take photos of Turn 4 as the action hotted up all along the line. On our left, 2 Div lined up against German 2nd and 3rd Brigades who were able to deploy in front of Veddelspang and Upper Stollik in time and keep our valiant Danes at bay with their longer-ranged rifles. The fabled Danish espingol machineguns did some damage but barrel changes and German counter-battery fire limited their impact.

In the centre, the convergent attacks from our 5 and 6 Bdes combined with the newly arrived reserve artillery to blow large holes in the German vanguard and 4th Brigade. However, they were able to fall back on Isted and on their own freshly deployed gun line and reply in kind.

On our right, Colonel Thestrup nimbly pre-empted the German 1st Brigade and seized the Claypit.

I moved our tiny cavalry force up the extreme righthand table edge but was guilty of indecision, letting it loiter there for several moves before dashing round into the enemy rear, and then choosing the wrong target in the end … of which more later.

The next shot shows the situation at the end of Turn 5 from behind the Danish centre, where the Guards’ assault has stalled in front of Isted (which would become a theme of the remaining moves). Black and yellow cubes show they are Low on Ammo and Disrupted. They are enfilading a Spent German unit (blue cube). Further to the right another such faces a similarly Spent Danish conscript unit. The deadly German gun line can be seen astride the road where it can defend Isted and command the Bogmose. Our gun line is out of shot astride the road to the right, a little too far away to bombard Isted itself. In the distance on the right is what became a protracted struggle for the Claypit. Beyond that the Danish cavalry are silhouetted against a murky grey foggy Danish sky.

 Situation at end of T5, view from Danish centre.

By Turn 6 things had got messy and bloody on our left. Mark was endeavouring to manoeuvre his 2 Div into gaps in the German line, per our plan. The German defenders of Veddelspang responded by sallying to beat up one of his regiments, which enabled another Danish unit to seize the village behind them. Our situation in front of Upper Stollik was less rosy as German rifles inflicted steady attrition.


German T6 on the Danish left. Upper Stollik in centre of photo; Veddelspang behind it in the distance.

During Turns 7 and 8, fortune turned against us on our right. Some sorry dice meant my attempt to press Col Thestrup’s advantage in the Bogmose failed. However, I did manage to race our cavalry around into the German rear. Our 3rd Brigade had also arrived from its flank march on T6 and was now astride the German line of communications.


Danish T7 – our assault in the bog bounces off. Our own grand battery in the foreground. Black cubes = Low on Ammo, having just blasted a German regiment into inconsequentiality.

The Germans then exploited our repulse in the Bogmose to storm the Claypit. Thestrup’s best regiment was now spent and had no prospect of retaking that precious objective.

 German T8 – Danes ejected from the Claypit! Sadly depleted, disrupted and spent, there's no way we're getting back in there.

The climactic Turn 9 saw us attempting to assault the central objectives, Isted and Upper Stollik, needing to take both for victory. Poor movement rolls saw the effort against Upper Stollik peter out, so our only chance now was to storm Isted for a draw. Unfortunately, I had wasted our cavalry by sending them to wipe out the small German battery by the Claypit, a pointless exercise as we could not realistically expect to recapture that. Far better would have been to attack the grand battery by Isted, which would then have been distracted from defending that objective. As it was, the valiant Danes went in once more, and German defensive fire repulsed them once more.

 End of  T9 – the Danes’ last hurrah repulsed. Our collection of blue, yellow, black and red cubes tells the sad story of defeat.

This was a terrific see-saw game. We played it over two evenings. The first session finished at the end of Turn 5. At that point, Crispin was ready to throw in the towel, thinking it was all over for his Germans. Far from it! In the second session, the German edge in firepower and troop quality gradually evened things up. In classic BBB fashion, all three results were possible on the last turn. Congratulations to Crispin on a hard-earned victory!

For anyone wanting to fight this battle themselves, the scenario is freely available from the BBB group files. (It's an earlier draft but I think essentially the same as the one we fought this month.)