Matt Bradley treated us to the fourth of his Marlburian games: Malplaquet. When he ran it previously with another group, it ended in emphatic Allied victory (see his report here). It is with mixed feelings that I tell you we demonstrated scenario balance by incurring an Allied defeat.
Five captioned photos tell the story, followed by post-battle reflections.
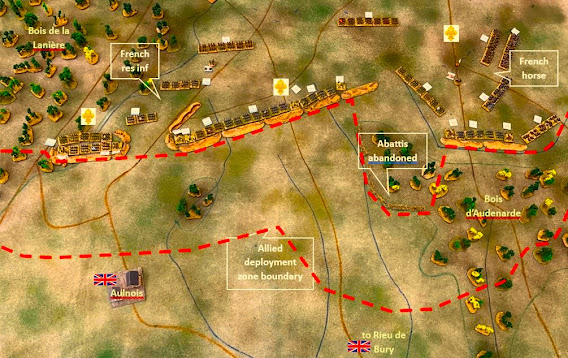
This shows the French deployment before we set out the Allies. The French hold a line of fortifications between two large woods. The fleurs de lys mark the three objectives: the redoubt on the left, the crossroads in the centre, and the road to the exit top right. The Allies must take one for a draw or two to win, while not losing Aulnois or Rieu de Bury. Allied forces deploy >12" away from the French line. Note how the ground the Allies have to cross is cut up by streams that seriously impede any attempt to shift pressure from one sector of the line to another, while of course the woods hinder their advance on the right and any efforts at outflanking. By contrast, note also the entirely open space behind the French line, meaning they can shift reserves to wherever they may be needed with relative ease and counter any Allied move.

The Allied left is deployed. Our plan on this flank was for Tilly's Dutch (commanded by David B) to move through the woods against the flank of the French redoubt (as they did in Matt's game) while Lottum's force (my command) attacked its front.
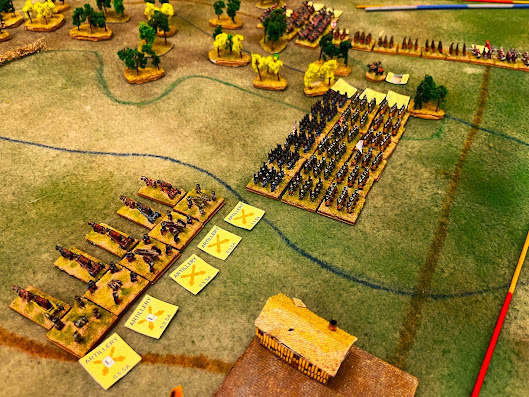
The Allied right. The scenario allows Withers's force to flank march and arrive on the west or east edge after mid-game, but Luke and Ben opted to commit it here to back up Prince Eugene from Turn 1. The limbered grand battery looks impressive but achieved nothing.
I used up all my good dice on Turns 1 & 2 with all my infantry conducting absolutely balletic manoeuvres to wheel into position. Unfortunately David was less fortunate and took a little too long to blunder through the woods, so Crispin was able to react and move reserves to protect his flank before we got there. No more pictures are necessary on this flank. After one turn of waiting for David, he and I then spend the next five turns banging our heads repeatedly against the brick wall of entrenched French and their flank support. Perhaps we only needed to be lucky once, but we weren't. Nil points.

A similar story on the right - if anything, worse. As we had committed Withers, Mark knew he had no flank threat to worry about and could immediately redeploy his reserves. While Luke and Ben struggled through the woods, the French fluently deployed into an enveloping line. Again, no more pictures necessary. Top left you see a French infantry unit storming out of its redoubts to see off the unwary grand battery before it could set up its guns. Next to them, Luke's infantry then got enveloped, enfiladed, assaulted and driven back. Right of pic are the French dragoons who got on Ben's flank, creating a succession of devastating French assaults from front and flank that shattered Ben's force.
Thus we Allies failed to take a single objective and were roundly defeated.
Reflections:
Allied errors. Well, we made a few. What you won't notice in any of the pictures is the two biggest and best Allied cavalry units. I had these loiter behind Lottum to exploit the breakthrough that never came. Maybe they'd have been better held in the centre where they could have deterred the French artillery-killing infantry charge. Our boys on the right kind of put their heads in a French noose by exposing both flanks, but in fairness it is hard enough to manoeuvre 18th-century troops in the open, so in the woods you've got no chance of doing anything efficient or coordinated. Likewise with our left flanking move that maybe could have been slightly better directed initially, but really it was down to the woods and the dice to stymie us.
Linear warfare and limited decisions. To grind one of my favourite axes ... at one level I had enough to do, wrestling with small tactical decisions like which brigade should lead the next futile assault or how best to get a cavalry brigade across a stream. But at a grand tactical level, my situation didn't change and I had hardly any choices to make. I marched up to the redoubt, I assaulted it four or five times in essentially the same way and I bounced off it every time. Not that I didn't have a good time - we all did and everyone was smiling and laughing at the end despite our emphatic defeat - but I'd say the game was absorbing rather than exciting, at least on my sector.
That'll have to do for reflections this time as it was Colours yesterday and I have a Peninsular War game tomorrow and things to do today, so right now let's publish and be damned!


Fine looking game there Chris and good post game reflections. I find the WSS too linear compared to the SYW, where there seems to be more room and ability to manouevre, hence my preference for it. Saw the game at Colours yesterday but it was too hot to try and stop by for a chat, as much as I wanted to!
ReplyDeleteCheers, Steve. Yes, I thought I glimpsed you yesterday through the realistic southern African heat haze ... we'll chat another time!
DeleteInteresting point about the streams on the allied side. I'd never thought about that before. From outside looking in, it looks like the biggest thing you could have done differently was to send Withers on his flank march. That seems to have been the thing that turned the tide in reality.
ReplyDeleteYes, I should have included that in my list of our Allied errors. That said, arrival was not guaranteed and required a successful die roll, so he might have turned up too late to help much or even at all and then it would have been worse.
DeleteI think of all of Marlborough's 'big four' this is the one with least room for manoeuvre, and when I have played it through before using Withers on the flank can be a game changer. The key to this period for keeping the ability to make grand tactical decisions seems to be keeping a balance between the troops you are committing with holding back a tactical reserve to exploit or to shift an attack that isn't working. With this period, once you have committed troops to a sector it can be difficult to break off and try somewhere else, and the rivers cutting through the allied rear make it even more of a challenge for this one.
ReplyDeleteYes, I agree on both counts, Matt. It's definitely the case that you have to line troops up and point them in the right direction, which means where you put reserves initially becomes really important. That's difficult and requires thought and after just four WSS games some of us still just aren't very good at it ... Anyway, I'm certainly willing to try Malplaquet again and see how differently it can go. Thanks very much for another beautiful game which I very much enjoyed!
DeleteThanks, and you are welcome Chris! I think a few people on the night were still getting used to moving from the more flexible manoeuvre of later battles to the challenge of plodding along at the more measured pace of this earlier period.
Delete