How many games have we all seen or endured that are just a boring line-out, wall to wall troops from table edge to table edge, with few tactical options beyond grinding forward and hoping to roll high?
How much more painful is it when one side is entrenched and has virtually nothing to do except keep rolling fistfuls of firing dice?
OK, I know it is possible to revel in such games simply because of the occasion and the spectacle. People will refight Pickett's Charge, or the Charge of the Light Brigade, and it will be awesome just because the original was so epically disastrous and because recreating it with your buddies in glorious 28mm has to be fun, right?
But for those of us for whom a game should be about making interesting and challenging decisions every turn - no thank you. (No disparagement of any beautiful Pickett's Charge game intended, it's just not for me.) I want options, choices, the chance to make an actual plan and see it succeed or fail. I don't want everything straitjacketed and railroaded and all the important decisions already made for me in how the game is set up.
That really didn't appeal to me as a game. Perhaps there could be some tactical decisions for the Danes about whether/when/how individual battalions should fall back from the redoubts, or where/when/how to move the individual battalions of the reserve brigade. For the Prussians, perhaps some nuance about which battalion attacks which redoubt, or how to exploit success, and where/when/how to commit reserve battalions. But for a big battle game that should be about manoeuvring entire brigades or divisions and that should generate some ebb and flow ... there just wasn't enough there.
So what to do? I found salvation in the battle's prelude and aftermath: the minor outpost skirmishes in the two months before it, then the amphibious invasion of the island of Als two months later. These were not worth a BBB scenario in themselves - Als cost the Prussians fewer than 400 casualties - but they offered an opportunity to shape the actual assault on Dybbøl, to give it context and consequences, and (most importantly) to give the players on both sides more scope for decisions and manoeuvre.
It was feasible to fit all these actions on a single 6'x4' table at the modest scale of 1700m per foot. I therefore decided to treat them as three linked phases of the same scenario: Outposts Stage; Redoubts Stage; and Als Invasion Stage. Prussian numbers make Danish military defeat virtually inevitable. The trick to making it a challenge was to put the Prussians under time pressure with a turn limit. The idea is that the Danes are trying to buy time for the other great powers to intervene and lean on Prussia and Austria to call their dogs off. Thus, for each stage I set certain objectives the Prussians have to take before moving on to the next: e.g., if they overrun the outposts swiftly, they gain time for a more methodical assault on the redoubts, etc. Ultimately, they have to take all the objectives within 10 turns to win or 11 to draw; otherwise, they lose.
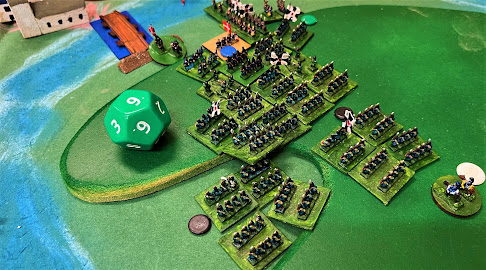
Crispin made a custom battlemat and rolled it out for us at OWS last week. Luke, Ben and John fancied defending the Danish cause, so Mark, Dave W and I took the Prussians. AAR in three captioned photos below, followed by some reflections.
Reflections:
It's a micro-campaign! I'm rather proud of the scenario structure. My Reflections on Wargaming essay on "Changing Situations Mid-Game" didn't mention this scenario, but probably should have. The three stages give two opportunities to reset and they create repeated peaks of excitement in between, as the Prussians try desperately to complete each stage and the Danes try to fend them off. The Danes also have important decisions about how many troops to commit and where during the first two stages. All told, it definitely has more options and more replay value than a straight assault would have.
Mistakes in Deployment are not Easily Rectified. Isn't that a von Moltke saying? Maybe Moltke the Younger in 1914? Anyway, I managed to prove it right this time. By letting myself be distracted by one irrelevant outpost brigade, I cost our advance precious time that we could never recoup.
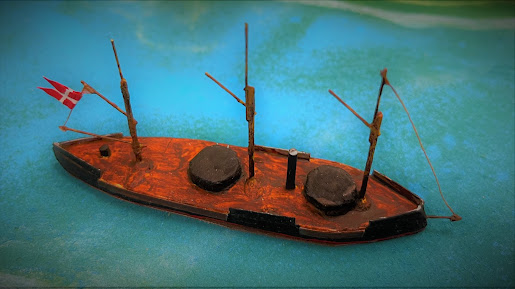
The Maritime Dimension. Having a naval element in the game - in this case, the Rolf Krake (loved it) and then the crossing of the Alssund (albeit that is basically abstracted) - enhances both the aesthetic and the game interest.
Right and Wrong Ways to Divide Command. On the German side, we didn't divide very sensibly: Mark on the left had a clear sector to himself, but on the right, I had the leading forces while Dave took the ones arriving on Turns 2 & 3 in the same sector. I'm sure that contributed to my carelessness. By contrast, the three Danish players decided they didn't have enough troops to divide up, so they made the interesting decision to divide command by time instead, each of them commanding in a different stage of the game (except Luke got the Rolf Krake throughout as his stage was going to be the shortest). This meant they always had unified command and therefore a clearer, more focused approach, vindicated by victory.
Yes, Assaulting Redoubts Can Make a Good Game! (To answer my own question in the headline.) It was a rocking good time, complete with whoops of success, cries of woe and wails of dismay. Even though the Danish force was largely wiped out, the Danish players greeted each turn that they survived with jubilation. Happy days!


Hmm, we have the Prussians, Union ACW could stand in for Danes and my paddle=wheel gunboat for the Rolf Krake...
ReplyDeleteGreat reflections on this little gamed War and how you went about making it playable and interesting at the same time:).
ReplyDeleteThanks, Steve!
DeleteLooked great and a really interesting read Chris. As I was reading your introduction, I thought, he created a mini-campaign of linked battles. Clever idea. The assault on the redoubts is there and clearly had its own tension and challenges as an action, but was added to because of the decision points and impacts of early combat. Top stuff.
ReplyDeleteRegards, James
Thanks for your kind comments, James, much appreciated.
DeleteI know what you mean about this type of game. I'm writing this on D-Day, and I have always thought D-Day re-creations make bad games. It's just a seige - like you say, very few decisions to make, and very slow going. As usual, you've turned that around and made some great games.
ReplyDeleteI'd never thought about D-Day that way, but you're absolutely right, Keith - great point!
DeleteGoing off on a tangent here... I toured Omaha Beach in 2019 and realized something my reading hadn't revealed. The landings aimed at the beach exits, which were the most heavily (and fiendishly) fortified. It was gruesome looking at the open beaches, all commanded by interlocked pillboxes etc. The breakthrough came later, up the lightly held cliffs after the shattered assault waves managed to regroup under fire. There were choices to be made at Omaha - but the wrong ones were made first.
ReplyDeleteI guess it would come down to scenario design, then, to capture those choices and present them in an interesting and playable way.
DeleteI appreciate how you've expanded upon a potentially static battle with additional skirmishes for greater strategic depth.
ReplyDeleteCheers, Kody. It often seems to be a question of zooming in or out until you find the level at which the interesting decisions are to be made. Some frontal assault that might be pretty limited and dull to play as the main event becomes more consequential and interesting when it's just part of a bigger picture game.
Delete