Monday, 23 December 2024

WWI East Africa: Belgians at Tabora (1916)

For our last game of the year, Anton turned up and gave us a Christmas treat: Tabora. This is one of those obscure corners of history it is such a joy to explore.

The background is that the Allies were trying to eliminate the little German colonial army in German East Africa (now Tanzania). The main attack was by a British Empire force pushing south from Kenya, but an important supporting attack was provided by a Belgian force coming from the Congo. Two Belgian columns totalling some 10,000 men converged on Major-General Wahle's 5,000 Schutztruppen and askaris at Tabora, on the east-west railway line connecting Lake Tanganyika to Dar-es-Salaam. After several days' fighting on successive defensive lines, punctuated by some aggressive counterattacks, Wahle finally abandoned Tabora and marched away to the southeast.

The game was a playtest of Anton's draft scenario, which will probably be included in a forthcoming scenario book, Bloody Big Battles in AFRICA!. (See also his previous WWI African excursion, Otavi.)  We anticipated it would need some tweaks, and so it proved. We spent half an hour or so on an initial false start that confirmed a couple of the tweaks we'd considered were indeed necessary. We quickly reset and fought the whole game through to a very satisfactory conclusion in under 90 minutes. 15 captioned photos illustrate the course of the action, followed by some Reflections at the end.

This is just to orient you before the table gets cluttered with miombo woodlands and troops. Top edge is north. The east-west railway bisects the table. Tabora nestles among rolling hills at the junction of the railway and the road running south. The village north of it with the fieldworks around it is Itaga. Belgians will arrive on the west edge around Usoke station and on the north edge above Itaga. White counters mark the objective locations: Tabora itself, Itaga, Lulanguru (the first station west of Tabora) and the hill commanding the road.

Now we add some bush. This is just for scenic effect rather than defining particular wooded areas. The ground scale is large - 6km per 12", so the 5'x4' table is 30x24km. Consequently, between that and the frequent woods, LOS is limited to 6" (artillery can fire indirect out to 12" at half effect) and infantry are treated as armed with Repeating Carbines (RC) rather than Repeating Rifles (RR).

Note the green counters marking off the SE grid square. This is the German escape zone, of which more later.

The troops arrive. This was the abortive first go, so doesn't exactly match the positions for the definitive second attempt, but it gives the right general picture. Belgians are on the browner bases, Germans on the greener ones. Colonel Frederik-Valdemar Olsen's 'Brigade Sud' has arrived following the railway line from the west, while Colonel Philippe Molitor's 'Brigade Nord' is moving to pin and outflank the main German defenders entrenched in Itaga. Smaller German forces are screening Lulanguru and there is a reserve in Tabora.

The game proper. Troop scale is about 250 men per base, so these units are battalions of ~1,000-1,250 men each. I took command of Olsen's force. I was opposed by Crispin, who decided not to bother with a forward delaying force but concentrated around Lulanguru, committing the Tabora reserve as well, to set up a solid defensive line. I started by feinting towards his southern flank ...

... but then tried to work around the northern flank instead. This would have worked better if my movement dice had been kinder. Having the main outflanking battalion stall entirely wasn't helpful.

Meanwhile, Anton was attempting something similar with Brigade Nord, seeking to work around Dave T's left flank towards Tabora, as well as taking Itaga itself. Empty trenches outside Itaga show where some of Dave's askaris fell, but top right of pic is his audacious right-flanking counterattack. This significantly delayed a couple of Anton's battalions.

Olsen tries to galvanise his attack on Lulanguru. The German defenders are bolstered by a naval gun on a railway carriage.

Belgian Force Publique infantry are actually my Balkan Wars Serbs (Irregular Miniatures 6mm figures). Germans are Anton's Boer War boers (Irregular again). The railway gun is my conversion: an Irregular flat car with some Peter Pig 1/600 coastal artillery. Railway sections also Irregular.

Turn 6 of 8. Crispin's rearguard hangs on in Lulanguru, but his left wing is retiring towards the escape zone. This is important as the Germans can earn one or two Objectives by retreating one or two units off the SE corner on Turn 8, but may not enter the SE 12" grid square before Turn 7.

Anton finally sees off Dave's counterattack and takes Itaga. However, some Schutztruppen still hang on in their position above Itaga, with artillery support. Can Anton reach the objectives further south?

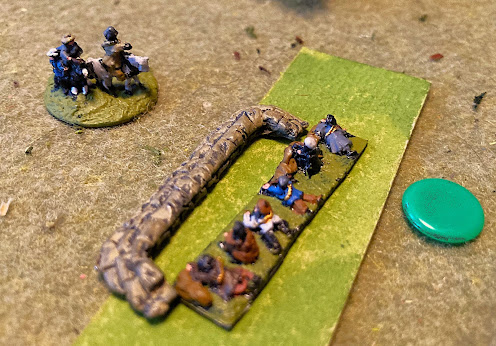
Like Crispin, Dave too has withdrawn a battalion towards the escape zone. Here we see the German commander, Major General Kurt Wahle, pointing out the green escape zone boundary marker to his loyal men. Sandbags by Irregular Miniatures. Veteran cardboard sabot base handcrafted by me 15 years ago and shows it.

Belgian Turn 7. My troops have suffered heavily (two battalions with black smoke on them are Spent), but we have stymied Crispin's attempt to escape (his withdrawing battalion centre right is Disrupted [white smoke] and can't move fast enough) and we are in range to capture both Lulanguru and the hill objective if we're lucky.

Also on Turn 7, Anton presses down from the north past Itaga to threaten Tabora. Not many Germans stand in his way now.

Turn 8. Crispin has judiciously withdrawn his battalion from Lulanguru to secure the hill (line of communications objective), leaving just a machinegun detachment to hold Lulanguru. One of my spent battalions gamely assaults the MGs but will perish in the attempt. The other balks and refuses to advance. My largest battalion is fresh and descends on the railway gun, hoping to exploit onto the hill, but will be repelled by German fire.

Anton seizes Tabora on the last turn, but it will not be enough.

Dave needed 7+ for this battalion to get a full move and escape. He rolled 6. Thanks to the +1 for Wahle's presence, that was enough, so he earned an Objective

The Germans needed to hold two Objectives for a draw or 3+ for a win. As one German unit had escaped and I'd failed to take either Lulanguru or the LOC hill, victory went to the Kaiser's valiant troops.


Reflections:

Fighting withdrawals make for fun games! Obviously, they oblige a defender to move, rather than just sitting and shooting. That's more interesting for all concerned than a simple attack-defence. Good examples are Beaumont (FPW 1870) and 2nd Vac (Hungary 1849). Tabora gave Dave and Crispin tricky decisions to make about how to time their escape. Anton's rule that effectively required units to make two successful movement rolls in succession to escape helped to build the suspense at the end.

What a quick, clean game. Low unit numbers (8 Belgian infantry units vs 7 German on a 5'x4') make the turns pass quickly. Low troop density plus the LOS limit meant plenty of room for maneuver without being pinned down and decimated (though WWI firepower still made frontal assaults a daunting prospect). And Anton's gift for scenario structure made it a nice tactical challenge.

6mm is great for proxies! Not every wargamer has a Belgian or German colonial army for WW1. Certainly I don't, but it was easy enough to put some plausible proxies in blue and khaki on the table. As Dave commented, it might have been a bit harder if my collection was all 15s or 28s. (You could probably still get away with it in 10mm.)

And finally: Merry Christmas! And thank you for your attention during what, for me, has been another great year of great games with great friends. I hope 2024 has treated you kindly as well (and that you've enjoyed my pontifications on this blog). Here's to more of the same in 2025!


Friday, 20 December 2024

Xmas special: Sekigahara (1600)

And now for something completely different (as they say) ...

Mark continued his fine tradition of running a Christmas special for us. As always, the setting was a surprise, not unveiled until we turned up to play. And a real surprise it was this time: whereas I think all the previous ones have been 19th-century battles with 6mm figures, this time we found ourselves transported to feudal Japan and a table covered with chunky 28s.

Although Mark did not tell us the actual historical battle until afterwards, the game was based on a famous one for a change: Sekigahara (1600), an epic battle involving >150,000 men, which ushered in two and a half centuries of the Tokugawa Shogunate. This worked out perfectly for Mark to script it for seven of us players.

There were three of us in the Eastern Alliance. I was its leader, Tokugawa Ieyasu, commanding our right wing. On my left was the stolid but dependable Fukushima Masanori (Dave W). Guarding our line of communications and supporting us was the somewhat tardy Asano Yoshinaga (Phil).

The Western Alliance had four players: their leader, Ishida Mitsunari (Crispin) - a politician rather than a general - facing me; the unpredictable Ukita Hideie (Nick O) opposite Dave; Mori Hideie (Dave T) and Kobayakawa Hideaki (Bruce), neither of whose forces were on-table initially.

15 photos and captions below tell the story. Then there are some reflections at the end.


My contingent, the right wing of our army, with me (Ieyasu) in the middle. Potent mounted samurai are flanked by columns of samurai on foot, followed by ashigaru soldiery with arquebuses or bows. I believe these are Dixon 28mm figures, painted by Mark nearly 40 years ago and not used for over 30.


A couple of turns in and I have deployed my infantry with the missile troops screening the samurai. At top of picture, Mitsunari has likewise advanced and deployed, erecting obstacles to protect his cowardly self from my assault. Left of pic is the town of Sekigahara itself (labelled anonymously as "Post Town" for the game), an objective for the Eastern Alliance to secure victory, but now seized by Mitsunari. My personal objectives (everyone had secret personal objectives) included conducting an assault, destroying an enemy unit, and one of my units having advanced beyond the Post Town by game end.


To my left, Masanori loyally pushes forward, trying to envelop and take the Post Town nestled among its paddy fields. However, Ukita's force can be seen top of pic, descending from Mt Tenma to confront him.


The table was deep rather than wide. Here we see the half behind our Eastern Alliance front line. Asano's infantry guard the village and bridge objectives, while his cavalry scout the heights of Mt Nangu. As well that they should do so ...


... as Mori's force appears there, threatening to descend on our line of communications. Note also Mori's small cavalry contingent (bottom right) about to be a nuisance to me. Top right: some Christmas cracker debris. As usual, Mark used cracker pulls to resolve some particular events during the game.


Battle is joined! The first of my multiple attempts to break Mitsunari's line. Lower right, Ieyasu himself fights in the front line. This was an option Mark added to the rules. A general who fought added +1 to his side's dice and had the chance to gain honour ( = earn a Victory Point) but, of course, risked death.


Dave (Masanori) likewise launched assaults. Unfortunately, his attacks on the defended town would prove costly and unsuccessful and leave his left wing outnumbered by Ukita's men.


My cavalry reserve (top right) fails to respond to Dave T's sneaky patrol in my rear. My cavalry would be plagued by dismal movement rolls all evening and failed to see any combat. Perhaps they were wiser than their leader.

Aha! At last my horsemen turn and head for the enemy cavalry - who will evade, of course.

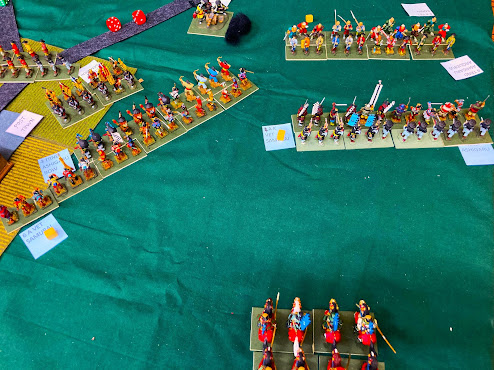
On my wing, the battle consists of repeated inconclusive charges and countercharges over several turns.

It can't last. Here both Ieyasu and Mitsunari attempt to inspire their troops by example. Ieyasu is slain; the following turn, he is avenged when Mitsunari perishes as well.

My cavalry scare off their opposite numbers on Mt Nangu. I considered piling into Mori's infantry, but chose to turn round to support my own and seek to achieve the elusive breakthrough that would let my troops advance beyond the Post Town. That didn't happen.


The turning point of the battle. Hard to tell who's who, but the gist is this. On our left, Masanori (Dave) (light blue labels) was facing Ukita (Nick) and having the worst of it. Things looked dire when Kobayakawa (Bruce) (darker blue labels) arrived from top left to back up Nick. However, Bruce's main victory condition was to end up clearly committed to whichever side won. He decided the best way to do this was to turn coat, abandon the Western Alliance, join our Eastern Alliance and stab Nick in the back. Half Nick's force was swiftly wiped out. This effectively ended the battle.


Game end on my side. My infantry had ground forward, but not far enough. My cavalry loiter at bottom of pic with their swords unbloodied. I (Ieyasu) have died honourably in battle - but I still died.


Betrayed and defeated, Nick (Ukita) asked if he could commit seppuku. Mark had anticipated just such an eventuality and had a rule for it. Here we see Ukita has rolled 4, enough to do so honourably. His loyal retainers attend him.

Final scores I think were:
Eastern Alliance:
    Dave W - 4
    Phil - 4
    Me - 2
Western Alliance:
    Crispin - 4
    Nick - 4
    Dave T - 2
Hence scores were tied, but Bruce's treachery threw his VPs into the scales to make it a win for the Eastern Alliance and (I believe) Bruce the individual winner with a maximum possible score of 5.


Reflections


The rules worked. Mark used our standard "Bloody Big BATTLES!" rules for 19th-century battles. Shunting BBB back another 200 years didn't seem to be a problem at all. Mark mostly just applied existing Attributes to create the appropriate troop types. Apart from the rule for generals in combat, the only significant change was some tweaking of ranges and shifts for the missile weapons.

The big figures on big bases worked. Mark's 28s are on wider bases than BBB's standard 1"x1": 40mm, I guess.  By making unit frontages wider, I felt this actually helped to make the battle suitably more linear, with less of the fluid maneuver and outflanking that we get in more typical BBB games. And of course, 28s just look good (and as Dave T said, "we can actually see them!").

Wargaming meets role-playing. In normal BBB games, there aren't many unknowns and there's very little fog of war. In these Xmas specials, though, we don't know how long the battle will last, or how many enemy we are up against, or where they all are or what exactly they're trying to do, or even what our own comrades are really up to. That takes more effort to create, and only works as a one-off, but I suppose makes it a truer simulation than the average wargame, as well as a richer experience. And, naturally, it gave us (OK, mostly me) the opportunity for bad accents and plenty of cultural references.

Good sportsmanship. I can only applaud the equanimity with which Nick greeted Bruce's treachery. He fought gamely on for the one turn or so until his defeat was clear, then took the honourable way out, having uttered hardly any swearwords. His good sportsmanship was rewarded when he was joint individual winner on the Western Alliance side.


Saturday, 14 December 2024

ACW battlefields between Nashville and Atlanta

Last month I spent a fascinating five days visiting six American Civil War battlefields between Nashville and Atlanta. I'm reporting on these, not so much to tell you all about what's there - you can find all that on the web (after all, that's what I did) - but to show how much there is to see on that 250-mile corridor and how feasible it is to see it. Hopefully that will encourage some of you to make similar trips and get as much out of them as I did from mine.

Step 1 was to fly to Atlanta - a hub airport, hence well served and relatively easy to get to from inside or outside the US.

Step 2: a 4-hour drive from Atlanta to Franklin (just SW of Nashville), doglegging west via Huntsville AL to avoid retracing our steps and to see some different scenery.

The advantage of that route was that we got to visit the US Space & Rocket Center in Huntsville on the way. What a magnificent place! A Saturn V, a training Space Shuttle, a bit of Skylab, moon rock, untold rockets both military and peaceful exploratory, a planetarium, tons of other stuff, all in a fabulous facility ... a real bonus.

Step 3: right, now for the battlefields. The war yo-yo'd up and down along this corridor, so the sequence I visited them in didn't match their historical chronology. Even so, it really helped me to join the dots and understand the battles in their campaign context and in relation to each other, rather than just as isolated events on a 6'x4' tabletop. The six in question, with the driving distances between them, were these:

#1: Franklin

#2: Stones River (about 40 minutes east of Franklin, SE of Nashville).

#3: Chickamauga (on the southern outskirts of Chattanooga, about 2 hours from Franklin/Nashville)

#4: Chattanooga (Lookout Mountain and Missionary Ridge), in Chattanooga itself.

#5: Resaca (an hour from Chattanooga, halfway along the 2-hour drive from Chattanooga to Kennesaw Mountain).

#6: Kennesaw Mountain (an hour beyond Resaca, NW of Atlanta).

All were big battles, among the largest 30 of the whole war, involving at least 30,000 or so men on each side (hence qualifying for "Bloody Big BATTLES!" scenarios - of which #2, 3 and 4 are already done).

The dozen photos that follow are not intended as any kind of comprehensive illustration, but just as a few snapshots annotated with pertinent comments/summaries, to interest or amuse and give a little flavour, rather than to exhaustively inform.

Battlefield #1: Franklin, Tennessee (30 November 1864)

Franklin has been called the "Pickett's Charge of the West", complete with its own highwater mark. After Sherman took Atlanta, rather than counterattacking directly, Confederate general John Bell Hood moved against Sherman's line of communications. He almost managed to catch the Union forces divided and defeat them in detail, but missed the opportunity. Frustrated, he launched a massed frontal assault against the Union army that was now concentrated and entrenched around Franklin. It resulted in a bloody repulse that wrecked his army.

Much of the battlefield is now covered by urban development but, remarkably, the heart of it has actually been reclaimed - two fast-food restaurants and some residential buildings bulldozed and turned into battlefield park, with plans to expand it. The Battle of Franklin Trust maintains three historic buildings, of which the Carter House at the centre of the Union line is the most important and hosts the museum of the battle. I signed up for a battlefield tour and had the privilege of a knowledgeable and enthusiastic guide to myself for 90 minutes. (And I believe he appreciated having a relatively knowledgeable visitor to discuss the battle with.) His punchline was to tell me about General Douglas MacArthur's pa, Arthur MacArthur Jr.

One of the thousands of casualties in the battle was this unfortunate Confederate brigadier. Yes, his name really is "States Rights Gist".

The inside of one of the outbuildings at the Carter House, peppered with bulletholes. Confederate marksmanship stands condemned by the fact that all the windowpanes appear to have remained intact.


Battlefield #2: Stones River (31 December 1862 to 2 January 1863).

Now we step back to very early in the war. Braxton Bragg's Confederate army was advancing on Nashville, where Rosecrans was ensconced and being too passive for Lincoln's liking. The President pushed Rosecrans into advancing against Bragg. Thus the armies met at Stones River, both planning to attack, but the Confederates beat the Union to the punch. The Confederate assault drove the Union forces back but a stand by Sheridan averted total disaster on the first day. A renewed assault on 2 January ran into a devastating Union gun line. Bragg had lost and was forced to withdraw.

The battlefield has a very good Visitor Center, from which you can then use the National Park Service app to follow a self-driving tour by car, stopping at various points to listen to an account of what happened there.

The local geology creates some unusual terrain. This is the so-called 'Slaughter Pen' where Sheridan's men put up their tough fight.


Two hours' drive from Franklin/Nashville is Chattanooga. The Chickamauga battlefield is a little way south of town. This is the battle I was most familiar with beforehand, as it is one of my favourite ACW scenarios and I have played or reffed it several times. It was also the first ACW battlefield to be designated a national military park in 1890. Hence it is really well preserved and dotted with 700 or so monuments and markers on its miles and miles of roads and trails through the woods.

Since Stones River, Rosecrans had first maneuvered Bragg back towards Chattanooga and then forced him out of this crucial junction of multiple rail and river lines. However, in doing so through outflanking maneuvers, Rosecrans left his army divided and vulnerable to counterattack. Bragg seized this opportunity and tried to fall on the US XXI Corps, but delaying actions enabled the Union forces to concentrate. Nevertheless, half the Union army was routed. This time it was General Thomas (the 'Rock of Chickamauga') who made a stand so that the Union army could retreat into Chattanooga, where it dug in. Thus, although it was a tactical victory for the Confederacy, it was a strategic failure.

Like Stones River, Chickamauga has a very fine visitor center and museum. First we did a 1-hour driving tour with a guide, then a longer self-driving tour to see the rest of the battlefield. (It also has what we Brits might call "toilets", but what the more refined and genteel folk who run the park have christened the "comfort pavilion". This term has now entered regular use in our household.)

The Chickamauga Creek at Alexander's Bridge, where Wilder's "Lightning Brigade" armed with repeating rifles held up the Rebs for vital hours. It's not a huge river but you can see it has pretty steep banks.


Battlefield #4: Chattanooga (Lookout Mountain and Missionary Ridge) (24 & 25 November 1863)

After Chickamauga, Bragg settled down to besiege Rosecrans in Chattanooga. The town and railroads were on the south side of the Tennessee River, and Confederate batteries commanded the river, so the Union Army of the Cumberland was in a tricky situation for a while. However, help was at hand. Rosecrans was removed, replaced by Thomas. A relief column under Hooker arrived, followed by more reinforcements. The Union forces now significantly outnumbered Bragg's. First Hooker stormed Lookout Mountain on the Confederate left flank. The next day, he combined with Thomas to storm the main Confederate position along Missionary Ridge.

"Point Park" on Lookout Mountain is well preserved, small and walkable

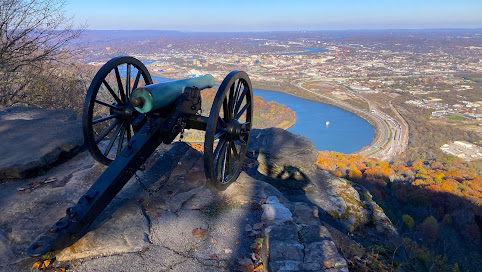
Dramatic view of Chattanooga from Confederate battery position on Lookout Mountain. It's high and steep (actual cliffs in some places) - so steep that the Confederate guns had trouble depressing enough to fire on the Union soldiers climbing up the slopes.


Triumphant Illinois monument at the location of Bragg's HQ on the centre of Missionary Ridge. This is where the third Union assault succeeded, after assaults at either end had failed.

Missionary Ridge is looong - about 6 miles. Most of it is covered with expensive hilltop homes, so touring the battlefield means driving along a winding road with a 20mph speed limit and lots of speed bumps (but no ditches or abattis, at least). On the plus side, it is punctuated with lots of information panels like those in the photo above, noting which regiments were where, etc. This pic is from the Sherman Reservation, a park at the northern end of the ridge.


Battlefield #5: Resaca (13-15 May 1864)

After Chattanooga, Bragg was replaced by Johnston, while Sherman took command over the three Union armies now there and began to advance on Atlanta. With his superior numbers, he was able to maneuver Johnston out of successive positions by outflanking him. Resaca was an exception where Sherman launched frontal attacks against an entrenched Confederate position. These attacks bounced off and it took yet another outflanking move to make Johnston withdraw.

As a grand tactical engagement, Resaca is not especially interesting, but it was the size of Gettysburg in terms of numbers engaged (albeit not as bloody or pivotal). People happily wargame much duller battles. It therefore puzzles me why it seems so entirely absent from our wargaming consciousness - leastways, I hadn't really heard of it much before, and searching my usual wargaming forum haunts found virtually no mention of it.

The battlefield itself is more a nature trail than a battlefield park. In fairness, I only had time for a brief walk along a portion of the line (no driving tour here) so I may have missed some interesting features. Still, I got some sense of the ground.


A view along the trail that I think marks where the Confederate trenches were, along the lower slopes of the ridge. Not really a right angle in the line, just an artifact of my poor attempt at a panoramic shot. 


This gives a typical view from the Confederate lines, showing what the Union troops had to cross when they emerged from the woods on the opposite ridge: a flat, open valley bottom, with a creek winding through it just to add to their difficulties (though at this particular spot, apparently, it provided excellent cover once their attack stalled).


Battlefield #6: Kennesaw Mountain (27 June 1864)

One of the last in the series of Confederate positions delaying Sherman's march to Atlanta. Again, the Confederates were strongly entrenched. Feint attacks against each end were followed by a main assault in the center. Again, the assaults were repulsed; again, it was a subsequent wider outflanking move that forced the Confederate army out of the position; again, much like Resaca, this is a battle nearly as large as Gettysburg, yet one we rarely hear about.

Unlike Resaca, Kennesaw Mountain has a good visitor center and museum and another NPS self-driving tour.

The highlight of the day was not the battlefield itself but the fact that I finally got to meet my longtime online friend and collaborator, Konstantinos Travlos, of "Leadhead, PhD" fame and author of "Bloody Big Balkan Battles!". (This was eight years later than we originally planned: I was going to visit him in Istanbul in 2016, but had to cancel my trip because of an attempted coup.) We rendezvoused at the Basecamp restaurant, where we had a very pleasant lunch together with his lovely family, then toured the battlefield together.


The man himself! Konstantinos manning a Confederate gun. These two were camouflaged and defending a ravine that seemed a likely approach into their lines - so it proved, and they did a deadly job, pinning down the Union attackers.

A Union attacker's-eye view, showing the scale of the earthworks in which the Confederates were entrenched.


Battlefields I didn't visit

There were also major battles just outside Nashville and Atlanta themselves, and at Peachtree Creek (now in the outskirts of Atlanta). These battlefields have all been lost to urbanisation. There are quite a few monuments, isolated redoubts, etc, dotted around them, though, for anyone with more time and inclination than I had. There were also numerous other smaller battles that fall below my BBB horizon but are not without interest.

In summary, this part of the world is easily accessible and is rich in Civil War history for those of us who like that sort of thing. If that includes you and you haven't been there yet, I encourage you to go.


PS - Oops, nearly forgot - Stone Mountain carvings

Something you may or may not want to add to your trip: Stone Mountain, kind of the Confederate version of Mount Rushmore. Just east of Atlanta, in the middle of Stone Mountain Park, is a massive mountain with a huge bas-relief of Confederate generals and soldiers carved into its side. Follow the link above and you'll see better pictures than I was able to take. We'd had clear sunny weather all trip, but the day we visited Stone Mountain it was shrouded in mist. My only pics are the not very good ones below. I didn't manage to capture the eerie moment when the veil parted briefly enough for Bobby Lee and his lieutenants to look critically down at me. Maybe that was better than a clear sunny day, in a way.


A terraced lawn slopes gently down to a reflecting pool at the base of the sheer mountainside. There is a mountain somewhere behind that cloud.

I took this one to try and give an idea of the scale. Left upper edge you can see cables above the treetops disappearing into the mist. Those belong to the cablecar that rides to the summit. (No, I didn't bother, there didn't seem much point in seeing the mist from a different angle.)

And finally, from next to the reflecting pool. You can make out the outline of the lower half of the great oval carving.