Friday, 23 December 2022

Xmas special: The Innsbruck Incident (1809)

Mark's Christmas games are a much-loved fixture in the OWS calendar. As they are so popular, and as our group has grown significantly this year, he had to accommodate ten of us around a 12' table and create personal briefings for all of us, each with distinct and not necessarily compatible objectives. He excelled himself and choreographed it perfectly.

The setting was the Tyrolean Rebellion of 1809: specifically, the Second Battle of Bergisel (near Innsbruck) on 29 May. Briefly, Napoleon gave the Tyrol to Bavaria after defeating Austria in 1806. The Tyrolese were not happy and when the Fifth Coalition resumed war in 1809, they revolted.

I found myself in the role of Generallieutenant Graf Bernhard Erasmus von Deroy, commanding 3rd Bavarian Division, charged with repelling the rebel attack on Innsbruck with the aid of my loyal lieutenants Vincenti (Mike), Seydewitz (Bruce) and Siebein (John). The hills were alive with rebel Landsturm, Schützen and irregulars, backed up by a few Austrian regulars. Mike covered our eastern flank against Crispin's Schützen; John had to fend off Luke and Ben's irregulars arriving from the west; Bruce and I were confronted by the enemy main body approaching from the south over the Bergisel (Dave T, Phil and Nick with a bit of everything, including artillery and even some cavalry).

It was non-stop fighting on all fronts from the off and rocked along so fast that I can't really tell you what was going on outside my central sector. There was more fog of war than in our regular BBB games: we didn't know how many game turns we had to hold on for, the ref sprung surprises on us all (ammunition shortages, armistice proposals, etc), and it was punctuated with Xmas crackers being pulled to decide such things as Tyrolese falling log traps or Bavarian cavalry rallying. Four photos briefly tell the story:

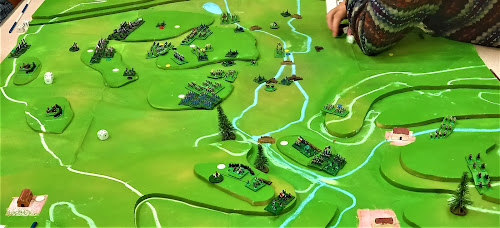
Looking west along the valley of the Inn! Bavarian main body clustered around Innsbruck in the centre; flank guards top right and bottom of pic; rebels about to swarm over the mountains from the south (left).

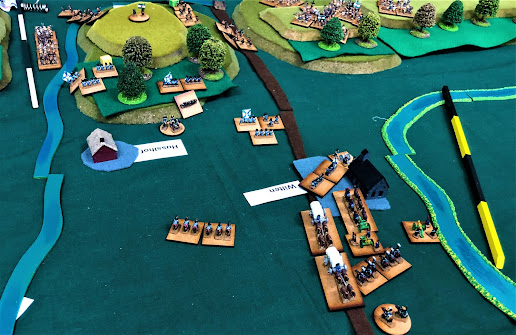
How things looked from where I was sitting on Turn 1. My three small triangular Bavarian units in echelon above Husslhof, backed up by Seydewitz's cavalry, are all that stands between the rebel masses on the mountaintops and Innsbruck (off bottom of pic), not to mention our precious ammo wagons.

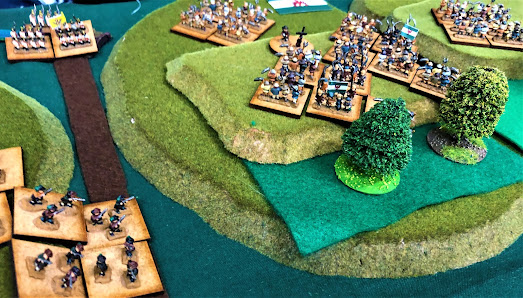
A closer look at the foe. White-coated Austrian regulars top left; Schuetzen lower left; and 1000s of irregulars clustered in prayer around Father Haspinger's cross. 6mm figures by Baccus. The scythemen with the Tyrolese flags are a mix of WEC13 Armed Peasants and YG1 Yodelling Goatherds.

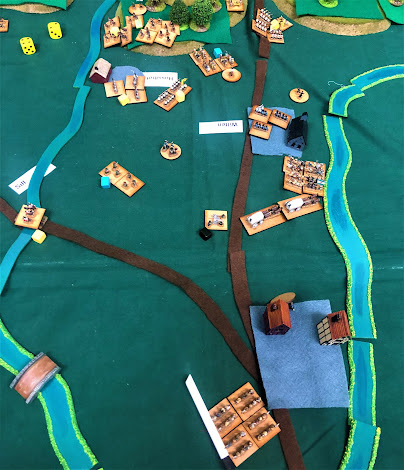
Endex. Hard to tell, but the only Bavarians left on this central sector are two of my infantry units holed up in Husslhof and Wilten and a lonely battery by the wagons, which have just been overrun by Tyrolese Landsturm. The mob at bottom centre are more rebels who snuck round into our rear, probably to the dismay of the good burghers of Innsbruck. Not sure how this added up to a Bavarian victory - credit to Mike on our left (out of pic), methinks.

At game end, Mark totted up victory points for us according to our individual objectives. I think I got a respectable 3VP, but our most successful Bavarian was Mike with 4VP, and our Bavarian players' combined total was enough for a Bavarian win. However, the winning individual player was Phil, who I think was the Capuchin priest, Father Joachim Haspinger, and who earned 5 VPs for repeated charges by his zealous congregation. But who cares who won? It was splendid good fun and a perfect way to round off what has been a really good year wargames-wise, not only in terms of quantity and quality of games, but also - most importantly - because our happy band is growing and thriving. Merry Christmas and a Happy New Year to you all, and here's to more of the same in 2023!

===

Previous Christmas specials: 

Jaithak (Gurkha War, 1814)
Khoosh-Ab (1857)
Amoaful (1874)
Java (1811)
Caucasus (1845)
The first one Mark ran was Magdala (1868) but sadly I don't have a record of that.

Thursday, 15 December 2022

On rules for committing reserves

I am fresh from an epic game in which commitment of reserves was crucial. Maintaining a reserve is a rather fundamental principle (even if it doesn't make it into the UK military's list of 10 principles of war these days). Any real-life general will keep troops in reserve: to exploit success in the attack; to plug holes and counter-attack if defending; and generally to respond to unexpected or adverse events. This is mainly because of fog of war, something which our tabletop games don't do very well. We wargamers with our helicopter view usually know how many troops our opponent has, where they are and what they are trying to do. It is hard to achieve deception and surprise, so there is not as much incentive as in the real world to hold troops back just in case.

Some rulesets make an effort to address this by various means. Units that are formally designated as reserves may enjoy certain advantages in exchange for initial restrictions. Units beyond a certain distance from the enemy might qualify. Command point systems or card-driven mechanisms might reward players who keep a reserve.

"Bloody Big Battles!" (BBB) makes no special provision for reserves in the rules as such. However, BBB relies on historical scenarios, and a number of the published scenarios do specifically deal with reserves in different ways. I list a few of these below, but first let me talk about the game that provided this talking point.

The Chernaya (1855) was the biggest battle of the Crimean War. In November the guys played it while I was away - see their composite report here. They had such a good time that Crispin decided to run it again (plus he'd put a lot of effort into making the custom terrain). He and I got to be the Russians against Dave and Mark as the Allies. Victory or defeat hinges on how long it takes the Russians to commit their reserves - more than half their army. The scenario stipulates that the reserves are not released until a Russian unit has crossed the Aqueduct (the line the Allies are defending) and held off any Allied counterattack in the following turn.

We had to fight this one and a half times on Monday evening. Our first attempt was abortive: every Russian attempt at crossing the Aqueduct was either repelled by deadly Allied fire or driven back again before it could establish a foothold. After four turns of failure we accepted defeat, reset, and tried again with a slightly different plan. It was still touch and go, but by the skin of its teeth one Russian brigade clung on on the far side and the Russian hordes were unleashed. After that there was still plenty of furious fighting to be done, but we were eventually able to report a victory to the Tsar, albeit with a horrendous casualty list.
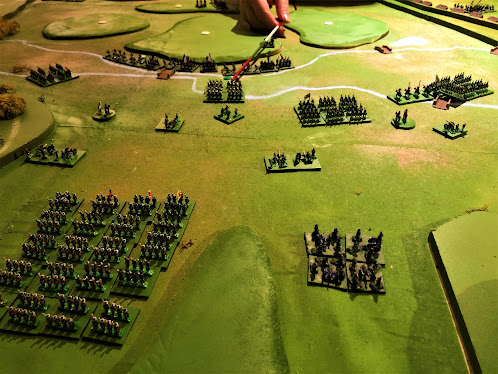
Looking south from behind the formidable Russian reserves (infantry lower left, artillery lower right). The substantial Russian cavalry reserve is out of shot to the left. The River Chernaya and the Aqueduct snake across the middle of the table. The infantry columns of the Russian advance guard are pushing across into the teeth of intense fire from the French line at the foot of the Fedoukine heights (four white objective markers indicate N, S, E and W Fedoukine). French reserves mostly came down from the Sapoune Ridge (top right). Sardinians out of shot guard the French right flank.

It is hard to overstate just how tense and dramatic those turns 2-4 were, while we were desperately trying to cross the Aqueduct and the French were trying equally desperately to thwart us. This 'trigger condition' for releasing reserves lent real urgency to the early moves and made every assault seem crucial and exciting.

Added spice was provided by the Allies' decisions over their own reserves. They have several French divisions available, including the Imperial Guard, as well as the British cavalry division. They may commit as many of these as they wish, at any time - but the more they commit, the greater the risk that this will cost them victory points (representing bad press back home about how serious the Russian attack was and/or how nervous the Allied generals were). This alone meant they had important decisions to make virtually every turn.

This game was truly epic and memorable, and the way the scenario handles reserves had a lot to do with it. This one scenario offers two different approaches. I have surveyed the available BBB scenarios and identified a few other possible ones. We might categorise the various options as follows. I have tried to group them into related types ('Take what you're given', 'Earning it', 'Preventing it', 'Paying for it'):

Take what you're given (simple basic approaches, no choices for players to make)

1. No restrictions. All troops on table, players may commit any and all as soon as they like.

2. Scheduled reinforcements. Frequently, BBB scenarios provide for troops to arrive during the course of a battle at around the time and place where they did historically. The players typically have some latitude over the arrival points for their reinforcements, but no influence over when they arrive, e.g.: 'Arrive Turn 3 within 12" of SW corner".

3. Scheduled release. Commonly a scenario states that certain units may not move on the initial few turns and specifies a turn when they will be released for use. This is a simple way to reflect the fog of war and limited information that usually prevents a real general from going 'all in' on Turn 1. Published BBB examples include the French at Gravelotte (1870), Beaumont (1870), or Sedan (1870); likewise the Italians at Custoza (1866) or the Russians at Metschka-Tristenik (1877), among many others.

Earning it (players' success or otherwise during the game affects what reserves they receive)

4. Triggered release. Similar to the Russians at the Chernaya, in the BBB scenarios for the Second and Third Battles of Plevna (1877) Russian reinforcements are triggered by the Russians capturing certain Turkish redoubts. This represents the decision to reinforce success. Pered (1849) also has such a 'triggering condition'. The Hungarians need to capture at least 3 objectives on Day 1 to be able to commit a reserve corps on Day 2, otherwise it has to wait until Day 3. In a draft scenario for Antietam (1862) I tried a trigger condition for releasing Porter's V Corps. 

5. Wrestling for advantage. Nagy-Salló (1849) is effectively an encounter battle in which the majority of both sides' troops arrive as reinforcements, subject to die rolls. The trick is that whichever side holds the central objective (the village of Nagy-Salló itself) is deemed to be accordingly more confident, so gets a +1 on its dice for committing reserves. This is the only scenario in which I have used this device, but it works so well I think it deserves to be used again.

Preventing it (players' success can stop enemy reserves being released)

6.  Deterrence. Montebello (1859) takes the choice out of the owning player's hands but lets his opponent influence it. The outnumbered French are trying to make themselves look bigger than they are by acting aggressively. An Austrian reinforcement unit arrives every turn unless a French charged on the previous turn. This represents the Austrian commander's caution in the face of French counter-attacks. It's a rather specific situation, but this is certainly a successful way of recreating it.

Paying for it (players can choose to commit reserves but risk paying a price of some kind if they do)

7. Victory point gamble. This includes the Allies at the Chernaya, trying to calculate whether the chance of retaking a lost objective is worth the risk of losing a victory point by committing the reserves to do so. Balaclava (1854) is similar to The Chernaya in that both sides risk sacrificing victory points if they choose to commit reserves. Sepsi-Szent-György (1849) offers another variation on this: the Hungarians have the option mid-game of committing additional forces - but if they do, their victory conditions also get harder. The fact that they have that option obliges their Austrian opponents to keep back some reserves themselves to guard against that possible additional force.

8. Schwechat (1848) is an interesting one. The Austrians are defending against a Hungarian army that is marching to aid the besieged revolutionaries. Turn by turn, the Austrians may commit reserves from their besieging force to help to fend off the Hungarians. However, the Hungarians have a one-time die roll to see if the Viennese will sortie against the Austrian rear - and the more Austrian reserves have been committed, the higher the chance of a sortie.


This is by no means an exhaustive list. There are undoubtedly many other ways of representing reserves: formal orders statuses, card activation systems, command point systems ... rather than try to list them myself, let me invite you, my loyal readers, to comment on what approaches you have seen used in wargames rules, and which you like and why.


This short essay is one of a series of 'Reflections on Wargaming'. If you'd like to read more such pontifications, see the full list here.

===

Update added 18 December 2022


This essay was deliberately only half-written originally. I expected lots of feedback and I was not disappointed: dozens of you wrote thoughtful and considered responses on TMP, Pendraken and TWW. These deserve some review and commentary from me in return.

The responses I received fell into these broad categories:


What do you mean?

It was pointed out that I blurred the distinction between ‘reserves’ and ‘reinforcements’. Of course reinforcements may arrive and then be held in reserve, while reserves may be used to reinforce an attack or a defensive position. I hope that clarifies things.


I don’t see the problem

A number of respondents took the view that players should be entirely free to order all their troops around as they saw fit. I can see the case for that – in fact, my Chernaya scenario that prompted this post provides exactly that as a scenario option.


But let’s consider an obvious example I should have included to start with, namely Napoleon’s Imperial Guard. Napoleon usually saved these up until late in a battle, yet any wargamer worth his salt is likely to try to get maximum use out of his best troops. Do we think Napoleon was always doing it wrong? The BBB Waterloo scenario awards the Allies a victory point if the Guard infantry are spent or destroyed. That leaves the player the freedom to commit the Guard, but with a penalty if he loses them. Is that still too restrictive?


Also I will maintain that sometimes tying players’ hands a little initially is a suitable way to compensate for their perfect information and the absence of the uncertainty or ignorance or even deception that the generals suffered from on the day. I don’t want to straitjacket players and force them to repeat their historical counterparts’ plans and mistakes, but I do want them to face similar historical constraints so they can appreciate the historical problem.


Greater freedom of movement for reserves

I quite like Andy O’Neill’s simple summary: ‘Committed troops – you already gave them a mission. Wave goodbye. They’re out of your control. Reserves. You may give them a mission. Until you commit them to some action. Then, see above.’ It’s not entirely applicable to games of the scope of BBB that can encompass several days of battle, but it’s a fair point that reserves may be easier to move around the battlefield than troops that are already engaged. Readers offered various mechanisms to reflect this: shorter time to activate orders changes, double moves or longer movement distances, a +1 on activation rolls … ‘Daft interpenetration rules’ were mentioned as a problem deterring players from holding units in reserve. ‘Order, counter-order, disorder’ was given as a factor that doesn’t get enough weight in a lot of games.


Morale benefit of reserves

It was suggested that the presence of nearby reserves could/should help units to pass morale checks.


Fast-moving games encourage appropriate use of reserves

Readers noted that games that do not last enough turns and/or have large enough movement distances for troops to move far across the table encourage players to put everything in the front line early. By contrast, games with room for maneuver and with movement distances large enough to significantly change the situation quickly allow more unpredictability (necessitating reserves) and the opportunity to react (making reserves appropriately worthwhile). Steve Holmes used the phrase ‘zooming out’, i.e., the advantage of starting the game not when two battlelines are about to clash, but before they are formed, thus allowing for more approach maneuver, which also brings reserves, flank marches etc more into play. Phil Dutré rightly raised troop density – wall-to-wall troops don’t leave much room for maneuver, nor for unpredictability (though I suppose they might force creation of a second line aka reserve if there isn’t room for everyone in the first line!).


Similar but different, the game dynamics need to make it possible for a series of attacks and counter-attacks to happen during the course of a game, contra Murvihill’s complaint: ‘Most games I’ve played only have time for one attack before the game is over’.


I would say BBB meets these criteria – as Vincent Tsao’s review here reports, ‘Movement is generous […] A unit can cover a lot of ground if it is unopposed’. Activation rolls mean reaction is not guaranteed, so a prudent player needs to anticipate as well. Scenarios are often ‘zoomed out’ deliberately so as to allow time and space for maneuver. And as anyone who follows this blog will have seen, a typical BBB game will rarely be a simple story of a single attack. Instead, there is ebb and flow, thrust and counter-thrust, the tale will twist and turn a few times before it reaches its end.


Army break points militate against retaining reserves

Some noted that certain rule systems that use ‘army break point’ to determine victory reward players who put everything up front rather than retaining a reserve.


Who should have control?

There was discussion about whether it is both more realistic and more fun to have arrival/availability of reinforcements/reserves essentially random – at the whim of fate (aka higher command) rather than the player having any say.


Do game mechanics adequately reflect fatigue etc?

It was noted that rules need to give sufficient advantage to fresh troops vs spent ones, and to reflect gradual exhaustion and increasing disorder and attrition. Even if casualties are negligible, or even if not directly under fire most of the time, simply standing to for hours in sight of the enemy is physically and mentally draining.


One of Clausewitz’s most interesting quotes, in my view, is this: ‘Delayed commitment of reserves – or outflanking through time, to put it another way – is always a very effective principle in modern warfare.’ (Carl von Clausewitz, ed & transl Murray & Pringle, ‘Napoleon Absent,Coalition Ascendant: The 1799 Campaign in Italy and Switzerland, Vol.1’, p177.)


Time spent in reconnaissance is seldom wasted

John Salt observed how rarely this venerable military maxim figures on the wargames table. This brings us back to the fog of war aspect I raised at the start of this post. Rules or scenarios where reconnaissance to identify enemy strengths, locations and intentions plays a significant part are also more likely to see players husbanding reserves until they have a clear enough picture to commit them.


Rules that represent reserves well

The Blücher, Rommel, Chain of Command, and Sharp Practice rules got honourable mentions for how they treated the ‘greater freedom of movement’ or ‘fatigue and attrition’ respects.


Let me summarise, then. First, let me state that my games, and I assume yours too, are trying to achieve at least two relevant goals:

- To present players with a challenge in the form of either a historical situation as faced by a historical general, or at least a plausible one with some foundation in history;

- To provide an entertaining game.


Uncertainty and unpredictability are key elements for both goals. Historical generals always had to deal with unknowns, and good wargames also need to provide us with surprises.


Surprises can be generated by game mechanisms that have some random element and whose time-space relationships make it possible for dramatic maneuver to change the situation significantly in a turn or two. Such game mechanisms encourage appropriate use of reserves. There are many ways to do this. I believe BBB does a good job in this department.


Historical surprises or uncertainties can be represented by scenario-specific rules that put suitable constraints on players. It is by no means always necessary, but BBB scenarios demonstrate that there are many different ways to do this if required. The Chernaya scenario as reported above is a prime example of how this can generate a uniquely exciting game.


Let’s finish with another quote: “There are known knowns, things we know that we know; and there are known unknowns, things that we know we don't know. But there are also unknown unknowns, things we do not know we don't know.” ― Donald Rumsfeld, Known and Unknown

Friday, 25 November 2022

Lisbon military museum

I have been travelling a bit lately. Downside: not much wargaming. Upside: I was in Lisbon and was able to visit the Lisbon military museum. According to the Lisbon Portugal Tourism Guide page about it, "maybe not too many people are interested in its theme, but no one leaves disappointed"! I'm interested ... and I wasn't disappointed.

The museum isn't organised chronologically but that doesn't mean this brief and far from exhaustive report can't be.

Pre-Napoleonic: quite a lot of morions and halberds and other stuff that goes ding-clang; not my period. I liked the very early artillery though.

Napoleonic: actually I expected even more, but there is still a very decent and substantial section on this.

C19 colonial: some interesting bits and pieces about this little-known (to a lot of us) historical chapter.

WWI: lots on this, about both the Portuguese expeditionary force on the western front and the colonial fronts. Very good.

C20 colonial: a poignant room devoted to this sombre period of colonial guerrilla wars.

Artillery: I believe the museum was once an artillery school and it has lots of cannon.

The museum's official website is part of the Portuguese Army website here.

For much fuller reports than my cursory effort above, and with lots of photos, see Bob Cordery's two reports from 2014 here and here.

Just four photos to give you a taste:

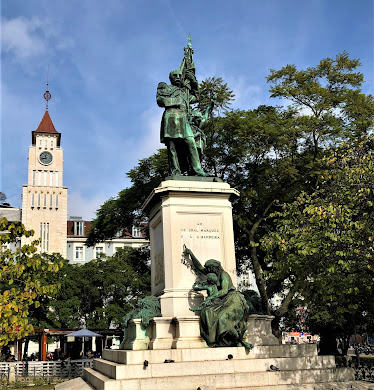
Not actually in the museum but on the way. One example of the many fine pieces of statuary with which Lisbon is endowed. This is the Marquis of Sa da Bandeira, a veteran of the Napoleonic Wars who fought in the Portuguese internal conflicts in the 1830s and subsequently served as prime minister.

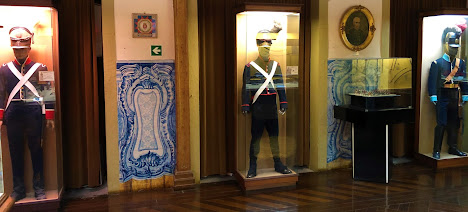
A poor photo that doesn't do justice to the fine Peninsular War exhibit. Lots more weapons, equipment, paintings, and a relief map of the lines of Torres Vedras.

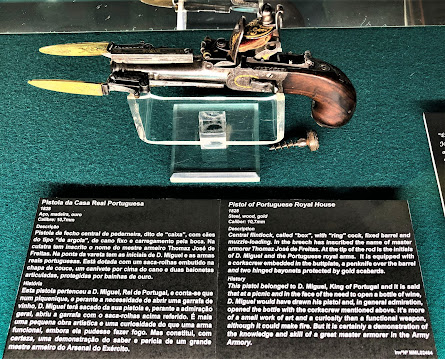
I'm sure we all know someone who could use a pistol like King Miguel's, with its corkscrew attachment. It has been suggested the twin bayonets mean it could be doubly useful at a barbecue, skewering sausages as well as opening bottles.

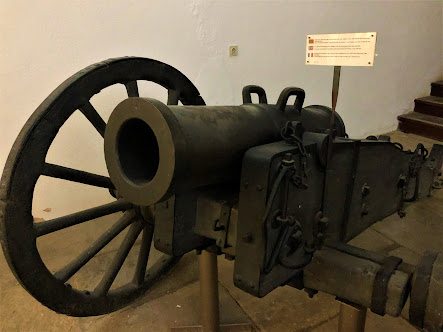
And finally: a French howitzer taken at Vitoria.


Saturday, 19 November 2022

Vae Victis likes the BBB Hungary '48 scenario book

When we ran our Pákozd 1848 game at the Colours show, one of the many good people I met there was Nicolas Stratigos, editor of the excellent French wargames magazine, Vae Victis. I pressed a copy of the new Bloody Big HUNGARY '48 Battles! scenario book into his hand. BBHB has now been reviewed in VV. I'm happy to report VV's verdict: "This supplement is really well done. [...] the historical content is remarkable and enables this forgotten conflict to emerge from the limbo of history." Merci beaucoup, Nicolas!


Sunday, 13 November 2022

Crimean War: the Gospels of the Chernaya (AAR)

I thought I'd let you hear the sound of a few different voices other than my own for a change. This is an After-Action Report by four players from four different points of view. The players were supposed to include Matthew, Mark, Luke and John, hence the 'Gospels' reference in the title. As it happened, John couldn't make it, so the fourth voice here is that lesser-known apostle, Phil. The game was a Crimean War scenario from the Bloody Big European Battles! scenario book: The Battle of the Chernaya (1855), the Russians' last major attack on the Allies besieging Sevastopol. Crispin created another of his custom terrain mats for it, painted the armies and ran the game.

I'll shut up now and let the four apostles and the photos from Crispin and Dave tell the story. 


===

Quick summary of events in four photos by Crispin:

1. (Looking west along the line of the Chernaya. Russians attacking from the right. White objective markers on the four Fedoukine Heights top centre, Kamara village lower left, Mt Hasfort and the Sardinian outpost lower right.) Russians attack and push Sardinians out of their forward Outpost.... but Sardinians recapture after an initial repulse... Russians withdraw to lick their wounds.

 
2. Main Russian thrust in the centre manages to push French off two of the Fedoukine Heights (west and middle) with considerable losses on both sides ...
 

3. Allies commit their cavalry and then infantry reserves to ensure further Heights are not lost. All four reserve contingents committed but with no loss of VP for the Allies!!! (Scenario rule requires a die roll for each contingent committed, the more the riskier.)


 4. Russian cavalry manages to sneak around the Italians' right flank and attempts to 1) get into Kamara (but gets blown away...) and 2) assault Italians in their Outpost - managed to push one unit back but not enough to reclaim the Outpost as a VP .... all on the last turn!

So it ended up as a draw .... but .... it could easily have been a Russian win ... Great fun.

===

The Gospel According to Matt (Allied Reserve)

As the commander of the Allied Reserve I could only express my astonishment as messenger after messenger emerged through the strangely stubborn mist bringing tales of a dangerous attack. But far from showing ‘significant alarm’ we kept our sang froid, rolling a truly astounding four ones in succession when testing for committing each of the reserve forces. If only I’d known ones would be rolled I would have committed them sooner! As the mist slowly cleared giving us a little more visibility, the reserve cavalry saw an ideal opportunity to assist our Italian friends by forming from column of fours into supported line and charging très magnifiquement full pelt onto the Fedoukine Heights. Unfortunately the fog still obscured several Russian batteries and in an all too familiar outcome half the horse were blown away in minutes. Not to be disheartened the plus courageux other half, from subsequent reports led by a certain Flashman (mostly his own as one of the few survivors), charged again up the steeply held slopes into the flank of yet more Russians (who seemed to be everywhere!) before following their brethren into oblivion. This discouraged the enemy long enough to buy time for the rest of our reserve to deploy, no doubt prompting more thrilling verse from Lord Tennyson to entertain generations for years to come! As my colleague General Pellissier stubbornly gave ground the reserve manoeuvred carefully to steady our collapsing line on the Fedoukine heights just in time to hold the last gasp of the Russian attack here. No doubt L'Empereur will be gratified to learn the Imperial Guard barely got their uniforms dirty and yet will claim all the glory, as usual! 


 Deadly Russian artillery dice blow away British cavalry (top right)


 Second and final British cavalry charge - a noble sacrifice.


===

The Gospel According to Luke (French C-in-C)

Report from French 2nd Corps

Under cover of heavy fog we were attacked to our right front on the Middle Fedoukine Height by a mass of Russian infantry, perhaps six divisions with a further four in a second wave. They came on in the old way in depth at the point of the bayonet, and once our infantry had rapidly and calmly repositioned itself to form a defensive line somewhat to the east of our initial dispositions, we commenced a storm of defensive small arms fire. Our infantry initially acquitted itself well, particularly the 3rd division and the Zouaves with their new muzzle loading rifles, though the full range of these effective weapons was not usable due to the low visibility. Those units with the older muskets formed up close to the stream line of the aqueduct and commenced volley fire. We appeared to cut down droves of the Russian infantry but still they came on in wave after wave. I regret to say the artillery attached to the Corps was unable to contribute much as it was cut to pieces by a Russian grand battery operating on the right of their line. Sadly, our brave fellows were swept away by a lucky Russian charge breaking through first one unit and then taking others in the flank, as there was an unfortunate angle in our firing line where it followed the curve of the Middle Fedoukine. The surviving elements of two units retreated in order to resupply themselves with ammunition, having expended every round in the troops’ pouches, such was the fury of our volleys. These units were glad to be supported by the reserve, including the Guard. The Russians seemed inordinately excited at the idea of engaging our reserve formations but were unable to push home the advantage beyond the Middle Fedoukine.

Whilst this was all occurring, our gallant Sardinian ally, the young General La Marmora, first lost and then retook the redoubt below Mount Hasfort, held it despite infantry and later cavalry pressure, destroyed a harassing Cossack flank movement with artillery fire, and was even able to throw a division, supported by the Turks, into a sadly unsuccessful flank attack on the East Fedoukine.

We must also pay credit to the gallant but characteristically rash attempt by the British cavalry to charge and disrupt the Russian attack. To lose the entire Light Brigade twice in one war illustrates a noble but impetuous streak. As a colleague said after a similar tragedy last year, “C’est magnifique mais ce n’est pas la guerre”.  


 French firepower takes deadly toll of first Russian wave.


===

The Gospel According to Mark (General Read, Russian right wing)

From the Fedoukine Heights 3.00pm 16 August 1855.

To His Imperial Majesty Alexander, Tsar of all the Russias, Grand Duke of Finland etc etc

In pursuit of your Majesty’s instructions conveyed by General Vrevski, I arrayed my troops alongside part of General Liprandi’s command in the approaches to the valley of the Chernaya. In the absence of clear orders from Prince Gortchakov, we opened the battle at 7.00 am. Seeing the French had fallen back to the heights we advanced first across the Chernaya and then the Aqueduct stream while our artillery deployed to bombard the heights.  On our left flank, General Bellegarde seized the outpost impudently established by the troops of the prince of Sardinia on Telegraph Mountain, forcing the enemy to commit almost all of the Sardinian troops to turn him out again. He then skirmished skilfully with the enemy preventing them from reinforcing the French with more than a fraction of their force. The Cossacks, following Bellegarde’s orders, raided almost as far as Kamara, according to their last report. In the afternoon, having carefully assembled the reserve cavalry on their start lines he launched a bold charge which almost drove the Sardinians from their outpost a second time. I commend this officer to your Majesty for promotion. 

About 10.00 am our troops, seconded by the reserve forces, surged forward in a mighty wave and soon destroyed or pushed back the French occupying the middle and east Fedoukine heights. These we held for the remainder of the day, brushing aside feeble attempts by British cavalry and Turkish infantry to retake them from the east. Such was the elan of our troops and their devotion to the person of your Majesty that they threatened to take control of both the south and west Fedoukine heights also and the French were forced to commit their entire reserve force - even the Imperial Guard themselves - in their efforts to hold their positions.

Though alarmed, the enemy did not panic and since many devoted sons of Mother Russia fell on the field of valour, I judge it best to withdraw at the end of the day under cover of darkness to rest and refresh my troops. I have nevertheless, the honour to report to you the finest feat of Russian arms against the French since the day of Borodino.

Your devoted servant

Read.
 
 
 The Tsar's children surge across the Fedoukine Heights.

 Every French reserve has been committed, proving barely sufficient to repel the Russians' last mass assault.


===

The Gospel According to Phil (Russian left wing)

The Ataman of the Ural Cossacks would contribute a dispatch, but General Read’s superlative account is a full, honest and humble depiction of all that happened and beside, a combination of the after-effects of post-battle celebrations of the heroism of His Majesties' Majesty's forces and the subsequent execution of an urgent mission to provide close personal protection to the more deserving of Sebastopol’s civilian populace, ensuring their safety from the clutches of the lascivious French, frankly unspeakable Sicilians and the Turkish terrors, means that he is currently indisposed and unable to add any further commentary that would assist your Majesties' Majesty’s appreciation of events.

PP Denisovich (AdC)      


Grammatically enhanced. Denisovich got a whiff of the Ataman’s vodka fumes.

Denisovich now undergoing remedial training with the Third Section.

Karamazov (dep. AdC)


Cossacks try to sneak into Kamara behind the allies' right flank but are deterred by Turkish artillery rolling 9.


Matt's match-winning dice to resolve whether the scale of the Russian attack caused consternation in Whitehall: "We may have had to commit every man capable of bearing a musket, but the issue was never in doubt."

===

Update: Deacon Michael Welker has helpfully pointed out that my Biblical references were flawed: "
clarification for history… Matthew and John were Apostles. Mark was St. Peter’s secretary who went to Alexandria as bishop and founded the catechetical school around 50 AD. Luke was a gentile convert, physician and historian… missionary by Paul’s side for a time. Phil though was an Apostle though also there was Philip the Deacon (he evangelized Ethiopia)."