Monday 24 June 2024

Turning flanks at Fraustadt (GNW, 1706)

I have had my second taste of the Great Northern War (regular readers will remember the first was at Kliszów) and a very characterful and indeed illuminating game it was: Fraustadt (1706). 

The background is that Russia has joined the war on the Saxon-Polish side. The allies are trying to concentrate their forces. A Swedish force under General Rehnskiöld intercepts Schulenburg's allied force near Fraustadt (now Wschowa in western Poland) before it can unite with other allied armies. Despite being outnumbered two to one and facing a line of chevaux de frise, the Swedes attack. Historically, Rehnskiöld's superior cavalry enabled him to accomplish a double envelopment and then crush the allied line from three directions.

Our Swedish opponents, Matt and Crispin, were less ambitious. They went for a mirror image of the 'Swedish Leuthen' plan that worked so well in our Kliszów game. The eight annotated pics below tell the story, followed by some reflections.

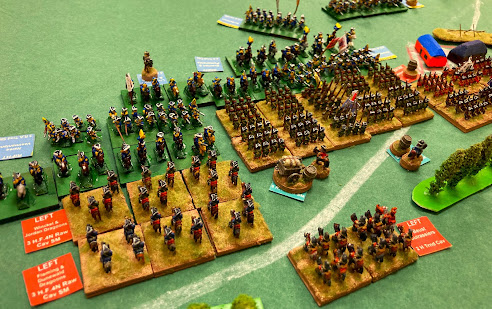
I commanded the allied left, backed up by John's Russians in the centre. Here we see guns behind chevaux de frise, massed infantry behind the objective village of Röhrsdorf, and cavalry on our left wing.

Dave W commanded our right, anchored on the objective village of Geyersdorf. The whole of the allied centre was protected by chevaux de frise and frozen ponds and a stream ... which the Swedes, not unreasonably, chose to sidestep entirely, committing all their foot and most of their horse to a powerful right hook.

This view of the whole battlefield from behind the allied line clearly reveals the Swedes' intent. The weight of the Swedish army is on its start line top left (Swedish troops are the ones on green bases). Just three Swedish cavalry regiments loiter in the centre to delay any allied countermove.


The formidable Swedish attack force - plenty of pikes and 'Gå på!'.

Undaunted, our allied infantry wheeled efficiently into position either side of Röhrsdorf to face the foe's pell-mell advance. Unfortunately, while their drill may have been sound enough, our troops' fighting qualities were not - which more than offset our numerical advantage.

A mighty clash was quick to arrive. We repelled the first onslaught. Counting ourselves lucky and knowing we would have no better opportunity, we launched our left wing infantry into a massed countercharge. This actually hurled back one Swedish infantry unit (top centre) with heavy casualties. Of course, then the Swedes in turn renewed their assault with redoubled fury. As the waggon and barrel and aides-de-camp denote, our infantry were by now disrupted and low on ammo, so they were smashed back, as were our feeble horse, resulting in the scene below ...

The Swedes have stormed Röhrsdorf and command the road beyond it (a line of communications objective). They are poised to exploit their advantage, roll up our line, and take Geyersdorf and our second line of communications from behind. Top left of pic, the allied right wing has advanced out of Geyersdorf and across the chevaux de frise with the aim of rolling up the Swedish left and retaking Röhrsdorf, but with poor allied generals it is slow work. Who will roll up who first?

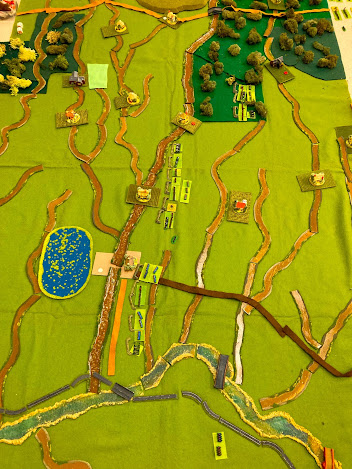
And the answer is: the Swedes nearly managed it but ran out of time before we ran out of troops. This plan view shows how the battle line has pivoted 90 degrees. The allies started in a line across the centre of pic, below the chevaux de frise and the stream/pond line. Our right has swung round as far as the Y junction top left, but is still too far away to threaten Röhrsdorf. Our left has been driven back most of the way across the battlefield and almost disintegrated, but one valiant Russian brigade (near lower right edge) prevents the Swedish horse from cutting the road behind Geyersdorf (out of pic, lower right). End result: a draw.

Reflections:

The attack is king! (See my earlier post on why defence is not king.) In this period of linear warfare, being able to choose the point of attack is a valuable advantage, as it is so difficult for the defender to respond by maneuver, and weapon ranges are short. Even though the Swedish plan was obvious from the start, it took forever for Dave's troops to get across from our right wing to help our left.

Options, options ... Halfway through the game I commented that I didn't see what else we allies could have done: we had to defend both villages to have a chance of victory; we had a central reserve and it wasn't enough. However, on reflection, we could have made the garrisons smaller and the central reserve stronger. Perhaps our right wing cavalry could have raced directly across behind our lines, rather than trying to fight its way through the enemy's pinning force. Our guns could have deployed differently too. We can always do better!

Victory conditions - more objectives needed? There were four objectives (two villages plus the LOC roads behind them). Both sides needed two for a draw or three to win. I think making the big pond in the middle a fifth objective and upping the Swedish victory target could be good. That would represent breaching the allied centre.

Linear warfare can be fun. I routinely mount my hobby horse with a freshly ground axe to condemn pre-Napoleonic warfare as limited and dull in terms of its gaming potential. I might cynically say that last pic looked just like every ancients or renaissance tournament game ever played at OWS: the battleline wheels clockwise or it wheels anti-clockwise and that's about it ... but actually it was thoroughly absorbing and there were enough interesting decisions to make. When and where to counterattack? How to reform our line after each Swedish assault? How to insure against Swedish breakthroughs? OK, I admit it - I had fun.


Tuesday 18 June 2024

NBBB is published!

What better day than the anniversary of Waterloo to announce the publication of the long-awaited and eagerly anticipated "Napoleon's Bloody Big Battles!" scenario book to accompany the "Bloody Big BATTLES!" ruleset! 

"Napoleon's Bloody Big Battles!" is written by Dr Mark Smith (who also wrote the "Bloody Big Battles in INDIA!" scenario book). The 16 scenarios in NBBB cover the biggest battles where Napoleon commanded in person after becoming Emperor:

The Wars of the Third and Fourth Coalitions (1805-1807) – 4-scenario mini-campaign
          Austerlitz                                     
          Jena/Auerstedt                             
          Eylau                                           
          Friedland                                     
The War of the Fifth Coalition (1809) – 3-scenario mini-campaign
          Eckmühl                                      
          Aspern-Essling                             
          Wagram                                       
Napoleon’s Invasion of Russia (1812) – 2-scenario mini-campaign
          Borodino                                      
          Berezina                                      
The War of the Sixth Coalition (1813) – 5-scenario mini-campaign
          Lützen                                         
          Bautzen                                      
          Dresden                                      
          Leipzig                                         
          Hanau                                          
The Final Battles (1814 & 1815) – 2 stand-alone scenarios
          La Rothière                                  
          Waterloo
The hyperlinks above take you to reports of some of these games being played over the five years or so this project has taken to complete. As those reports show and as I can attest, small-scale figures on a regular 6'x4' table can still produce an epic experience and a grand Napoleonic game. In connection with that, let me quote 'Shugyosha' of the 'Wargaming Everything' blog, who has embarked on an ambitious endeavour: 'The Ultimate Napoleonic Wargame Rules Review and Comparison'. He had some very nice things to say about BBB:
"When thinking of the biggest battles of the era, [...] BBB makes it actually possible in a manageable time frame. [...] Among all true army level systems it is probably the best middle ground between playability and period flavor. This might sound like a compromise, but it is not. BBB stands on its own, and for me among the very top.!

NBBB is printed and shipments are en route to BBB's usual loyal retailers right now. I should like to take this opportunity to thank them for their support - between them all, they have bought out the whole first printrun already! I'm sure their confidence will be rewarded.

Happy Napoleonic gaming!


Tuesday 4 June 2024

Defence is not king! Lule Burgas (1912)

A friend of mine writes school textbooks. A few years ago he did one in war and society for the UK history curriculum. I reviewed the chapter on 1750-1914 for him. I thought I was doing him a favour but in fact I caused him a problem. I found two bones of contention in it.

One was the claim that war did not change significantly between 1750 and 1850. Napoleon and Clausewitz might disagree with that.

The other debatable claim was this (I paraphrase): 'the foolish WW1 generals had not learned the lesson of the previous 50 years that, because modern weapons had become so lethal, the defence was king'. I pointed out that (a) the attacker gets to shoot too and (b) the lesson from virtually every war of the previous 50 years was that the attacker wins. The Crimea; Italy in 1859; Denmark in 1864; the ACW; the Austro-Prussian War; the Franco-Prussian War; the Russo-Japanese War and the Balkan Wars, with the latter two being proto-WW1 warfare with WW1 weapons: the attacker wins, the attacker wins, the attacker wins. The difficulty for Paul was that the debatable claim was not his, but he was required to make it because it was actually in the curriculum ...

Which brings us to this week's wargame: Lule Burgas (1912), the fourth in our ongoing campaign from the "Bloody Big Balkan Battles!" scenario book. This was the largest European battle between 1870 and 1914. The attacker won.

The historical situation was that, just four days earlier, the Bulgarians had defeated the Ottomans at Kirkkilise. The battered Ottoman army established a new defensive line at Lule Burgas, but its right flank was open. Ottoman reserves were rushed up to fill the gap and clashed with the Bulgarian 3rd Army, while the Bulgarian 1st Army took Lule Burgas. After a three-day battle, the Ottoman defense caved in and retreated to the fortified lines at Chataldja.

The scenario revolves around four objectives: Lule Burgas itself on the Turkish left; Karagac in the centre; Bunarhisar on the right; and Congara in the rear. Both sides need to hold two of these to draw or three to win. The five annotated photos that follow reveal how the game went.

Looking north up the Turkish lines. Lots of lovely muddy brown rivers, custom-made for me by Rob Owens of Rob's ScenicsA cavalry brigade foot of pic covers the Turkish left. IV Corps is entrenched behind Lule Burgas (the town with the marsh in front of it); I Cps holds the centre; II Cps in the woods. III Cps and XVII & XVIII Provisional Cps are poised to enter top right. Red and white counters mark the four objectives. (Turkish figures are a mix of Irregular Miniatures and Heroics & Ros 6mm.)

View of the same Turkish deployment from the Bulgarian side of the table. The scenario uses a large scale - this 6'x4' table represents a 60km front; it lasts 9 turns with two night intervals, each turn being 6 hours; the armies are both over 100,000 men, so each individual base is 2,000-2,500 men and units are brigades of 6,000-10,000 men. Because of the large scale, there is a simple scenario special rule that fire cannot cross more than one river. This worked rather well.

Halfway through the battle, the Turkish left has been turned. Will, commanding Bulgarian 1st Army, chose to send the Sborna Division south of the River Ergene to outflank the Turkish trenches, while the Sofiyska Div threatened the front. Day 1 was spent moving into position and exchanging inconclusive fire with the defenders in Lule Burgas. This photo on Day 2 shows empty trenches as the Turkish units in them and the town have been routed, leaving Abdullah Pasha alone, embarrassed, and hoping John's finger can bring reserves from the centre in time. (Proxies of proxies: the 'Bulgarians' are actually my Greek army for this conflict, which uses British WW1 figures from Irregular. I'll need a different solution for the 2nd Balkan War battles between Bulgarians and Greeks! Entrenchments and railway also by Irregular.)

Meanwhile, the thin line of Nick's Bulgarian 3rd Army clashes with Dave's Turkish reinforcements in the woods. Bulgarian cavalry hold the Bunahisar objective (foreground); Turks hold Congara (top centre) and Karagac (top right). On Day 1, the wide open space in front of Karagac was a scene of carnage as the Bulgarians advanced into a deadly storm of fire, the survivors falling back at dusk and then shifting their effort further left. At that point, Nick was struggling to see how he could possibly avoid defeat.

The game produced a wonderful climax on the last turn. Both sides held two objectives, which would have meant it was a draw. However, in attempting to capture Bunahisar on their right and to hold and then retake Lule Burgas on their left, the Turks had drawn forces away from their centre, exposing Karagac. Two brigades of the Balkanska and Sofiyska divisions were close enough to assault Karagac, which was held by two Turkish brigades. Bulgarian fire had scrubbed away would-be supporting units and Bulgarian QF artillery wiped out one defending brigade. Both attacking units got the full moves they needed to reach, albeit one of them still in march column. Defensive fire held off the Sofiyska, but the Balkanska assaulted from the march - and emerged victorious! It was a splendid end to a game that at one stage had looked nigh impossible for the Bulgarians.

Reflections:

Blenheim in the Balkans. The battle had a nice shape to it: initial fencing along the front, a turning movement on the Turkish left, then essentially a big fight on each flank that made the Turks thin out their centre and make it vulnerable to the victory blow. Kudos to Will for having the vision four turns earlier to get his Balkanska brigade into march column and race it across the battlefield to where it was needed.

Other plans are possible. As is usually the way, I can see other options for both sides. The Turks could deploy differently with more attention to their left flank and to fields of fire. The Bulgarians could try what seemed an obvious approach at first glance: weight their attack heavily to the left, avoiding most of the dug-in Turks and going for the three village objectives rather than the tougher town. Certainly worth replaying to see how it goes with different plans and different players.

Limiting LOS. I noted in the Kirkkilise report how that similarly large-scale scenario might benefit from some line of sight limit. The scenario special rule here did the job.

Quality tells! All the Bulgarians were rated Aggressive. Most of the Turks were Fragile. On Day 1, while they were mowing down advancing Bulgars, the Turks had the best of it. Once the Bulgarians developed their own firing lines and set up their artillery and started dishing some out, Turkish units evaporated rapidly. And, of course, the quality difference swung it in the final assault.

Nice terrain. Rob Owens's rivers had their second serious outing (their first having been at Kirkkilise). Definitely an improvement on the usual blue felt. Now to attend to the roads, and then the woods ...

What a good game! I embarked on this one with some trepidation. Assaulting against an entrenched enemy with equal numbers of troops and modern weapons? It didn't look too promising. But the space for manoeuvre on both flanks actually enabled a mobile game, and it was a bold dash in the centre that decided it at the end. The shift in fortunes and the epic climax meant the game really told a story.


Thank you to Nick, Will, Dave and John for being engaged and enthusiastic and tackling the challenge in good spirits, and to Konstantinos for a fine scenario.