Showing posts with label American Civil War. Show all posts

Wednesday, 27 August 2025

The whole Petersburg campaign (twice)

Well, those were two remarkable games! This is a long post but I'd like to think it's worthy of your attention.

I've been wrestling for months with trying to create a scenario for the siege of Petersburg during the American Civil War. I don't mean just the Battle of the Crater - I can't see much fun or edification to be had from that - but the whole dam' siege, all nine months or so of it. I'd done the reading, identified the major outlines, thought about how I'd tackle the particular scenario design challenges of a 9-month operation encompassing multiple actions of various sizes, drawn the map - just couldn't put fingertip to keyboard to turn my ideas into a tightly written scenario.

To force myself to crack it, I promised to host it as a game at my house. I set a date that gave me three weeks to knuckle down and write the thing. I drafted it, sent it out to my players, did a solo dry run, revised it and sent it out again.

The moment of truth arrived and so did old comrades Mark and Mike B plus a new recruit, Mike S. I was a bit apprehensive that Mike S's first game with us was this untested and radically unconventional scenario that might turn out to be a serious dud. I needn't have worried.

Let me expand on 'radically unconventional'. What struck me, having gamed the three major battles from the brief six weeks of Grant's intense and bloody Overland Campaign (the Wilderness, Spotsylvania, Cold Harbor), was how much more cautious and measured he was around Petersburg. As he himself acknowledges in his memoirs, after Cold Harbor his army's morale was low and the Confederates' was high. The quality of the Army of the Potomac had been significantly diluted as well. Added to that, once Grant moved to face Petersburg, his line of communications ran through hostile territory and needed a lot of guarding. It is notable that the campaign mostly consisted of operations by just one or two corps, occasionally three; also notable that each US corps typically faced a Confederate division a third of its strength, yet often still came off worst.

I therefore introduced some limits on how many units the US can activate each turn and in the whole game. I also engineered the unit strengths and ratings to reproduce these results. 

I eliminated firing except at or by units assaulting or being assaulted.

I introduced logistics in the form of a US LOC line that is vulnerable to Confederate attack, constrains where US units can move, and gets extended at intervals.

I split it into three Phases with big operational lulls between them, in which fortifications get dug, LOC extended, reinforcements arrive and redeployments happen.

Once the attempt to take Petersburg by storm failed, it became a matter of the US trying to cut each of the major road or rail lines radiating from it in turn. I provided for immediate US victory if Petersburg fell, but of course the fortifications make this difficult. I gave the US victory points for cutting each of these lines by a certain turn and bonus VP for doing so earlier. Letting the Rebs cut the US LOC costs US VP.

This means there are two basic plans available to the US: swarming and storming the fortifications, or focusing on collecting VPs. Meanwhile the Confederates have incentive to launch judicious sorties against US LOC, as well as needing to manoeuvre to block those US line-cutting moves. When the Rebs do either of these things, they may open up opportunities for the US to respond to. Anyway, both sides have plenty of options and decisions.

And, yes, there's a special rule for The Crater!

As there isn't a huge number of units on either side and the number that can move each turn is limited, we were able to rock through the game twice in five hours and try both the possible US plans. There are some 20+ annotated photos below to talk you through the action, followed by reflections as usual. The Crater detonates in #7 ...


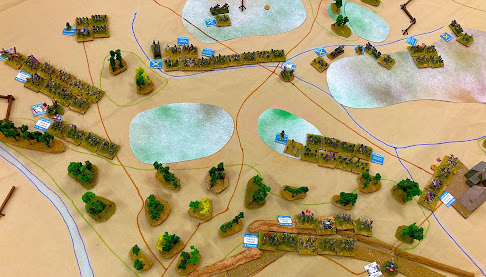
Let's start with the traditional plan view for orientation. The town of Petersburg is surrounded by fortifications, stylised as six individual forts. A quarter-circle of US entrenchments faces the east side of town. The wagon train running behind those is the US LOC. US units are limited to within 12" of their LOC in Phase I (which lasts 2-4 turns at US player's discretion). This is just enough to reach the Weldon railroad, marked with two white VP counters in the centre for reaching it by Turn 2 or Turn 4. Subsequent objectives are the Boydton Plank Road (two white counters left centre, T4-T6), White Oak Swamp Road (two white counters near left edge, T6-T8) and Southside Railroad (one white counter upper left, any turn).

Game will end after 9 turns, or total of 30 US corps activations, or fall of Petersburg - whichever comes first.

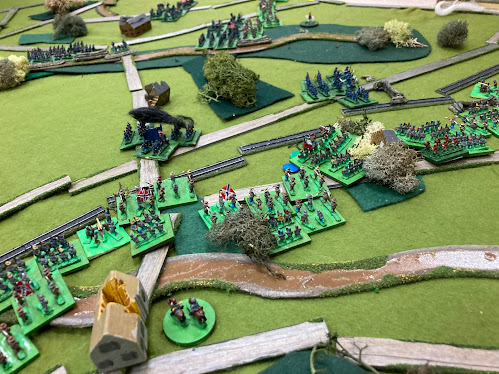
View from inside Petersburg at set-up. (I actually deleted two of those three CSA artillery units after my solo run.) Nice to have a rare chance to use all those wagons I painted when I was 17.

CSA units are divisions, each of 4 BBB 1"x1" bases. Some are Aggressive Veterans (2 flag bases), most are simple Trained (1 flag). The figures are ones I inherited from a friend who emigrated; I've never got round to rebasing them for BBB, hence the veteran cardboard sabots. Figures are Baccus 6mm. Forts are Peter Pig's 1/600 ACW Coastal Fort.

US units are Trained corps of 6 bases, which is only half their nominal strength, the rest assumed to be on rear area guard duty. Further Raw 6-base "LOC troops" units come into the line in Phases II and III.

 All units always operate In Depth in this scenario, no formation changes - another simplification to make way for more scenario-special complication.


The Union boys try assaulting a fort on Turn 1 just to see if they get lucky. They don't.
(White fluff = Disruption.)


Two US corps step out to the west from the end of their LOC (left of pic). Unfortunately one is a bit slow. The Rebs respond by sallying in force. One moves through a gap and parks on the end of the US LOC. All US units will be Passive while it's there, and they need to kick it off or lose a VP. A second Reb division has driven another US corps out of its entrenchments back behind the LOC. This attacker needs to be confronted as well. Furthermore, the unit forced to retire costs the US another activation against its total.


At this very early stage, the US players gave up on any hope of the left hook line-cutting option working and went all in on storming Petersburg. They quickly managed to take both forts in the first line on the east side (right edge and foreground). Bobby Lee is on his horse looking concerned behind the next fort to the left.

The corps that set out for the Weldon Railroad turned around to drive the Confederates off their LOC. As the CSA division in the foreground was outnumbered, outflanked, and had enemy in its rear, it was wiped out. The one behind it was driven back with loss. A weakened Rebel army was about to find it hard to defend the city against what were now even more superior numbers.


KABOOM! To take the second line fort, the US decided to blow The Crater. They got the best possible result, which helped them to maim another CSA division. Remarkably, this attack still ended up getting repulsed.

End of US Turn 2 (I think), with the Union firmly ensconced in both eastside forts and the defenders seriously depleted. 


A view from inside Petersburg after the CSA has rallied and reorganised its defenders. A lot of Union boys out there!

At this point the US had the option of calling the end of the Phase (in real world terms, a couple of months' lull) but understandably decided to press their advantage to the maximum before the Rebs could replace their losses.

On Turn 3, the US took a third fort on the south of town. Mike B felt he could not afford to let the US keep it. The Confederates sent two divisions in to counterattack, but got a calamitously bad result - both divisions lost a base and routed back through the town to rally in the top left corner of the photo. The door to Petersburg is open!


Grant therefore sends another two-corps attack against the rightmost attack, taking it this time, while a third feeds through the gap into the town - Petersburg has all but fallen! The Confederates must retake it in their half of the turn or lose the game immediately. One brave Rebel division charges, scorning superior numbers of bluebellies holed up in the cover of the buildings. Mike B's dice this time are as improbably good as his previous assault was disastrously bad - Petersburg is saved!

There were now two Confederate units in the town. The US had used a lot of activations in its repeated massed assaults on the fortifications. It had enough gas in the tank for just one attempt to expel both Rebel units, but failed. Grant's Petersburg campaign had come within an ace of victory but ran out of steam. So ended a close and exciting game that could hardly have been tighter.


OK, so US Plan A almost worked but didn't. Would Plan B go any better? We swapped sides, reset, and went at it again to find out.


Whereas Mark had only committed two corps to his left-hook effort in the first game, Mike and I thinned out our troops in the fortifications enough to free up a third. All three duly moved out to extend our line towards the Weldon Railroad objective. Two Confederate divisions responded by storming out against our corps at the hinge, covering the end of our LOC, but were repulsed - twice. So far so good.


A bit hard to see what's going on here (sun streams in at certain times of day to make photography rather difficult) but let me try to explain. The US got onto the Weldon Railroad by Turn 2 for the maximum 2 VP there. We therefore promptly called a new Phase so we could extend our LOC and reach for the next Objective, the Boydton Plank Road. At lower right edge you can just see the end of the extended Confederate fortifications. These didn't stop us beating and bypassing the CSA division beyond the end of that line, which you can see driven back to the upper left by our two corps now ensconced on the road, upper right. (Petersburg and everyone else out of shot to the right.) That's another 2 VP for us on Turn 4.


Audacious! As the Rebs stretched to keep us from the Boydton Plank Road, they left a gap in their line. We were able to launch a corps through it to raid across the Southside Railroad. That Confederate division top centre charged our corps and drove it back towards the Petersburg defences, causing heavy losses but unable to dislodge us from the railroad. Alarm and despondency in Richmond! And another VP to the US. (And then we pulled the raiding corps back in when the Phase ended.)


Meanwhile, mostly quiet around Petersburg itself, where the Confederates have seriously thinned out their defenders, while the US barely has enough men to guard the LOC, not enough to attempt a major assault.

The 5 VPs the US had garnered so far. The nominal target was 6 for a draw or 7 for a win. If we could keep our LOC intact, that would be one more. Victory had to be found on the White Oak Swamp Road!

So we called Phase III so that we could extend our LOC and redeploy in reach of the road Objective. Unfortunately, Confederate reinforcements arrived, including Wade Hampton's cavalry, and made sure to defend it in force (while still keeping Petersburg itself secure). Here's the Confederate view of the nut we had to crack: four whole divisions plus the cavalry ...

... and we didn't really have a big enough hammer to crack it with: three corps (one in centre of pic, two more top right) plus Sheridan's cavalry (bottom left. Still, if fortune favoured us, we had a chance.


All quiet on the eastern front - but we still have to guard that LOC.

No, fortune did not favour us. Our troops must have been exhausted (or unwilling to take any risks when they could see the war was nearly over) - our infantry pretty much failed to move, leaving Sheridan's cavalry to charge alone. They did drive the enemy back but not enough to matter. The cheeky Rebs even counterattacked to try to threaten our LOC! (But failed.)

One more turn's worth of activations left. We still have a chance, but these infantry assaults you see in the picture above will need to be outlandishly lucky - and will need the cavalry to be luckier still, whereas they failed even to rally. It doesn't happen. The US has fallen a bit short with its left hook, but an intact LOC should mean it still has a draw, unless ...

Just as virtually the last act of the campaign historically was Lee's abortive assault on Fort Stedman, so it was in our game, where we see a futile Confederate sortie in that exact spot.

LOC intact, 6 Objectives secured = a draw, but a tense and hard-fought one all the way.

Thus, in less than five hours of game time, we had fought this nine-month campaign to a finish twice. It produced two very different games, both very plausible, and both coming down to the wire.


Reflections

This was such a good day, I could enthuse and enthuse, but I'll discipline myself and just share three main thoughts.

Distilled Decisions. The relatively small number of units, the limit on how many the US could move, the dispensing with firing except in assaults: these all made for fast play as they forced us to focus on the few units that were actually important each move. This was helpful as it left brain room to attend to the scenario special rules and how those affected what was important. It all felt very clean and distilled. Hmm: maybe we should add pip dice for command points to BBB!

Tempo of Operations. In my reading, I was really struck by how the intensity of the six-week Overland Campaign was followed by this much lower-key period: lulls lasting weeks and months, punctuated by operations on limited scale for limited gains until the general advance at the end. I wanted the scenario to capture that. The constraints I put on the US seemed to have the desired effect. Giving the players some latitude over when to call an end to a Phase worked nicely too and it was easy to rationalise what a decision in game terms would have meant in real world terms. These two levels of tempo - constraints within turns, and constraints within Phases - meant we were conscious of it in a way that I don't often encounter in a game.

Resonating with History. Likewise, the elements of the scenario structure - both physical (troops and terrain) and regulatory (phases, LOCs, etc) - combined to produce player decisions and tabletop actions that really resonated with what I'd read. The Confederates sortied just as they did; significant actions happened in roughly the places and at roughly the intervals they did; the fortified lines and the action stretched out across the table as they did. I really couldn't have been happier with how it turned out.


This scenario is available in the files of the BBB io group (you have to join the group to get access).

Recommended reading: the scenario owes a lot to Noah Andre Trudeau's 'The Last Citadel: Petersburg, Virginia, June 1864-April 1865'.


Wednesday, 19 March 2025

Changing history at 2nd Bull Run (1862)

Matt's current work-in-progress, both physically and intellectually, is the ACW Battle of 2nd Bull Run (aka 2nd Manassas). He rolled out his half-finished battlemat for us to playtest his scenario. Nick O and I took the part of the Rebs; Matt teamed up with Mark to save the Union.

The History: Having defeated McClellan on the Peninsula in his Seven Days campaign (which we played in January - report here), Lee launched his Confederate Army of Northern Virginia north towards Washington, hoping to destroy Pope's Union Army of Virginia before McClellan's redeployed Army of the Potomac could intervene.

Lee's Left Wing led the way, commanded by Jackson. On 28 August, Jackson set upon a US column at Brawner's Farm, just west of Groveton. This attracted the attention of Pope, who thought he had a chance to destroy Jackson's force, so launched a full attack on the 29th. In his strong position on Stony Ridge, with an unfinished railroad cutting providing an earthwork to cover his front, Jackson fended off Pope until the Right Wing under Longstreet arrived on his right around noon. Pope continued to launch a series of attacks on Jackson through the afternoon, all of which were repelled; his intended main blow by Porter against Jackson's right resulted only in an inconclusive clash with one of Longstreet's divisions. So ended the 29th.

On the 30th, having overestimated his success and Confederate losses, misinterpreted Confederate tactical withdrawals, and therefore underestimated Confederate strength and determination, Pope unwisely resolved to attack again. After a morning spent in reconnaissance and redeployment, around noon he attacked Jackson's right - effectively the Confederate centre - with his own left wing. This attack was bloodily repulsed. The Union army's left was then exposed to Longstreet's ensuing counterattack. As the Union forces reeled, Jackson too went on the attack. However, he was slow to do so, giving Pope enough time to form a line across Henry House Hill and cover an eventual orderly withdrawal.

Hmm, that was a longer exposition than I intended. To describe how the game went, let's plunge straight into the 10 captioned photos that illustrate it. (Some Reflections follow.)

My cameraphone doesn't do justice to Matt's artwork. What I'm trying to show you here is the striped trousers he's painted on these 6mm "Wheat's Tigers" Lousiana zouaves!

The battlefield. The mottled paper cutouts are hills, not woods. Woods are the green outlines with trees on them. (As I said, this is a work in progress. The finished product will look like the other lovely layouts on Matt's 'Pushing Tin' blog.) The big hill on the left is Stony Ridge, with the railway cutting in front of it. Groveton is the small town in the centre. US will deploy in the top half of the photo; Confederates in the bottom half. 

I commanded the Confederate left, shown here lining the railroad cutting. You can see I have already pushed two divisions forward into the woods on the left, seeking to hit the flank of the Union line top of pic. This is because my assessment of the situation was that, rather than waiting for the Union to make suicidal attacks, we Rebs needed to attack immediately to smash the outnumbered Union forces on-table initially before their substantial reinforcements could arrive to rescue them. Unfortunately, Mark had reached the same conclusion and took advantage of the very free deployment allowed by the scenario to form a solid defensive line near the back of the table to buy time. This entailed him sacrificing the Grovetown objective temporarily, but of course (a) he didn't need it to win and (b) there would be plenty of time to retake it once he had all his army available.


Meanwhile, on our right, Nick brought up most of Longstreet's corps. Nick doesn't play BBB very often, so didn't take full advantage of the roads and our advance here wasn't as swift as it might have been.

A couple of turns later on our left. I have pushed a third division forward but my left hook has been slow to emerge from the woods. Matt has responded by extending his right somewhat (top left of pic), while sending a couple of divisions of his own, including Berdan's sharpshooters, to test my position in the cutting. At least I have managed to seize Groveton (right edge) and flank them.

On the next turn, Matt tried to storm the cutting but was repulsed. I launched a counter-assault of my own to take advantage of his temporary discomfiture, plus two more assaults (finally) with Jackson's and Ewell's divisions top left. Matt blithely dismissed all these with firing rolls of 9, 10 and 11. Was that the highwater mark of the Confederacy for this game? Read on ...


Meanwhile, Mark chose to march up his reinforcements swiftly on the Union left, obliging JEB Stuart's cavalry to scamper back and aborting Nick's intended right hook. See the blue-labelled unit top left? That furthest-forward Union division presented Nick with an opportunity to isolate and smash it before its friends could help. He duly charged - and Mark duly rolled 11, managing not only to repel Nick's charge with heavy loss but also to leave the chargers hanging, awaiting the Union left's onslaught. The Union then wiped out one of Nick's divisions.

That pretty much sums up the action on Day 1 (29 Aug), apart from a couple more Union divisions showing up late in the day to seize Sudley's Ford on our extreme left and threaten Stony Ridge, where we deployed Anderson's division when it arrived during the ensuing night. 

Now we're about halfway through Day 2, still looking at the Confederate right. Nick managed to form a thin grey line in front of Stuart Hill (objective flag on bottom edge of pic), but he was facing a fat blue one that was getting round his right flank (see the bad guys in the woods upper right). He put up a valiant fight but by now the arithmetic was already inexorable. He was steadily driven back and back until Stuart Hill fell on the last turn.

We could still deny the Union victory if we held Groveton and took Henry Hill, in their right rear. We were in with a chance of doing so. How did that go?

Here's my own thin grey line in the centre of the battlefield around Groveton: good troops, in some cover, but too few of them. The diminished 3-base unit in the woods to the left of Groveton was overrun by two Union divisions upper left; our guns were driven off by fire; then the two divisions upper right stormed Groveton itself.

This is a view from a different angle, from the top of Henry House Hill. The main battle lines are off the lefthand edge. The three units top of pic are from Jackson's and Ewell's divisions, the troops I'd sent on my initial left hook. These had finally smashed the US right-flank guard division. The Henry House Hill objective lay before them, naked save for one battery that we could surely drive off with rifle fire. Onward!

Unfortunately, on the next US move, the three nearest US units all rolled the full-move results they needed to execute a smart about-face, cross the streams or woods in their way, and form up with the battery. My gallant men tried three times to storm the hill but the odds were too great. Maybe that was our highwater mark here. It was certainly every bit as bloody, desperate, and ultimately futile as Pickett's charge.

Happily, only little lead men perished (and will be resurrected on Sunday when we present Gettysburg at the Overlord show in Abingdon). Many thanks to Matt for creating the scenario and laying on the game; congratulations to him and Mark on a sound plan well executed and a deserved victory; and medal of honor to my comrade Nick for being indomitable in the face of adversity - I could see the writing on the wall and was ready to surrender by Turn 7, but Nick gamely said we should carry on for the full 10. Bravo!


Reflections

Players and Plans Matter. This was the third time Matt had run this scenario. He said the other games had produced crushing Confederate victories. His report on his previous playtest, with different players, is here. In that one, the US commander basically followed Pope's script, deploying forward and bashing his head repeatedly against the Confederate defences until he lost. In our game, Mark made no such mistake and had a much better plan, which worked. As for how it played out on-table, the mismatch of experience and expertise between Mark (our canniest player) and Nick (who only plays occasionally) didn't help the Confederate cause.

Victory Conditions Matter. This is a tricky battle to recreate, because it is difficult to replicate Pope's misapprehensions about his supposed numerical superiority and therefore to encourage the Union side to attack as they did historically. On the one hand, you don't want to force players to repeat dumb actions; on the other, if the Union can just sit back and wait to mass superior force, is it really Second Bull Run? Maybe we need to build in some incentive for the Union to try to hurt Jackson early on, be it objectives that only count on Day 1, or some more variability in Confederate deployment (maybe Longstreet gets to turn up at X distance from the Union, rather than having to arrive from the table edge?). This needs further thought.

Dice Matter. It's too easy to blame the dice when the truth is we were beaten primarily because of a good Union plan. I'm sure they evened out over the course of the game (I enjoyed an unlikely victory in Matt's first assault when I rolled a 6 to his 1; he did exactly the same to me later). But those four big US shooting rolls on Turn 3 or so absolutely stymied any initial advantage we had and had significant ramifications. Fortunes of war.

Player Morale. I don't care about winning - it's just losing I can't stand. I could see from quite early on that it was unlikely to go well for us; from halfway, it was obviously a case of fighting to salvage a draw, rather than any chance of victory; and a couple of turns later, I felt we were just going through the motions, performing the last rites. My morale definitely dipped and I was ready to throw in the towel. But even though Nick was in an even worse situation on his wing than I was on mine, he was determined to fight on, put up a spirited defence to the last, and almost managed to hang on. Never say die!

Wednesday, 8 January 2025

The Seven Days Battles (ACW) - all in one evening

My current project is to create and play BBB scenarios for all the biggest battles of the American Civil War. In several cases, I am exploiting the BBB ruleset's elastic scale and making a single scenario cover battles so large in time and space that most conventional rulesets would split them down into several different smaller actions: Chancellorsville, Spotsylvania, Cold Harbor, Petersburg ...

Perhaps the most extreme example is the Seven Days Battles. In an area of some 30 x 15 km, between 26 June and 1 July 1862 (ignoring a preliminary skirmish on 25 June), Robert E. Lee's Confederate Army of Northern Virginia fought four substantial battles against McLellan's Army of the Potomac: Beaver Dam Creek (Mechanicsville); Gaines's Mill; Glendale; and Malvern Hill.

Of course, I could just write conventional scenarios for each of these. No doubt eventually I or another BBB enthusiast will. But I think these are less interesting individually than as episodes of the larger whole, and anyway, I'm sure they've been done that way many times before. I therefore wrote a scenario for the whole Seven Days. Ambitious! But feasible - as we proved this week.

The historical background is the Peninsula Campaign, McLellan's attempt to capture Richmond by advancing NW up the Virginia Peninsula, taking advantage of Union naval superiority. After a couple of months of slow advance involving a few actions of moderate size, the main result of the otherwise inconclusive battle of Fair Oaks (aka Seven Pines) was that the Confederate C-in-C, Johnston, was wounded and replaced by Lee. Within a month, Lee planned and prepared his attack. Leaving a small force under Magruder covering his own right, he massed most of his forces against McLellan's right wing, both attacking it frontally and outflanking it from the north. Over the next few days, the Union army was driven back, forced to switch its line of communications, and eventually gave up and escaped by sea. However, Lee's repeated attempts to envelop and crush it had failed, ending in an especially costly repulse at Malvern Hill.

Our scenario compresses all this into a 6'x3' table and 9 or 10 game turns (originally 12, but that was too many), punctuated by two nominal 'Night Intervals' that are really strategic pauses and resets, given that each turn represents about half a day. You'd think that might work out kinda funky, but in fact it seemed to go pretty much as per the history without feeling silly or 'gamey'. Let me explain with the help of eight photos, followed by some Reflections.

Send a gunboat! This represents USS Mahaska and USS Galena on the James River. Malvern Hill just visible top right of pic. Model from Crispin's collection.

OK, let's get you oriented with a view of (almost) the whole battlefield, looking north. Confederates are on the brighter green bases, left and top of pic. The force top right is Jackson's, poised to fall on the Union right flank and rear. Their ultimate target is the Union line of communications, the rail exit guarded by Union cavalry, centre right edge. Top left is Longstreet, about to assault Beaver Dam Creek. Centre left, Magruder has a thin screen protecting the Confederate LOC rail exit.

The balloon facing Fair Oaks is actually a US balloon, but represents the "Magruder Effect". Historically, Magruder conducted a brilliant deception by generating lots of fake activity for the Union to observe, making himself look much stronger than he was. In game terms, this meant on Turns 1-4 any Union unit trying to move within 9" of Magruder was penalised with a -2 on its movement roll.

Most of the Union forces are in the line, either waiting to fend off the Confederate assaults in the north or to launch their own frontal attack against Magruder in the south. However, the force lower right - IV Corps (Keyes) - is about to execute a swift route march around the Confederate right, into the bottom left corner of the pic, to threaten Magruder's flank and rear.

A closer look at Jackson's force about to cross the Totopotomoy Creek and attack the Union right around Beaver Dam Creek and Gaines's Mill. Figures are Baccus 6mm from Crispin's collection. Roads and rivers by Rob's Scenics.

Now we leap ahead to Turn 5. The game allows Strategic Redeployment during the two Night Intervals. This is also when the Union can choose to switch its LOC exit from the railroad to the James River. That's what has happened here. Despite inflicting historically significant casualties on the Confederates at Beaver Dam Creek and Gaines's Mill, the Union forces have suffered badly themselves, as witness the black puffs on several Union divisions that are now Spent and have been left to fight rearguard actions around Savage's Station (where that happened historically). The Union has formed a new line behind White Oak Creek, in front of Glendale (the blue counter and building centre of left edge) while still attacking Magruder (top of pic). Yet again the Confederates will try to combine frontal assault with envelopment of the Union right (again, rather historical).

Close-up of Jackson's Rebs about to overrun a Union rear guard division.

Lee about to do likewise at Savage's Station and Seven Pines.

Turn 7 and the Confederate assault against the Union line in front of Glendale is in full swing. Top left, a Union division spontaneously fell back before it was hit - a bad movement roll that was actually perhaps the smart move, pre-empting the Confederate envelopment.

Game end: the Confederates have broken through, the retreating Union army is in disarray, the pursing Rebs are rampant and (out of shot, below right of pic) wrapping round the Union right, while JEB Stuart's cavalry menace the James River LOC.


Reflections

Now that's what I call grand tactical. Or maybe 'operational'. I was really happy with how this ambitious scenario worked out. The game moved quickly all across the table (OK, it was only a 6'x3' table), with intense action throughout, and the lines pivoting through more than 90 degrees. We didn't quite get to Malvern Hill, but otherwise, all the historical sub-battles pretty much happened along the way - each only lasting a turn or two. And it did leave the Union players as shell-shocked as McLellan and the Confederates suitably historically jubilant. Operational-scale maneuver but with a tactical tabletop feel. Lovely!

Multi-day actions multiply the fun. Said it before, say it again: games with Night Interval 'resets' so often make the best games as they generate more decisions and more interesting situations. I discussed this at more length in one of my Reflections on Wargaming essays, Changing situations mid-game.

One man's 'grand' is another woman's 'busy'. To me, the opening pic looks grand: a layout like an aerial view of historical terrain, the two armies with battlelines drawn, and 6mm giving that great mass effect. My clubmate Linda wandered over for a chat. She always plays ancient/renaissance tournament games with armies that preferred flat open plains, hence minimal terrain. She said our table looked 'busy' and maybe too confusing for her - but admitted she'd like to join our BBB games for a change ...

Special rules can make a game special. This game has two. One is a provision for units to lose bases in the Night Interval if they are 'Out of Supply' (unable to trace a clean route to their LOC). It didn't come into play directly during the game, but did influence players' maneuvers and the Union decision to switch LOC. The other is the Magruder Effect, which worked very well to protect the weak Confederate right in a plausible way. And it was a good excuse to put a balloon on the table.

Victory Conditions. These have mutated through the development of this scenario (which I first drafted in 2016). I think we'll settle on essentially a typical BBB formula - three objective locations along the battleline (Gaines's Mill, Fair Oaks, Glendale) plus LOC objectives - but with a twist: rather than all being calculated at game end, the Union will earn objectives by holding them until a given game turn. That should give the right incentives, give the Union some big decisions to make about when to fall back, plus make for an interesting decision for the Union about if/when to switch LOC. And BBB games should be all about making interesting decisions.


Saturday, 14 December 2024

ACW battlefields between Nashville and Atlanta

Last month I spent a fascinating five days visiting six American Civil War battlefields between Nashville and Atlanta. I'm reporting on these, not so much to tell you all about what's there - you can find all that on the web (after all, that's what I did) - but to show how much there is to see on that 250-mile corridor and how feasible it is to see it. Hopefully that will encourage some of you to make similar trips and get as much out of them as I did from mine.

Step 1 was to fly to Atlanta - a hub airport, hence well served and relatively easy to get to from inside or outside the US.

Step 2: a 4-hour drive from Atlanta to Franklin (just SW of Nashville), doglegging west via Huntsville AL to avoid retracing our steps and to see some different scenery.

The advantage of that route was that we got to visit the US Space & Rocket Center in Huntsville on the way. What a magnificent place! A Saturn V, a training Space Shuttle, a bit of Skylab, moon rock, untold rockets both military and peaceful exploratory, a planetarium, tons of other stuff, all in a fabulous facility ... a real bonus.

Step 3: right, now for the battlefields. The war yo-yo'd up and down along this corridor, so the sequence I visited them in didn't match their historical chronology. Even so, it really helped me to join the dots and understand the battles in their campaign context and in relation to each other, rather than just as isolated events on a 6'x4' tabletop. The six in question, with the driving distances between them, were these:

#1: Franklin

#2: Stones River (about 40 minutes east of Franklin, SE of Nashville).

#3: Chickamauga (on the southern outskirts of Chattanooga, about 2 hours from Franklin/Nashville)

#4: Chattanooga (Lookout Mountain and Missionary Ridge), in Chattanooga itself.

#5: Resaca (an hour from Chattanooga, halfway along the 2-hour drive from Chattanooga to Kennesaw Mountain).

#6: Kennesaw Mountain (an hour beyond Resaca, NW of Atlanta).

All were big battles, among the largest 30 of the whole war, involving at least 30,000 or so men on each side (hence qualifying for "Bloody Big BATTLES!" scenarios - of which #2, 3 and 4 are already done).

The dozen photos that follow are not intended as any kind of comprehensive illustration, but just as a few snapshots annotated with pertinent comments/summaries, to interest or amuse and give a little flavour, rather than to exhaustively inform.

Battlefield #1: Franklin, Tennessee (30 November 1864)

Franklin has been called the "Pickett's Charge of the West", complete with its own highwater mark. After Sherman took Atlanta, rather than counterattacking directly, Confederate general John Bell Hood moved against Sherman's line of communications. He almost managed to catch the Union forces divided and defeat them in detail, but missed the opportunity. Frustrated, he launched a massed frontal assault against the Union army that was now concentrated and entrenched around Franklin. It resulted in a bloody repulse that wrecked his army.

Much of the battlefield is now covered by urban development but, remarkably, the heart of it has actually been reclaimed - two fast-food restaurants and some residential buildings bulldozed and turned into battlefield park, with plans to expand it. The Battle of Franklin Trust maintains three historic buildings, of which the Carter House at the centre of the Union line is the most important and hosts the museum of the battle. I signed up for a battlefield tour and had the privilege of a knowledgeable and enthusiastic guide to myself for 90 minutes. (And I believe he appreciated having a relatively knowledgeable visitor to discuss the battle with.) His punchline was to tell me about General Douglas MacArthur's pa, Arthur MacArthur Jr.

One of the thousands of casualties in the battle was this unfortunate Confederate brigadier. Yes, his name really is "States Rights Gist".

The inside of one of the outbuildings at the Carter House, peppered with bulletholes. Confederate marksmanship stands condemned by the fact that all the windowpanes appear to have remained intact.


Battlefield #2: Stones River (31 December 1862 to 2 January 1863).

Now we step back to very early in the war. Braxton Bragg's Confederate army was advancing on Nashville, where Rosecrans was ensconced and being too passive for Lincoln's liking. The President pushed Rosecrans into advancing against Bragg. Thus the armies met at Stones River, both planning to attack, but the Confederates beat the Union to the punch. The Confederate assault drove the Union forces back but a stand by Sheridan averted total disaster on the first day. A renewed assault on 2 January ran into a devastating Union gun line. Bragg had lost and was forced to withdraw.

The battlefield has a very good Visitor Center, from which you can then use the National Park Service app to follow a self-driving tour by car, stopping at various points to listen to an account of what happened there.

The local geology creates some unusual terrain. This is the so-called 'Slaughter Pen' where Sheridan's men put up their tough fight.


Two hours' drive from Franklin/Nashville is Chattanooga. The Chickamauga battlefield is a little way south of town. This is the battle I was most familiar with beforehand, as it is one of my favourite ACW scenarios and I have played or reffed it several times. It was also the first ACW battlefield to be designated a national military park in 1890. Hence it is really well preserved and dotted with 700 or so monuments and markers on its miles and miles of roads and trails through the woods.

Since Stones River, Rosecrans had first maneuvered Bragg back towards Chattanooga and then forced him out of this crucial junction of multiple rail and river lines. However, in doing so through outflanking maneuvers, Rosecrans left his army divided and vulnerable to counterattack. Bragg seized this opportunity and tried to fall on the US XXI Corps, but delaying actions enabled the Union forces to concentrate. Nevertheless, half the Union army was routed. This time it was General Thomas (the 'Rock of Chickamauga') who made a stand so that the Union army could retreat into Chattanooga, where it dug in. Thus, although it was a tactical victory for the Confederacy, it was a strategic failure.

Like Stones River, Chickamauga has a very fine visitor center and museum. First we did a 1-hour driving tour with a guide, then a longer self-driving tour to see the rest of the battlefield. (It also has what we Brits might call "toilets", but what the more refined and genteel folk who run the park have christened the "comfort pavilion". This term has now entered regular use in our household.)

The Chickamauga Creek at Alexander's Bridge, where Wilder's "Lightning Brigade" armed with repeating rifles held up the Rebs for vital hours. It's not a huge river but you can see it has pretty steep banks.


Battlefield #4: Chattanooga (Lookout Mountain and Missionary Ridge) (24 & 25 November 1863)

After Chickamauga, Bragg settled down to besiege Rosecrans in Chattanooga. The town and railroads were on the south side of the Tennessee River, and Confederate batteries commanded the river, so the Union Army of the Cumberland was in a tricky situation for a while. However, help was at hand. Rosecrans was removed, replaced by Thomas. A relief column under Hooker arrived, followed by more reinforcements. The Union forces now significantly outnumbered Bragg's. First Hooker stormed Lookout Mountain on the Confederate left flank. The next day, he combined with Thomas to storm the main Confederate position along Missionary Ridge.

"Point Park" on Lookout Mountain is well preserved, small and walkable

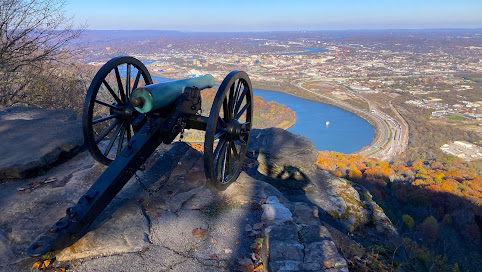
Dramatic view of Chattanooga from Confederate battery position on Lookout Mountain. It's high and steep (actual cliffs in some places) - so steep that the Confederate guns had trouble depressing enough to fire on the Union soldiers climbing up the slopes.


Triumphant Illinois monument at the location of Bragg's HQ on the centre of Missionary Ridge. This is where the third Union assault succeeded, after assaults at either end had failed.

Missionary Ridge is looong - about 6 miles. Most of it is covered with expensive hilltop homes, so touring the battlefield means driving along a winding road with a 20mph speed limit and lots of speed bumps (but no ditches or abattis, at least). On the plus side, it is punctuated with lots of information panels like those in the photo above, noting which regiments were where, etc. This pic is from the Sherman Reservation, a park at the northern end of the ridge.


Battlefield #5: Resaca (13-15 May 1864)

After Chattanooga, Bragg was replaced by Johnston, while Sherman took command over the three Union armies now there and began to advance on Atlanta. With his superior numbers, he was able to maneuver Johnston out of successive positions by outflanking him. Resaca was an exception where Sherman launched frontal attacks against an entrenched Confederate position. These attacks bounced off and it took yet another outflanking move to make Johnston withdraw.

As a grand tactical engagement, Resaca is not especially interesting, but it was the size of Gettysburg in terms of numbers engaged (albeit not as bloody or pivotal). People happily wargame much duller battles. It therefore puzzles me why it seems so entirely absent from our wargaming consciousness - leastways, I hadn't really heard of it much before, and searching my usual wargaming forum haunts found virtually no mention of it.

The battlefield itself is more a nature trail than a battlefield park. In fairness, I only had time for a brief walk along a portion of the line (no driving tour here) so I may have missed some interesting features. Still, I got some sense of the ground.


A view along the trail that I think marks where the Confederate trenches were, along the lower slopes of the ridge. Not really a right angle in the line, just an artifact of my poor attempt at a panoramic shot. 


This gives a typical view from the Confederate lines, showing what the Union troops had to cross when they emerged from the woods on the opposite ridge: a flat, open valley bottom, with a creek winding through it just to add to their difficulties (though at this particular spot, apparently, it provided excellent cover once their attack stalled).


Battlefield #6: Kennesaw Mountain (27 June 1864)

One of the last in the series of Confederate positions delaying Sherman's march to Atlanta. Again, the Confederates were strongly entrenched. Feint attacks against each end were followed by a main assault in the center. Again, the assaults were repulsed; again, it was a subsequent wider outflanking move that forced the Confederate army out of the position; again, much like Resaca, this is a battle nearly as large as Gettysburg, yet one we rarely hear about.

Unlike Resaca, Kennesaw Mountain has a good visitor center and museum and another NPS self-driving tour.

The highlight of the day was not the battlefield itself but the fact that I finally got to meet my longtime online friend and collaborator, Konstantinos Travlos, of "Leadhead, PhD" fame and author of "Bloody Big Balkan Battles!". (This was eight years later than we originally planned: I was going to visit him in Istanbul in 2016, but had to cancel my trip because of an attempted coup.) We rendezvoused at the Basecamp restaurant, where we had a very pleasant lunch together with his lovely family, then toured the battlefield together.


The man himself! Konstantinos manning a Confederate gun. These two were camouflaged and defending a ravine that seemed a likely approach into their lines - so it proved, and they did a deadly job, pinning down the Union attackers.

A Union attacker's-eye view, showing the scale of the earthworks in which the Confederates were entrenched.


Battlefields I didn't visit

There were also major battles just outside Nashville and Atlanta themselves, and at Peachtree Creek (now in the outskirts of Atlanta). These battlefields have all been lost to urbanisation. There are quite a few monuments, isolated redoubts, etc, dotted around them, though, for anyone with more time and inclination than I had. There were also numerous other smaller battles that fall below my BBB horizon but are not without interest.

In summary, this part of the world is easily accessible and is rich in Civil War history for those of us who like that sort of thing. If that includes you and you haven't been there yet, I encourage you to go.


PS - Oops, nearly forgot - Stone Mountain carvings

Something you may or may not want to add to your trip: Stone Mountain, kind of the Confederate version of Mount Rushmore. Just east of Atlanta, in the middle of Stone Mountain Park, is a massive mountain with a huge bas-relief of Confederate generals and soldiers carved into its side. Follow the link above and you'll see better pictures than I was able to take. We'd had clear sunny weather all trip, but the day we visited Stone Mountain it was shrouded in mist. My only pics are the not very good ones below. I didn't manage to capture the eerie moment when the veil parted briefly enough for Bobby Lee and his lieutenants to look critically down at me. Maybe that was better than a clear sunny day, in a way.


A terraced lawn slopes gently down to a reflecting pool at the base of the sheer mountainside. There is a mountain somewhere behind that cloud.

I took this one to try and give an idea of the scale. Left upper edge you can see cables above the treetops disappearing into the mist. Those belong to the cablecar that rides to the summit. (No, I didn't bother, there didn't seem much point in seeing the mist from a different angle.)

And finally, from next to the reflecting pool. You can make out the outline of the lower half of the great oval carving.