Thursday 12 October 2023

Kassassin & Tel-el-Kebir (1882) as a single scenario

After last week's excursion among the sun-kissed vineyards of northern Hungary, this week we were transported to the sun-baked sands of northern Egypt. As part of the "Bloody Big AFRICAN Battles!" project, we playtested Mark's scenario for Tel-el-Kebir (1882), the major action during the British conquest of Egypt.

Tel-el-Kebir on its own is not very exciting as a situation to wargame: a frontal assault on a simple line of entrenchments that was over in an hour after a rather one-sided fight. (See my post here on whether frontally assaulting redoubts can make a good game.) Mark's creative solution was to combine it with the preceding action at Kassassin. This entailed some compression of both time and space: Kassassin should really be another four feet away from the entrenchments, rather than on the table edge; and the 'Night Interval' between the two actions is actually the fortnight between 28 August and 13 September 1882. This compression did not create any distortion or other problem and produced a scenario in which both sides get to do some maneuvering and have some genuine decisions to make.

Herewith a brief photo-AAR followed by some reflections:

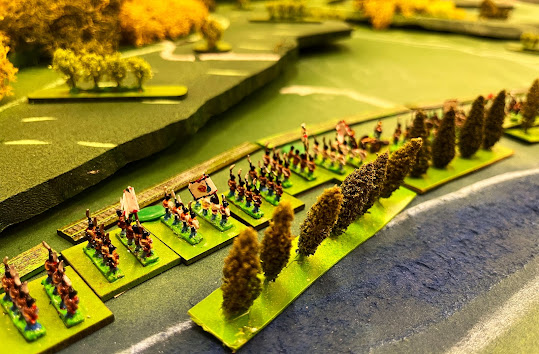
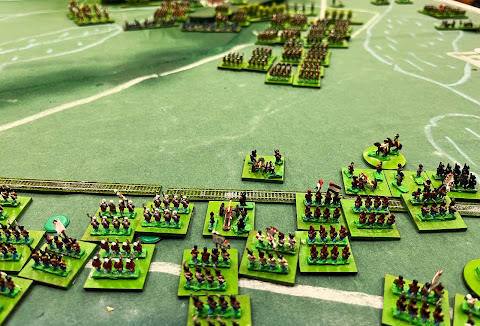
It really was a very pretty table. Proper sand-coloured cloth, sandy hills, sand-embanked railway, exquisite palm trees, and a tidy British tent encampment in the foreground. The loco is pushing a flatcar-mounted 40-pdr gun. The British 2nd and 4th Brigades are all that stands between the 15,000 Egyptians debouching from their entrenchments (top of pic) and the British camp and the village of Kassassin (lower left). If either of these two objectives is taken, however briefly, the Egyptians earn a victory point - in effect, establishing a 'highwater mark'.

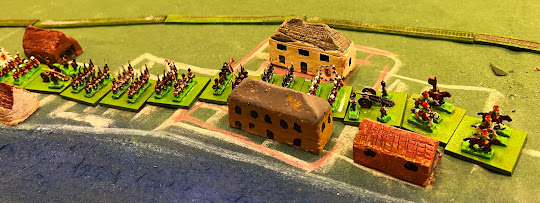
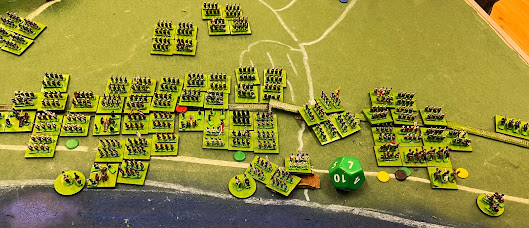
The open sandy plain on the British right. A small Egyptian force threatens from top right, opposed by British guns bottom left. Just visible at top of pic, to the left of the QR sheet, is pale felt representing the soft sand ('Difficult Terrain') protecting the Egyptian lines' left flank.

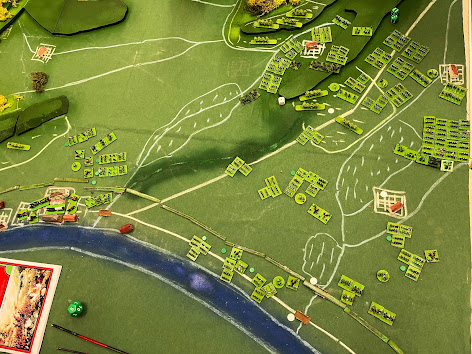
The Egyptian assault inflicted casualties (you can see both British 3-base infantry units are now reduced to 2-base) and came close to breaking through and taking the camp. However, the thin red line held firm long enough for the Household Cavalry to come to the rescue (upper right), to be followed on Turn 3 by the Guards Brigade. Egyptian losses were heavier (blue cube indicates a Spent unit; another brigade was wiped out entirely). The scenario gives the Egyptian player the option of pressing his attack for 4 turns rather than 3, which has two advantages: it not only gives another bite at the cherry to take the camp or Kassassin, it also means the British player will have one turn less when it comes to assaulting the entrenchments. However, Mark opted not to take the extra turn, preferring to have his troops spend it defending entrenchments rather than being ridden down by Horse Guards in the open.

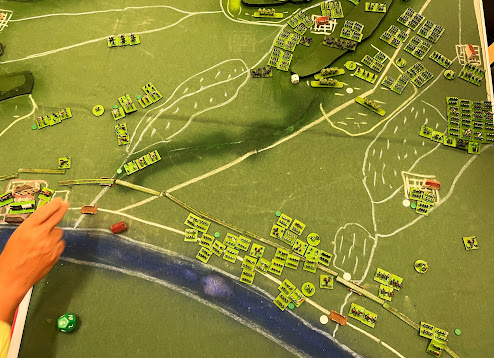
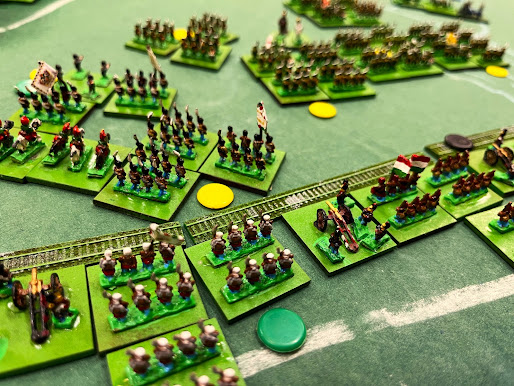
Cavalry action on the British right. I sent the Indian cavalry brigade (top left of pic) through the gap between the two advancing Egyptian contingents and then wheeled it right to take on its Egyptian counterparts (right foreground). This put it in a crossfire from Egyptian guns, not to mention an infantry brigade. Fortunately, my enfilading artillery helped to wipe out the infantry. Still, I was lucky not to lose the Indian horse entirely. Don't give me cavalry to command, I clearly don't know how to use them.

I only took photos of the first third of the game, so apologies that you will have to make do with my 1,000 words to paint a picture of the rest of it. Having repulsed the Egyptians from Kassassin, I needed to take 5 of the 9 remaining objectives to win. Two of these were villages among the palm groves and farms south of the canal (top left in first pic), the other seven being redoubts dotted among the entrenchments (all marked by white counters in first pic). In the Night Interval, my troops set up in the historical deployment for the assault on Tel-el-Kebir: Indian brigade on my left south of the canal; Highland Bde and 4th Bde north of it; a grand battery in the centre; 2nd Bde and Guards Bde on the right; Cavalry Division on the right flank.

Honestly, I found the prospect of assaulting the Egyptian fortifications daunting. Most of the Egyptian troops had modern breechloading rifles, with long effective range and deadly short range; they also had a lot of Krupp breechloading cannon, which are no fun to assault frontally. I was especially concerned about the risk to my cavalry (the BBB rules make them a more vulnerable target than infantry) so I fannied about trying to hide them initially, rather than using them to outflank or assault.

Still, I got stuck in eventually. On the left, the Indians took one objective village but ran out of time to reach the second. Next along, the Highlanders and 4th Bde took a long time to storm one objective redoubt, so although they then had another at their mercy, they only had one turn left to take it and failed the movement roll to do so. On my right, the Guards and the Household Cavalry broke in and took one redoubt; the HC were so successful they had a compulsory exploit that actually put them in a position where they had a chance at taking another redoubt in the second line of entrenchments, but didn't quite manage it; redoubts to right and left of the Guards' incursion were at risk on the last turn, but all my three units in range failed to get the necessary movement rolls.

Thus, I took 3 objectives, and had chances at 5 others on the last turn. As none of these came off, I was left with a defeat, but it was by no means a crushing one-sided one, as victory had been very much a possibility until those last few dice. It was a thoroughly entertaining game and should go down well when Mark takes it to the club.


Reflections:

Too much artillery. The typical BBB figure ratios are either 1,000 men / 24 guns per base or 1,500 men / 36 guns per base. For this scenario, Mark had used 500 men / 6 guns per base. That meant artillery was 100% overrepresented - no wonder I was daunted! It evened out to some extent, of course, because the British have plenty of artillery too, but it advantaged the Egyptians more because their guns were in fortifications and we had to approach in short range of them. Fixing the gun ratio shouldn't change the game balance radically but should make it a shade easier for the British to storm the redoubts they need to take.

Characterful units: it's always fun to be able to point out the Highlanders or the Guards. On the British side, Indian troops and the railway gun added further colour. On the Egyptian side, at one end of the scale were the Sudanese veterans - hardcore! - and at the other, a rabble of fellahin conscripts and Bedouin bashi-bazouks.

Scenario design: the concept of combining Kassassin and Tel-el-Kebir in a single game absolutely worked and made it far more interesting than the simple assault would have been. Punctuating games with a Night Interval always seems to have that effect, providing a significant pivot point that entails significant decisions before and during it and gives different aspects to the game.

Cavalry: nope, still don't really know how to use 'em. Any advice? Maybe we should dispense with the wretched nags and replace them with some kind of armoured landship powered by the new-fangled engines those German fellows invented in the 1870s.


Tuesday 10 October 2023

The Value of Playing "What-Ifs"

I don't usually do "what-ifs". By that I mean, my staple fare is straight recreations of historical battles, in which forces have to start deployed broadly where they did historically and both sides are trying to achieve the objectives they were aiming for historically. The purpose of these (apart from providing a few hours' entertainment, obviously) is to let players explore various plans as different possible routes to victory - cracking tactical puzzles, if you like.

Occasionally, though, in the historical scenarios I write I might provide for some not too remote alternative possibility, such as the Russians at the Alma choosing to present a flank threat rather than a direct blocking position.

This week we explored a quite radical alternative. The scenario in question is the Second Battle of Vác (1849) from the Hungarian War of Independence, as found in the "Bloody Big Hungary '48 Battles!" scenario book. The standard historical scenario is an unusual and interesting one to start with, as it is an initial advance guard action followed by a fighting withdrawal. I did the straight refight back in January 2022 (in-depth report with lots of gorgeous photos here). The scenario provides an option that assumes the Hungarian C-in-C, Görgei, chooses the bold course of attempting to break through the Russian army that has intercepted him, rather than withdrawing to find another way around it as he did historically.

The following photos show how that went, with some reflections at the end.

'Der Donau ist blau.' The Hungarians start with an advance guard and two corps on table with a third due later. Here Leiningen's III Cps conducts its forced march along the Danube ...

... preceded by Nagysándor's I Cps, seen here marching through the town of Vác. Behind it is the railway embankment for Hungary's very own HS2. (At this time, the Hungarian rail network consisted of one line from Budapest southeast to Szolnok and another from Budapest north to Vác. The leg to Pressburg aka Bratislava was under construction.) Out of shot to the right is the Hungarian advance guard. This spent the first four turns driving back the Russian advance guard and making space for I Cps to push down the road to the south.

OMG that's a lot of Russians ... after the advance guard action, the scenario provides a Night Interval, a lull for everyone to have a rest after their forced marching and deploy for the next day's withdrawal or breakthrough attempt, as applicable. The Russians can deploy anywhere >6" from the Hungarians and south of the Csörög stream. Here you see about 50,000 men poised to crush the reckless Magyars, with a formidable gun line already deployed lower right. Only two of the units in shot are Hungarian: one in the bottom left corner and the other above that in the edge of the vineyard.

Plan view gives the full picture. The Hungarians are trying to push from left to bottom right. Victory depends on how wide a gap they can maintain at game end, as measured by how many of the four white counters they hold (the two bridges and the village of Sződ at lower right, and the vineyard above that). Russians are all in the upper right quarter. Hungarian I and III Cps are facing them, lower right. Pöltenberg's VII Cps has arrived around Vác (left centre) and will try to put pressure on the Russian right flank.

Most of I and III Cps immediately falls back to try to defend the line of the railway embankment, apart from one brigade that advances to occupy Sződ. VII Cps pushes forward on the Hungarian left. 

A view from behind the railway embankment before the Russian hordes arrive there.

Turn 7 of 12. The solitary forward Hungarian brigade in Sződ has been demolished. Initial Russian assault on the Hungarian extreme right has been rebuffed, but worse is about to come.

Russian highwater mark - eight regiments assault the embankment.

Plan view, end of Turn 7 or 8. Russians continue to press forward bottom right but have been repulsed in the centre. Centre of pic, two Hungarian brigades and some hussars have crossed the embankment to attack the right flank of the massed Russian assault. Upper left, VII Cps and the Russians facing it find themselves in a stand-off.

Close-up of the Hungarian counterattack against the repulsed Russians. Their blurred images betray just how shaken those Russians are.

Unusually, we ended the game a couple of turns early because several of the guys had to leave a bit early. The rest of us could have finished it but we were happy to call it a draw. The Russian hordes had suffered enough infantry losses that they would have struggled to press another assault home, but they probably had enough guns to prevent the Hungarian counter-attack from carrying too far either.


The Hungarian army's historical withdrawal was seriously impeded by a column of thousands of refugees following it. Here we see the refugee column milling around and blocking movement through Vác. Even if the Hungarian army itself does break through the Russians, this tail of unfortunates is likely to be left at the mercy of Russian Cossacks and Caucasus Muslim cavalry.

Reflections:

An Illuminating 'What-If'. Görgei is widely regarded as Hungary's best general of the war. I think it fair to say that this what-if game confirmed the wisdom of his actual decision in this case. His historical withdrawal took his army into hilly country that aided rearguard actions to delay pursuit and made it difficult for the Russians to bring their superior numbers to bear; he was able to send his baggage and ammunition trains away first and give them a head start; the Russians were unsure about exactly where he was heading; his army escaped virtually intact (and then dodged behind and through the Russians, leading them on a merry dance for weeks). By contrast, our attempt to break through showed that it would have been pretty disastrous. Even if victorious, his army would have been mauled; it would then have had to march across open country, harassed by Russian light cavalry and Cossacks; it would probably have lost much of its supply train. No doubt I could have worked that out as the likely result beforehand, just as Görgei evidently did, but it was still highly instructive to see it play out on the table.

Shock and Awe: it's one thing to read (or indeed write) a scenario, and another to see the troops deployed. Once the Russian army appeared in full force after the Night Interval, we were all a bit gobsmacked - especially those of us on the Hungarian side tasked with fending it off. It goes to show that small figures can still make a big impression. 6mm is good for mass effect.

Quality vs Quantity: Görgei's army was a pretty well oiled machine at this stage, whereas the Russian one was a mighty but unsubtle steamroller. The Russians had also been ravaged by cholera, which killed more Russians than the Hungarians did in this war. The scenario therefore gives the Hungarians a quality advantage overall. By the time we stopped, this seemed to be on the way to compensating for Russian numerical superiority.

What is a 'What-If'? It's a bit of a stretch to claim this post as a genuine 'Reflection on Wargaming'. Really it's one battle report that prompted one particular thought that I've tried to expand on. I suppose I can expand on it a bit more by saying every game is a what-if to some degree (unless it is not a game at all but simply an exercise in pushing figures along courses utterly pre-determined by history, without any player choices or chance to deviate from that history). My typical historical recreations start the 'what-if' around the point at which historical opposing armies deployed for a historical battle, with their historical objectives and orders of battle, and explore how different plans might have worked out. The alternative version of Vác that I've reported here just changes the Hungarian C-in-C's aim - the mission, if you like - and explores a more radical strategic plan rather than grand tactical ones. A next step away from the historical event would be to have those same armies meet on a different battlefield, perhaps imagining a breakthrough attempt at a slightly different location; the step after that, to put historical opponents on some imaginary battlefield, tournament-style; beyond that, we get into competition-style games pitting ahistorical opponents against each other in battles that never happened, on terrain that didn't exist, in wars that were never fought. Which step of that progression we prefer depends on which 'what-if' question we want answered.

And finally: Thanks to Crispin for creating the custom battlemat, painting the armies and laying on the game.

For the full list of my (mostly rather more extensive and considered) 'Reflections on Wargaming' essays, see here.