Monday 21 August 2023

From 2mm to 28mm, Malplaquet to Spion Kop, FB to YouTube!

It has been a bumper weekend, not for playing, but for observing the creativity and enthusiasm of other BBB players. In the space of a couple of days I saw reports from four different players on games covering four different conflicts spanning 200 years, using 2mm, 6mm and 28mm figures and terrain, and disseminated via Facebook, blogs, and even a YouTube video. Here they are:


Malplaquet (1709)

Matt Bradley has written and played a scenario for this, the last of Marlborough's 'Big Four'. On his 'Pushing Tin' blog you can see Matt's beautiful 6mm layout.


Dennewitz (1813)

This was David Lopez's first go at BBB and I'm pleased to see he says "really enjoyed the rules". He shared a nice set of photos on the BBB Facebook page. He used 6mm armies with 2mm terrain, including a lovely town and some convincingly forested forests.


Hatchie Bridge (1862)

Another Facebook report, this time from Michael Peccolo. He ran his own Hatchie Bridge scenario at Nashcon. Most BBB players use small-scale figures to fight large-scale battles. Michael used large 28mm figures to fight this small division-sized action. It looks good and it works!


Spion Kop (1900)

Finally, some Boer War action. Eric Elder has cut custom hills to reproduce the Spion Kop scenario battlefield faithfully. You can see his YouTube video about it here. Looking forward to the episode where he fights the battle!


I was actually a bit stunned to see all of these in rapid succession. I was struck by the quantity, the quality, and the range of games, figures and terrain on display. Each of them seems to me to meet the criteria I listed in my essay about the 'High Quality Gaming Experience' (one of my series of 'Reflections on Wargaming'). Those criteria are: The Terrain, The Troops, The Venue, The Rules, The Scenario, The Company. The terrain and troops all look great. Venue-wise, whether basement or garden room or gaming convention, all good. Naturally, I cannot praise the choice of ruleset highly enough. OK, I can't absolutely vouch for the scenarios as I've only played one of them, but it sounds as though they produced entertaining games; nor can I comment with any authority on the company, as I wasn't there to judge, but I'm sure all present were estimable characters and gallant gaming companions.

My compliments to Matt, David, Michael and Eric on their good work and my thanks to them for sharing it with us all.


Wednesday 9 August 2023

Beaten up at Beaumont (FPW 1870)

So often, my AARs finish by saying something like, "so after a nailbiting climax that could have gone either way, with multiple objectives contested on the final turn until the last throw of the dice, it ended as a classic BBB draw". Not so this week!

Crispin offered us one of the Franco-Prussian War scenarios from the BBB rulebook: Beaumont. This is a fighting withdrawal, one of the more interesting situations to wargame and one that doesn't find its way onto our tables often enough, but a tricky one to pitch the victory conditions just right. At Beaumont, a French corps gets caught and mauled by the advancing Germans as it is about to try to move away from them across the Meuse. The BBB scenario actually makes the situation more interesting by including additional forces further west, where another French corps ended up being forced apart from the others.

Dave and I took the part of Failly (French 5th Corps) and Douay (7th Corps) respectively, while Matt took the Bavarians and German V Korps, leaving John with IV Korps and the Saxons.

The French deploy first. They have one important decision to make immediately: whether to deploy part of 5 Cps forward in Beausejour (forcing IV Kps to start further back) or hold it all further north in and behind Beaumont. We opted for the forward deployment. As it turned out, that may have been an error. The captioned pictures below illustrate why. (Skip past them if you can't wait to read my perceptive, witty and erudite reflections and resulting profound insights arising from the game. If they disappoint you, you can ask for your money back.)

The battlefield, looking east. French 5 Cps top right facing Germans in the woods. French 7 Cps bottom right, most of it out of shot bottom right corner. We need to traverse the whole table and get across the Meuse to join 12 Cps at Mouzon, top left. This is made more difficult by the terrain. Brownish areas are hills; pinkish edges indicate steep slopes. Green chalked areas are woods. Unfortunately, after going to all the trouble of making this custom mat, Crispin forgot to bring his trees.


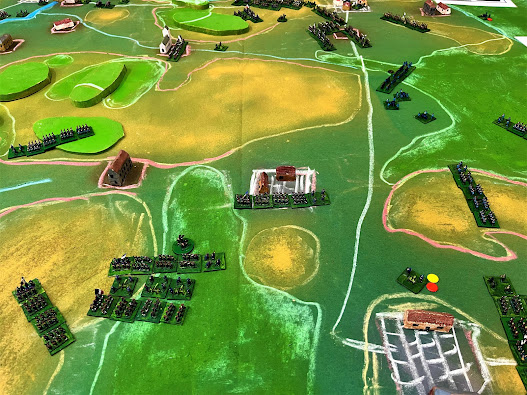
A better view of my command. Most of it is forced to set up having responded to the Germans' proximity by instinctively deploying to fight them off. First order of business will be to get it back into march columns. Top right can be seen the two brigades of 5 Cps that we pushed forward into Beausejour and onto the hill next to it. 


Two brigades of Bavarians start the game in the woods between 5 and 7 Cps. These would swiftly push into the gap between our French formations and make life extremely difficult for 7 Cps.

End of Turn 1. Both Bavarian brigades have reached the edge of the woods, top centre, with another two following them. No such slick efficiency on the French side: my lead column failed to move at all, blocking the road, while all my artillery managed half-moves only. This was rather crucial - I really needed to get something, anything, deployed around La Besace (the town left center) to screen the rest of my troops marching towards Mouzon.

End of Turn 4 or 5, I think, and the battle has moved on. Top centre: 5 Cps has lost its two forward units and been kicked out of Beaumont, overwhelmed by German numbers, while Saxon reinforcements from top right are arriving on its left flank. That solitary unit left centre of pic is not an escaping French division, unfortunately, but the lead Bavarian brigade barring our way. I now have a division in La Besace (centre of pic), but too late to be useful. Three brigades and my artillery have made it through the large wood but still have a long way to go. My other brigade has disappeared, as German V Kps (bottom right) caught the tail of my column and chewed it off.

A closer look at the ominously tight-packed and well-drilled assault columns of V Kps, with batteries of Krupps rumbling up behind them.

And a close-up of their prey, my 7 Cps columns desperately sweating up hill and down dale to escape.


Turn 6 or 7. One of my units is winning the firefight against the lead Bavarian brigade, but that has done its job by forcing my columns to detour so far that it is doubtful whether they can reach the bridges in time. My unit stuck in La Besace (top right) seems doomed to fight a rearguard action that it will not survive.

Game end. Dave got some of his 5 Cps artillery away but none his infantry escaped. This shot shows the only unit of mine to reach the bridge, about to be shot up badly by Prussian needleguns as it crosses. We fell a little short of our victory target: we needed to extract five infantry units and three artillery for a draw, or six and four to win. Dave got enough guns away, but one solitary infantry unit was all we managed between us. Hence we were utterly trounced.


Reflections:

Is the Scenario Balanced? When you lose a game as badly as we did, you can't help wondering whether the scenario is skewed against you. The French have 10 infantry units south of the Meuse, of which five or six have to escape, so they can only afford to lose/leave four or five at most. They are also handicapped by being Passive. Did we have an impossible task?

Well, maybe not. From looking at the report in the BBB group files of our epic campaign in which we fought all 9 battles in a 3-day weekend, I see that although Beaumont was a German victory then too, it was a lot closer - the French actually got enough infantry off the table and were unlucky not to get the guns away too.

 In this week's game, a few things all went wrong straight away. In some game situations, a run of bad dice early on can be made up for by good ones later. In a fighting withdrawal like Beaumont, it can harder for the withdrawing side to recover from initial setbacks - once you're caught, you really have to stop and fight; if someone gets in your way to start with, getting through or past them becomes so much more difficult.

In our case, (a) we committed troops forward instead of sitting back to exploit the longer range of our massed chassepots; (b) all the crucial units at the head of my column failed to get enough movement to cover the rest; and (c) Matt's Bavarians then got the good rolls they needed to get in my way. From there it just cascaded bad to worse. I think it fair to say that, on my side of the pitch at least, it was compounded by Matt rolling plenty of deadly high firing dice, while mine were consistently ordinary.

Regardless, the boys are keen to roll this one out again in the near future, so maybe we'll find that it can go very differently with a few different dice (and better French plans).

Does Scenario Balance Matter? Even if the scenario is skewed and we were doomed from the start - how much does it matter? We all had fun and kept smiling (even if the smiles were wry ones as Matt rolled another 11 to kill off my chasseurs, or as one of my columns yet again refused to demonstrate any sense of urgency and stopped for coffee and croissants in the woods). We're not tournament gamers, so it's about the journey, not the destination.

All true, but still, the journey is more exciting when it's not so obvious where you're going to end up. I enjoyed the game but I'm sure I'd have enjoyed it more if we'd still had a chance of getting enough troops away towards the end. That makes it a qualified 'yes', in that a balanced scenario where both sides have a decent chance of winning isn't essential but does add to the game. (Though I note again - I'm not saying Beaumont definitely isn't balanced.)

Possible tweaks. Historically, the French ended up divided on both sides of the Meuse and headed downriver to Sedan. Perhaps rather than just having to try to cross the Meuse, 7 Cps should be allowed an alternate (nearer, historical) escape route, say anywhere within 6"-12" of the NW corner of the board. Units getting off there might count half as much as if they cross the Meuse. It's always good to have more than one way of winning. Another simple tweak would be just to remove the French 'Passive' rating.


Wednesday 2 August 2023

We oohed 'n' aahed at Oudenarde

Having entertained us royally last year with his recreations of  Blenheim and Ramillies, Matt moved on to offer us Marlborough's third big battle of the War of the Spanish Succession: Oudenarde (1708).

Oudenarde is an exception to the conventional 18th-century simple line-out, being that rare thing, a genuine meeting engagement. Both armies are in motion, the French marching to seize the small fortress of Oudenarde and its bridges over the Scheldt, the allies racing to intercept them. Hence, only the two sides' small advance guards start the game on table, the main bodies having to march on over the first several turns.

Seven photos and captions tell the story of the game, followed by the usual post-battle reflections (and a link to the scenario).

Matt's games are always works of art. Here we see the fortress of Oudenarde. It played no direct part in the historical battle, nor in our game, but it does make a beautiful table ornament.


I commanded the French advance guard, seen here on parade before deploying: two Swiss brigades and some old-style caracoling cavalry. My role would be brief and inglorious. Admire Matt's handiwork - not only the beautifully painted troops but also the nice printed labels and a French royal banner to mark a French-held objective.


The enemy arrives! The allied advance guard has already raced off to the west. Here the allied right wing under Prince Eugene debouches through Oudenarde. It will follow the advance guard (and in doing so become the left wing).


My force concentrates in one of the village objectives, Eyne. 18th-century maneuver is slow and laborious, so it will take me another two turns to cross the stream in front of Eyne and take a second objective (Schaerken), despite being entirely unopposed. 


The whole battlefield, end of Turn 1 before the battle lines have formed. Essentially the battle will be fought up the middle of the table, from Eyne (foreground) through Schaerken, the high ground beyond, the orchards and farms surrounding that, and in front of Oycke (top left). Allied advance guard is in and approaching Oycke; the first of the French main body arriving from upper right. 


Several turns later and battle is well and truly joined. As massed allied infantry finally started to pay attention to my side of the battlefield, I launched a couple of spoiling moves. First my cavalry sallied forward into a gap in the allied line. The allied infantry responded by diverting left to drive them off. That exposed a flank, so I boldly pushed a Swiss brigade out of Eyne to enfilade them. Two volleys @ 42% chance failed to register any effect at all. By contrast, both large allied brigades then got the movement dice they needed to able to turn, assault and crush the Swiss. After that, they turned their attention to my remaining troops in Schaerken. Pic shows the ensuing assault, maneuver dice again favoring the allies. Top of pic, both sides' lines are forming up and preparing to contest Oycke.


Close-up of the assault on Schaerken. Yet another Swiss volley misfired, so the overwhelming allied numbers closed in, wiped out my second Swiss brigade and chased out the cavalry. That effectively ended my part in the game, so I'll have to summarise without further pics. Meanwhile, another chance to admire Matt's craftsmanship. Note how important it is to paint the lace on 6mm tricornes - very helpful to tell which way a unit is facing.

The conquerors of Schaerken turned their attention to Eyne and pushed Crispin's French out of there as well. However, he brought up more troops, including elite guard cavalry in the centre, counterattacked Eyne unsuccessfully, but retook Schaerken, where he fended off allied counterattacks in turn.

In the western half of the table, Dave's French maintained pressure on Oycke, could not take it, but obviated any allied attempt to take the central hill or interfere with Crispin's attack on Schaerken.

Thus, another seesaw game with objectives taken and retaken and several contested on the last turn. It ended, as so often, as an exciting and hard-fought draw.

My own early elimination from the game was fortuitous, as it freed me up to chat with a visitor from Yorkshire, Paul, who was checking out OWS for an Oxford friend. We had a good old natter but it does mean readers must forgive me for not taking more photos.


Reflections:

C18 maneuver constraints again. After both our previous WSS games I commented on how Matt's rule mods capture the limitations of linear warfare and force us players to think a bit harder and anticipate a bit more carefully. It was no different this time (in fairness it has been a year since the Ramillies outing). I'd just add that occasionally people forgot and tried to move a bit too freely and easily (including myself). Next time we should probably have a pre-game reminder briefing just to help cement the mods into our brains.

Never say die. My personal morale broke along with my command. My dice had been as dismal as Mark's were destructive. The allied line looked denser and more solid than ours. About halfway through the game I thought we had no chance and the French were just going through the motions before inevitable defeat. I reckoned without Crispin's spirited counter-attack and the quality of his elite guard troops that salvaged the battle for us and even gave a chance of victory.

Love the aesthetic. Matt's games are gorgeous: the figures, the custom hills and painted mats, the fortress, the printed unit labels, the flags for objectives, the figures for status markers. Just exquisite. Looking forward to his redoubts for Malplaquet already.

Seeing is believing. This was our visitor Paul's first chance to see BBB in action. A serious game designer himself, he commented favourably on the flow of the game, the level of player engagement, and the way it achieved its aim of rocking through an entire battle in an evening club session - sufficiently so that he told me he plans to invest in a copy. Cheers, Paul!


Scenario available from the BBB groups.io files.