We arrived at the penultimate clash in our year-long Hungary 1848 campaign: Szőreg.
The historical situation was this: Hungary's southern army, commanded by 'the disastrous Dembinski', had
been occupying a large entrenched camp at Szeged on the west bank of the River
Tisza. As Haynau's Austro-Russian columns approached, Dembinski was fearful of
being surrounded, so he abandoned the camp without a fight and fell back to the
east bank of the river. He then allowed the Austrians to establish a bridgehead
in front of him, again with barely a fight. When the Austrians broke out from
their bridgehead, the battle
of Szőreg ensued. A distinctive feature of the battle was a massive dike, built to contain the Tisza's seasonal flooding, that the Hungarians had embrasured for 50 guns.
Historically, Szőreg was a rearguard action by one Hungarian corps while the anxious
Dembinski again retreated pre-emptively with most of his army to avoid the
threat of being outflanked. My scenario allows the Hungarians the
option to have more of their troops turn and fight to try to give the Austrians
a bloody nose, but at some hazard: a 'flank threat'
rule stipulates that if the Hungarian players commit troops to battle that historically
avoided it, they risk conceding victory points to the Austrians, representing
being outflanked and cut off post-battle by two other Austrian corps that were bypassing them to north and south.
For our game, I donned the Hungarian kepi, Colin the Austrian shako, and Crispin the Russian pickelhaube. The allies elected to commit all of the Russian division to a big right hook towards Sz.-Ivan, leaving the Austrians to take on the dike defence alone. I therefore chose to gamble straight away. The two contingents of Guyon's IV Corps, starting on-table in the Hungarian rear, are supposed to retreat off-table by Turn 6 if they are to avoid the flank threat. I decided to push them forward initially to delay the Russians' advance.
AAR in five photos follows. Skip to the end if you just want to go straight to my reflections on the game. (Apologies for the fuzzy/grainy screenshot pics - this was played remotely, not because of pandemic but because I am away from home at the moment and Colin has moved up north.)
End of Allied Turn 1 (allies moved first). View from the allied bridgehead. Bottom left: allied batteries bombard the Hungarian dike defence (out of shot to left) while Liechtenstein's infantry division and Bechtold's cavalry surge towards an undefended stretch of dike. Right centre, most of Panutine's Russian division is racing down the road alongside the River Tisza. In the distance, Panutine's vanguard is about to cross the dike and begin clearing Hungarian irregulars out of the Sz.-Ivan Wood (one of the six objective locations).

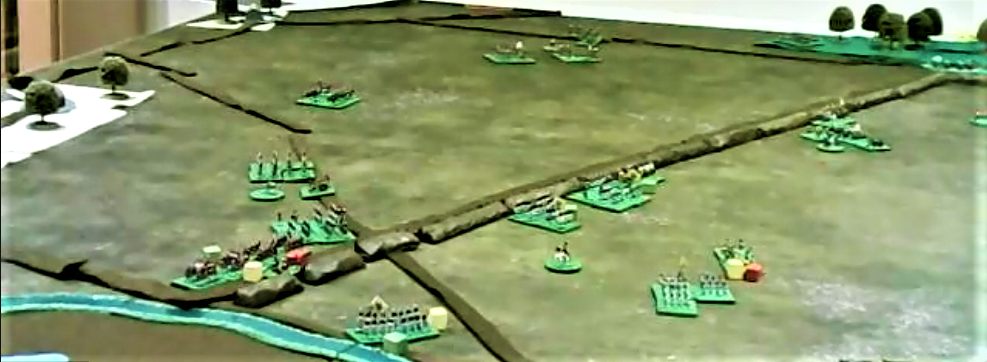
End of Hungarian Turn 2. Originally there were two Hungarian batteries in embrasures astride the two roads through the dike, each backed up by an infantry division. The battery between the red and yellow cubes has been pummelled by Austrian heavy guns and rockets - the cubes indicate it is Reduced and temporarily Silenced. An Austrian battery lower right has suffered similarly from Hungarian fire - but the second Hungarian battery that did the damage has run out of ammo entirely and been removed. An Austrian grenadier brigade by the River Maros has taken casualties and stalled under the Hungarian guns. Further to the right, Austrian and Russian troops have reached the dike but not crossed it. To counter their threat, Guyon's corps has moved from the furthest corner (top of pic) and deployed mostly astride the far road leading to Sz.-Ivan (village top left), with one division moving to support the guns on the dike. A cavalry division (upper left) commands the open ground in the centre and covers the sprawling village of Szőreg (left edge).

End of Hungarian Turn 3. Three Austrian brigades have crossed the dike but are regretting it. Hungarian guns and jaegers lining the road have battered the second grenadier brigade. Some hussars (top right) have moved to pin the righthand Austrian brigade. Away to the right, out of pic, the Russians have advanced into the Sz.-Ivan wood but have yet to clear the defenders out of it.

End of Allied Turn 4. The Russians have cleared the wood (out of pic to the right) and a Russian jaeger regiment is confronting Guyon's men on the Sz.-Ivan road (top right). Things start to go badly for the allies in the centre. Two more of Guyon's divisions centre of pic have advanced boldly, obliging the Austrian cavalry to evade back behind the dike, and are about to overwhelm a Russian jaeger regiment. The unit in the foreground is Simbschen's Austrian light cavalry brigade. This failed to support Lederer's cuirassiers who tried to charge across the dike again and attack the Hungarian hussars. This failed badly: the cuirassiers were destroyed, leaving the hussars free to turn and attack the rear of the Russian infantry next turn.

End of a disastrous Allied Turn 6. In three successive assaults I rolled three sixes, while two of the allies' dice came up as ones. They were repulsed from Szőreg with loss, then were countercharged and all but wiped out; an assault along the dike out of pic to lower left was also repulsed; and their isolated Russian jaegers were wiped out. The defenders now visible in Szőreg are the largely scythe-armed raw recruits of Gál's X Corps. I hadn't wanted to bring these on but the Austrian advance on the three objective locations in Szőreg obliged me to, thereby invoking a third 'flank threat' to add to the two already in play because I had kept all Guyon's corps in the field.
There are no more photos because it was getting really fast and furious now. At this point it was clear that the Austrians were done and would not take any more objectives. We therefore just played the Russian end of the table for the last two turns. This was a race for Sz.-Ivan, which they just managed to take with their lead regiment on the last turn. That plus the wood gave them two of the four objectives they needed for a draw (five for a win). The three flank threats (for committing both of Guyon's contingents and X Corps) were potentially another three objectives. These were resolved at the end of the game by rolling a D6 for each. On 4+, the allies gained an objective. Had they gained all three, they would have won; one or none and they would have been defeated; but of course, they got two, meaning the game was drawn!
Reflections
The now familiar pros and cons of the remote format: the poor ref having to scramble round the table adjusting the camera and moving the troops; the players struggling to see what was going on and explain their wishes to the ref; the game taking rather longer than if we were all round the same table; but nevertheless enjoyable and made it possible for us to have a game that couldn't have happened otherwise.
The scenario produced the ideal last-turn nail-biter. The 'flank threats' rule worked well in several respects: it gives the Hungarian side significant and interesting choices to make about how many troops to commit instead of retreating; that helps to keep the table-top action an even fight; and the die roll to see if the flank threats materialise keeps the result in doubt to the end. (And it proved well balanced.)
The virtue of unified command: as the sole Hungarian player, I think I had an advantage over the allies, who didn't always coordinate as well as a single player can. In particular, when the Russian jaegers crossed the dike in the centre, Crispin specifically asked for Austrian support; the Austrian cavalry crossed to back him up, but then scarpered when the Hungarians advanced, leaving him in the lurch.
Indecision costs lives. I think that on Turn 1 Colin was still recovering from a hard day at the office. He pushed an Austrian grenadier brigade forward mostly for the sake of pushing it forward, but it didn't take advantage of the Austrians' initial surprise deployment to assault, it just halted in canister range and duly paid the price.
Fortunes of war: my three sixes in a row for the assaults on Turn 6 were huge. On the other hand, on Turn 5 I had blown several easy movement rolls, which was why I had to call X Corps's scythe-wielders onto the table to defend Szőreg. That really mattered at the end, as it was that extra flank threat roll that saved the game for the allies.
Strategic choices, an unusual terrain feature, varied troop types, room to manoeuvre, and the flank threat question mark: this was a great combination that made for a great game.


A closely fought game, even with the issues of remote gaming as you say. It certainly looks an intriguing scenario and certainly not the sort one would normally encounter. I'm looking forward to the scenarios being published at some point, all being well.
ReplyDeleteYes, we were all very happy with this one. This wasn't its first playtest - we fought it a while back and it was OK but needed tweaking. Evidently the tweaks worked!
DeleteIt was hugely enjoyable, even though the technology got in the way. Having moved house a week before and after a hard day in the office I admit I didn't have a plan for the Austrians other than keep the enemy occupied. I managed to roll 5 "1"s consecutively, so my cunning assaults turned into Austrian bloodbaths. Crispin, as the Russian, did well; Chris as the Hungarian kept up a lively and well planned defence. Mark got his "10,000 steps" workout as the umpire. Using a camera also introduces a bit more fog of war - troops can be off camera or too far away to be distinguishable or blend into the terrain features in a way that they don't when you can look at the table. It kept my interest all the way through and I really enjoyed the banter! Colin
ReplyDeleteIt was great to see you across a (remote/virtual) table again!
Delete